310300 03
A
utomatic Switch for
Power Outlets
eltimo 020 s
eltimo 020 s DCF
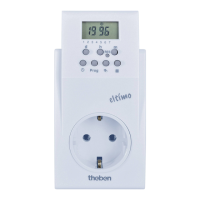
1 For setting the real time
2 For setting day of the week
3 Cursor for indication of day of week
(1 = Mo, 2 = Tu ...)
4 Hours display
5 Display for automatic summer /
wintertime switching
6 RC display flashes while the switch is
trying to receive the DCF signal
(with DCF device)
7 Display minutes
8 For switching condition display
ON / OFF
and permanently ON OFF
9 Hours setting
10 Minutes setting
11 RESET (complete deletion)
12 Random program
13 Channel selection ON / OFF
14 Programming/ interrogation
After the DCF signal has been received, the switch is immediately ready for use.
1. Plug the switch (eltimo 020 s DCF) into the power outlet.
2. The RC icon flashes while the DCF signal is being received. After a few minutes,
the RC icon stops flashing and the time will be set automatically.
If the switch is still unable to obtain a DCF signal after a few minutes, the time must
be set manually (see chap. 5).
To provide for interference-free signal reception, the switch should always be
installed at a distance of approx. 1 m from other electrical devices (e.g. PC)!
A. Week program
Prerequisite: The initial start-up must have been performed as described in
sections 5.1 A and 5.2 A.
Result: Same switching time on different days of the week.
Programming switch-on time
1. Press button Prog.
2. Press button d for day selection.
3. Store with Prog.
Identical switching time on several days of the week (e.g. Monday to Friday 1-5).
Repeat the programming steps 2. and 3. until the cursors are positioned above 1-5.
4. Set the switch-on time by pressing button h and m.
5. Store by pressing Prog.
Programming switch-off time
6. Select icon
with button
i
.
7. Repeat setting 2. - 5.
B. Day program operation
Prerequisite:
The initial start-up must have been performed as described in sections 5.1 A
and 5.2 A.
See above but without 2. and 3.
1. Press button RES.
2. Select adjustment rule e.g. dat 1
with button i.
3. Store by pressing Prog button.
4. Set the year by pressing button d.
5. Store by pressing Prog button.
6. Set the date of the day by pressing button d.
7. Use button m to set the date of the month.
8. Store by pressing Prog button.
9. Hold down button for the next
setting operation.
Setting beginning of beginning of Valid for
are summer time winter time region
dat bis last sunday last sunday EU
12/95 in march in september
dat 1 last sunday last sunday
from
1/96 in march in september EU
dat 2 last sunday 4 th. sunday
in march in october GB (earlier)
dat 3 first sunday last sunday
in april in october North
no no no
adjustment adjustment
4. Initial startup without auto summer-/wintertime adjustment 020 s
A. Setting week program
1. Press button RES.
2. Select adjustment rule no with button i.
3. Store by pressing Prog button.
4. Hold down button
.
5. Set the day by pressing button d (1 = Mo, 2 = Tu, ...)
6. Set the actual time by pressing button h and m.
7. Please release button .
B. Setting day program
See above without 5.
5. Setting/changing the current time 020 s / 020 s DCF