Simple to Start:
1. Press the ON Key.
2. A series of start-up screens will
appear.
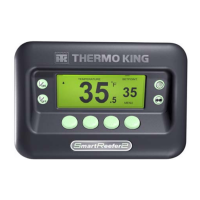
3. The Standard Display appears
showing setpoint and box
temperature when the unit is
running.
4. The Standard Display defaults to the “Temperature Watch” screen after
2 1/2 minutes. This screen displays same setpoint and box temperature in
larger font.
NOTE: For more detailed information, see the Operation chapter in
the appropriate unit operating manual.
Simple to Set:
CYCLE-SENTRY or Continuous Run
1. Return to the Standard
Display.
2. Press the MODE
SELECTION Key.
3. The “Programming
Continuous Mode” or
“Programming CYCLE-
SENTRY Mode” screen briefly
appears.
4. The “New System Mode is
Continuous” screen or the
“New System Mode CYCLE-
SENTRY” screen briefly
appears.
5. The Standard Display appears and the heading on top of screen reads
the new mode.
6. Pressing the MODE SELECTION Key again will change the unit back to
the previous mode.
NOTE: For more detailed information, see the Operation chapter in
the appropriate unit operating manual.
Simple to Set:
Setpoint Temperature
1. Return to the Standard
Display.
2. Press the SETPOINT Key
on the Standard Display.
3. Press the + or - Keys to
change the setpoint reading.
4. Press the YES or NO key
accordingly.
5. The Standard Display
appears with setpoint changed
to the new setpoint.
NOTE: For more detailed
information, see the
Operation chapter in the
appropriate unit operating
manual.
Simple to Check:
Gauges
1. Return to the Standard
Display.
2. Press the GAUGES Key.
3. Press BACK or NEXT
Keys to scroll through
following gauges: Coolant
Temperature, Coolant Level,
Engine Oil, Pressure, Amps, Battery Voltage, Engine RPM, Discharge
Pressure, Suction Pressure, ETV Position, I/O. If no keys are pressed
within 30 seconds, the screen will return to the Standard Display.
4. Press the LOCK Key to display any gauge screen for an indefinite
period. Press the key again to unlock the screen.
5. Press the EXIT Key to return to the Standard Display.
NOTE: For more detailed information, see the Operation chapter in
the appropriate unit operating manual.
Simple to Defrost:
Initiate Manual Defrost
1. Return to the Standard
Display.
2. Press the DEFROST Key.
3. Miscellaneous defrost
programming screens appear.
4. A modified Standard Display
screen appears. The bar
indicator will fill in showing the
time remaining to complete the
Defrost cycle. When the
Defrost cycle is complete the
display returns to Standard
Display screen.
NOTE: For more detailed information, see the Operation chapter in
the appropriate unit operating manual.
Simple to Access:
Sensors
1. Return to the Standard
Display.
2. Press the SENSORS Key.
3. Press the BACK or NEXT
Keys to scroll through the
following sensor screens:
Control Return Air
Temperature, Display Return
Air Temperature, Control Discharge Air Temperature, Display Discharge
Air Temperature, Temperature Differential, Evaporator Coil Temperature,
Ambient Air Temperature, Spare 1 Temperature, Datalogger Temperature
Sensors 1-6 and the Board Temperature Sensor. If no keys are pressed
within 30 seconds, the screen will return to the Standard Display.
4. Press the LOCK Key to display any sensor screen for an indefinite
period. Press the key again to unlock the screen.
5. Press the EXIT Key to return to the Standard Display.
NOTE: For more detailed information, see the Operation chapter in
the appropriate unit operating manual.
Simple to Check:
Pretrip Test
1. Clear all alarm codes.
2. Return to the Standard
Display.
3. Press the MENU key.
4. Press the NEXT Key as
required to show the Pretrip
Menu.
5. Press the SELECT Key to
start a Pretrip Test.
6. If the unit is not running, a Full
Pretrip will be initiated. If the unit
is running in either diesel or
electric mode, a Running Pretrip
will be performed.
7. When all tests are complete, the results are reported as PASS, CHECK or
FAIL. If the results are CHECK or FAIL, the accompanying alarm codes will
direct the technician to the cause of the problem.
NOTE: For more detailed information, see the Operation chapter in the
appropriate unit operating manual.
Simple to Check:
Hourmeters
1. Return to the Standard Display
screen.
2. Press the MENU Key.
3. Scroll through Main Menu by
repeatedly pressing the NEXT and
BACK Keys until the hourmeters
Main Menu Screen appears.
4. Press the SELECT Key to enter the Hourmeters Menu.
5. Press the NEXT and BACK Keys to view the Hourmeter Displays.
NOTE: For more detailed information, see the Operation chapter in the
appropriate unit operating manual.