© 2003 - 2008 TOSHIBA TEC CORPORATION All rights reserved e-STUDIO350/352/353/450/452/453
ERROR CODE AND SELF-DIAGNOSTIC MODE
2 - 25
2
2.2 Self-diagnosis Modes
Notes:
1. To enter the desired mode, turn ON the power while two digital keys designated to each mode
(e.g. [0] and [5]) are pressed simultaneously.
2. When the optional FAX unit is installed, Faxes received automatically during the self-diagno-
sis mode may not be printed out. Be sure to disconnect the modular code from the line con-
nectors (LINE1, LINE2) of the equipment before starting the self-diagnosis mode. Also, be
sure to finish the self-diagnosis mode by turning the power OFF and back ON before connect-
ing the modular code.
<Operation procedure>
• Control panel check mode (01):
Notes:
1. A mode can be canceled by [POWER] OFF/ON when the LED is lit and the LCD is blinking.
2. Button Check
Buttons with LED (Press to turn OFF the LED.)
Buttons without LED (Press to display the message on the control panel.)
Button on touch panel (Press to display the screen on the control panel at power-ON.)
• Test mode (03): Refer to
P. 2-27 "2.2.1 Input check (Test mode 03) (e-STUDIO350/450)"/
P. 2-34 "2.2.2 Input check (Test mode 03) (e-STUDIO352/353/452/453)" and
P. 2-42 "2.2.3 Output check (test mode 03)".
• Test print mode (04): Refer to P. 2-45 "2.2.4 Test print mode (test mode 04)"
• Adjustment mode (05): Refer to
P. 2-46 "2.2.5 Adjustment mode (05) (e-STUDIO350/450)"/
P. 2-64 "2.2.6 Adjustment mode (05) (e-STUDIO352/353/452/453)"
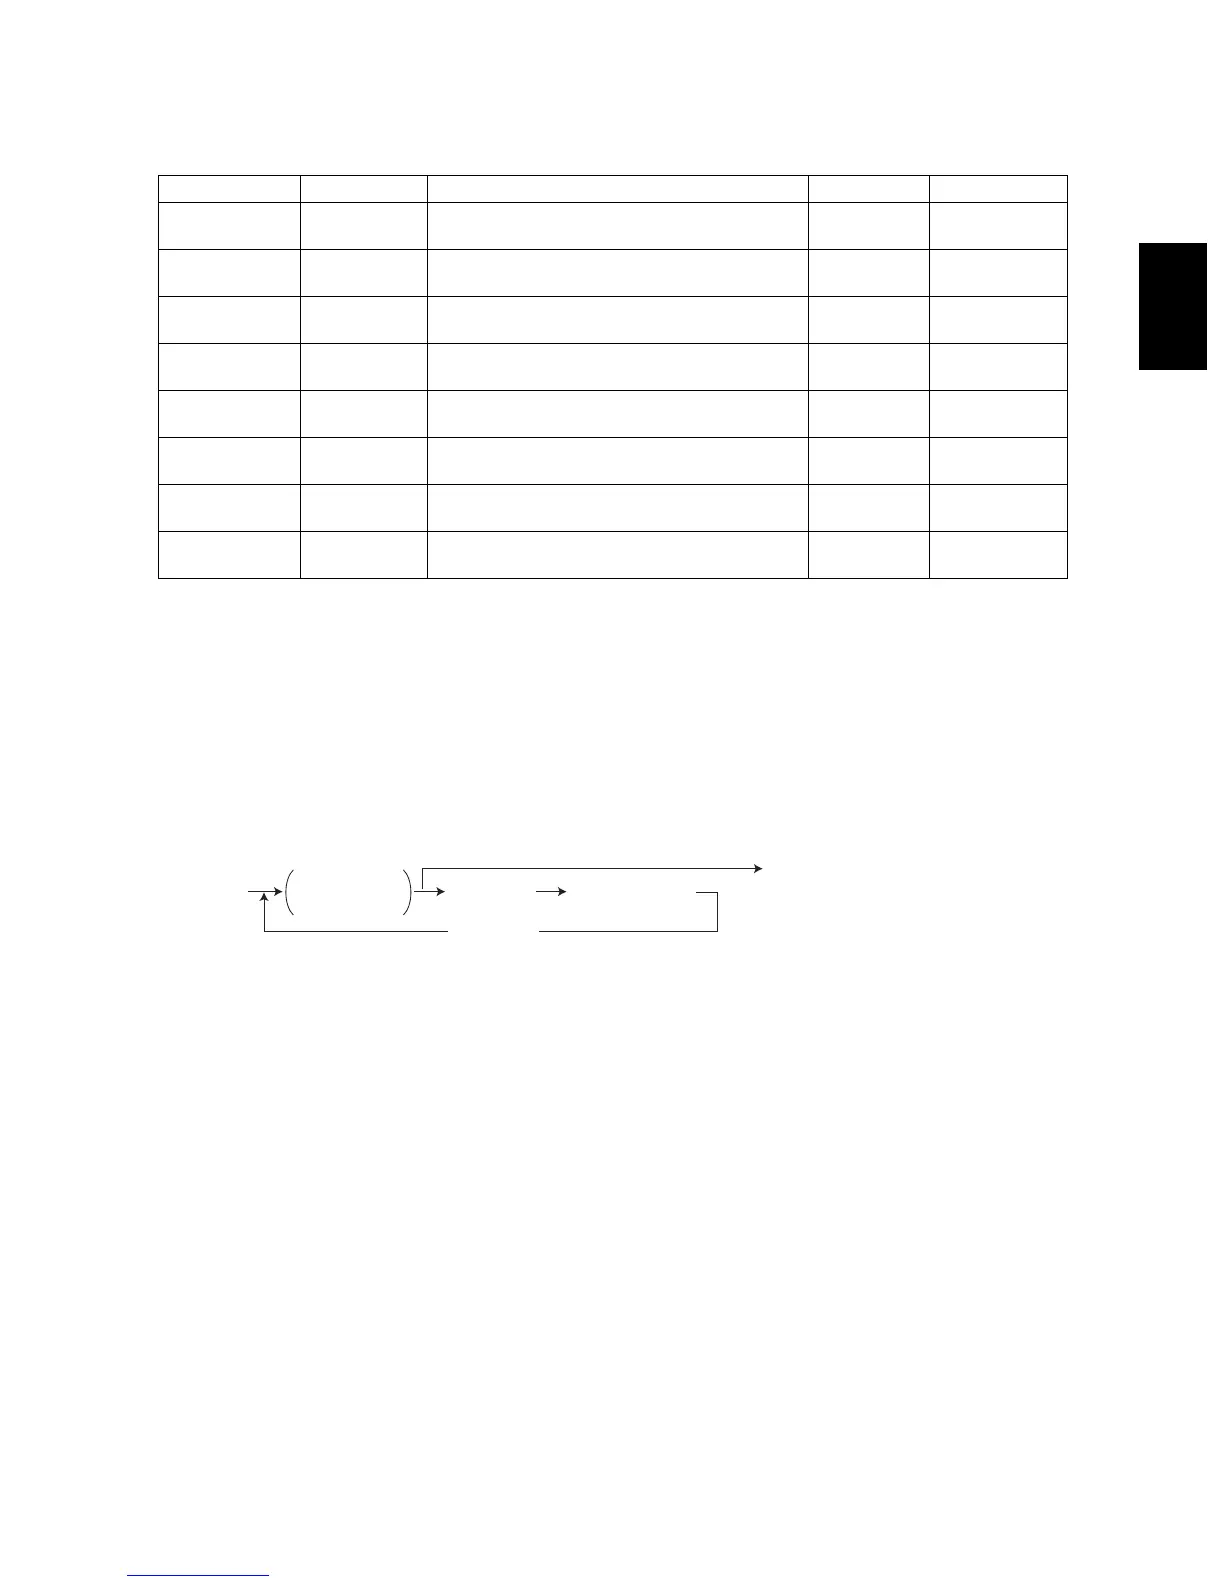
Mode For start Contents For exit Display
Control panel
check mode
[0]+[1]+
[POWER]
All LEDs on the control panel are lit, and all
the LCD pixels blink.
[POWER]
OFF/ON
-
Test mode [0]+[3]+
[POWER]
Checks the status of input/output signals. [POWER]
OFF/ON
100% C A4
TEST MODE
Test print mode [0]+[4]+
[POWER]
Outputs the test patterns. [POWER]
OFF/ON
100% P A4
TEST PRINT
Adjustment
mode
[0]+[5]+
[POWER]
Adjusts various items. [POWER]
OFF/ON
100% A A4
TEST MODE
Setting mode [0]+[8]+
[POWER]
Sets various items. [POWER]
OFF/ON
100% D
TEST MODE
List print mode [9]+[START]+
[POWER]
Prints out the data lists of the codes 05 and
08, PM support mode and pixel counter.
[POWER]
OFF/ON
100% UA A4
LIST PRINT
PM support
mode
[6]+[START]+
[POWER]
Clears each counter. [POWER]
OFF/ON
100% K
TEST MODE
Firmware
update mode
[8]+[9]+
[POWER]
Performs updating of the system firmware. [POWER]
OFF/ON
-
[0][1]
[POWER]
LED lit/
LCD blinking
[START]
[START]
(Button check)
[POWER] OFF/ON
(Exit)
07/11

 Loading...