Viale Vicenza 14
36063 Marostica VI - Italy
www.vimar.com
20592.0 01 2105
EIKON
20592.0
ARKE'
19592.0-19592
IDEA
16492
PLANA
14592-14592.0
Connected 2-way switch
20592.0-19592.0-14592.0: to be completed with 1- or 2-module interchangeable buttons.
19592-16492-14592: complete with button.
The device is equipped with 2 interlocked relay outputs for the switch function and it can also be
connected to existing wired multi-way/two-way switches to make the load function “connected”.
TWO OPERATING MODES (ALTERNATIVE)
or
Download the View Wireless App from the stores onto the tablet/smartphone you
will be using for configuration.
Depending on the mode you select, you will need:
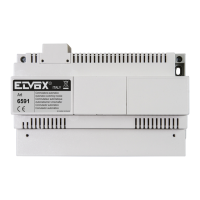
Gateway
art. 20597-19597-16497-14597
Zigbee Gateway
(Amazon Echo Plus, Echo Show or Echo
Studio)
Alexa App
View App
for management via smartphone/tablet
Amazon Alexa, Google Assistant, Siri and
Homekit voice assistants for possible
voice operation
CONFIGURATION IN
1. Create your Installer account on MyVimar (on-line).
2. Wire all the devices in the system (2-way switches, actuators, thermostats, gateway, etc.).
3. Start the View Wireless App and log in with the credentials you just created.
4. Create the system and the environments.
5. Associate all the devices with the environments, except for the gateway (which should be
associated last).
To associate the 2-way switch:
• Select “Add” (
), choose the environment to place it and give it a name
• Select ; activate the Bluetooth connection on your tablet/smartphone and approach the
2-way switch
• Press the button on the 2-way switch and set the desired function
6.
For every device, set the function, the parameters and any accessory devices (wired or radio
control and related function).
7. Transfer the configuration of the devices to the gateway and connect it to the Wi-Fi network.
8. Transfer the system to the Administrator user (who must have created his/her profile on
MyVimar).
For details please refer to the View Wireless App manual you can download from www.
vimar.com DOWNLOAD View Wireless MOBILE App
CONFIGURATION IN
Follow the procedure above from points 1 to 3.
Associate the 2-way switch directly with Amazon Echo Plus, Echo Show or Echo Studio.
1) Press the button on the 2-way switch until the LED flashes. Download the Zigbee software
onto the device using the View Wireless App (see the View Wireless App manual).
To update the software on the device, the procedure is the same.
2) After conversion to Zigbee technology (or the software update), the 2-way switch automatically
goes into pairing mode so that it can be recognised by the Amazon device within 5 minutes.
If the 2-way switch is not in pairing mode, cut off the power supply and restore it after a few
seconds.
3) Associate the 2-way switch with Amazon Echo Plus, Echo Show or Echo Studio according to
the procedure envisaged by the voice assistant (see the Amazon documentation).
Set the actuator parameters.
1) Within the first 5 minutes after the device has been powered (already associated with Amazon
Alexa), press the button for 15 s; this way, you can select the relay operation - between one-po-
sition stable and two-position stable (the LED flashes green for the two-position stable setting
and amber for the one-position stable setting).
2) Briefly press the button to switch from two-position stable to one-position stable and vice
versa; once the choice has been made, press the button for 5 s to confirm. If you have set the
two-position stable setting, the LED flashes green three times, whereas if you have chosen the
one-position stable setting, you will move on to the next step (3).
3) Press the button for 5 s to set the one-position stable activation time. Press the button briefly,
the output is activated and the LED lights up amber permanently; at the end of the time you
wish to set, press the button again. The output is deactivated and the LED flashes amber for 3
times to confirm the setting made.
N.B. When the voltage returns after a power outage, the relay maintains the state in which it was
prior to the power supply cut out.
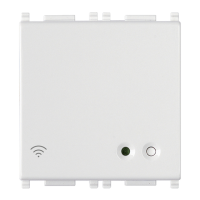
Summary of Zigbee technology mode signalling.
• During normal operation:
LED Meaning
On
(amber for Eikon, blue for Arké, green for Idea and
Plana)
Relay active
Off Relay not active
• In the configuration phase:
LED Meaning
Flashing white
(for max 5 min.)
Zigbee mode active pending voice assistant
Flashing blue
(for max 2 min.)
Pending receipt of a fw update
Blue permanently lit
Device associated with the smartphone via
Bluetooth
Flashing green during the one-position
stable/two-position stable configuration
(for max 5 min.)
Setting in two-position stable
Flashing amber during the one-position
stable/two-position stable configuration
(for max 5 min.)
Setting in one-position stable
Amber permanently lit One-position stable time setting
Flashing green 3 times Confirms two-position stable setting
Flashing amber 3 times Confirms one-position stable setting
Flashing green quickly 3 times
Device correctly associated with the voice
assistant
On
(amber for Eikon, blue for Arké, green for
Idea and Plana)
Relay active during normal operation
CONTROLLABLE LOADS.
For correct load state signalling, connect a 2 W minimum load.
Loads
- maximum
100 V~ 250 W 50 W 60 W 125 VA
240 V~ 500 W 100 W 120 W 250 VA
RESETTING THE DEVICE.
The reset restores the factory settings. Within the first 5 minutes from powering, press the
button for 30 s until the white LED flashes.
INSTALLATION RULES.
• Installation must be carried out by qualified persons in compliance with the current regula-
tions regarding the installation of electrical equipment in the country where the products are
installed.
• The device must be completed with interchangeable buttons and installed in flush mounting
boxes or surface mounting boxes with Eikon, Arkè and Plana mounting frames and cover
plates.
• The relay output power circuit must be protected against overloads by installing a device, fuse
or automatic 1-way switch, with a rated current not exceeding 10 A.
• Installation must be carried out with the system switched off. Install the buttons onto the
switch mechanism before powering up the system.
IMPORTANT: the electronic switch must be powered with the same L and N that power
the load. In the event of installation with wired multi-way/two-way switches, the electronic
switch should be connected so that it is always powered and therefore should be installed
instead of the wired two-way switch furthest from the load.
CHARACTERISTICS.
• Rated supply voltage: 100-240 V~, 50/60 Hz.
• Dissipated power: 0.55 W
• RF transmission power: < 100mW (20dBm)
• Frequency range: 2400-2483.5 MHz
• Terminals:
- 2 terminals (L and N) for line and neutral
- 1 terminal (P) for connection to the remote wired control (for instance art. 20008-19008-
16080-14008). The max distance between the IoT device and the push button is 50 m
with a cable with a minimum cross-section of 1.5 mm
2
.