Setup
Making connections
1. Turn the POWER LEVEL knob on the amp to the minimum position.
2. Connect the included AC adapter to the DC12V jack (DC15V jack on the VX
II), and then plug the AC adapter into an AC outlet.
Only use the specied AC adapter. Using any other AC adapter may
cause malfunctions.
3. Plug the cable that’s connected to your guitar into the INPUT jack. If an
audio player will be used, connect it to the AUX IN jack.
4. Hold down the power button until the LED on the top panel lights up and
the amp is turned on.
Tip To turn off the amp, hold down the power button until the LED turns off.
5. Slowly raise the POWER LEVEL knob to adjust the volume.
Auto power-o function
The amp has an auto power-o function. With this function, the amp is automati-
cally turned o if there is no operation or input for approximately 1 hour. When
the amp is turned o, it is not turned back on, even if a knob or selector is oper-
ated. After the amp is turned o, turn it on again.
The auto power-o function is activated if the input is only to the AUX IN
jack or when the input level to the INPUT jack is extremely low.
With the VX II, the auto power-o function will not operate while the amp is
connected to a computer with a USB cable.
Tip As the factory default setting, the auto power-off function is enabled.
Enabling/disabling the auto power-o function
1. While holding down the TAP button, turn on the amp. The PROGRAM/
TUNER LED shows the current setting.
Enabled
2. Press the TAP button to switch between enabling and disabling the function.
3. Wait without performing any operation for a few seconds. The setting is
applied, and the amp automatically returns to normal operation.
Preset programs and user programs
To recall a preset program, turn the AMP selector when the PRESET LED below
PROGRAM lights up. Regardless of the position of each knob, a preset program
for a sound typical of each amp model will be recalled.
You can also adjust the amp and eect seings to create a sound that can be
saved as user program A or B. The saved program can be recalled by pressing
the PROGRAM buon.
Regardless of the program, the sound level will reect the current position
of the POWER LEVEL knob.
Saving a program
After adjusting the various knobs and buons on the top panel to create your
desired sound, it can be saved (wrien) as a user program.
Tip The saved sound can be recalled with the PROGRAM button.
1. Hold down the PROGRAM button for at least 0.5 second. The LED for either
USER A or B blinks to indicate the location where the program will be saved.
2. Press the PROGRAM button to select the save location.
Tip To cancel the write operation, press the TAP button.
3. Hold down the PROGRAM button for at least 2 seconds (until the LED
changes from blinking to lit). The program is saved at the selected location,
and the saved program is selected.
Any program previously saved at that location is overwrien. In other words,
the program previously saved at the location selected in step 3 is erased.
If you switch to another program or turn o the amp before saving the
sound that you are creating, the changes that you made will be lost.
Restoring the factory settings
Here’s how to restore all seings of the VX I/VX II to their factoryset state.
This operation will erase all user programs that had been saved and will
initialize the programs to their factory default seings.
1. Turn off the power.
2. While holding down the PROGRAM button, turn on the amp. After the
USER A and B LEDs blink, release the pressed button.
Tip If you decide to cancel initialization at this point, press the TAP button.
3. Hold down the PROGRAM button for at least 2 seconds (until the LED
changes from blinking to lit).
Initialization is completed, and the amp returns to normal operation.
Never turn o the power while initialization is in progress.
Using the tuner
The tuner function lets you tune a guitar that’s connected to the INPUT jack. With
this tuner function, the pitch of the input is measured, and the dierence with the
reference pitch (E) is indicated by the PROGRAM/TUNER LEDs.
1. Hold down the TAP button for at least 1 second. All effects are bypassed,
and the tuner function is turned on.
2. Play the open 6th string on the guitar.
Be careful not to play any of the other strings.
3. Tune the string until only the center green LED of the three LEDs lights up.
Tip This tuner will also detect E in a different octave. It can also be used for tuning
using harmonics or for tuning other instruments, such as a bass guitar.
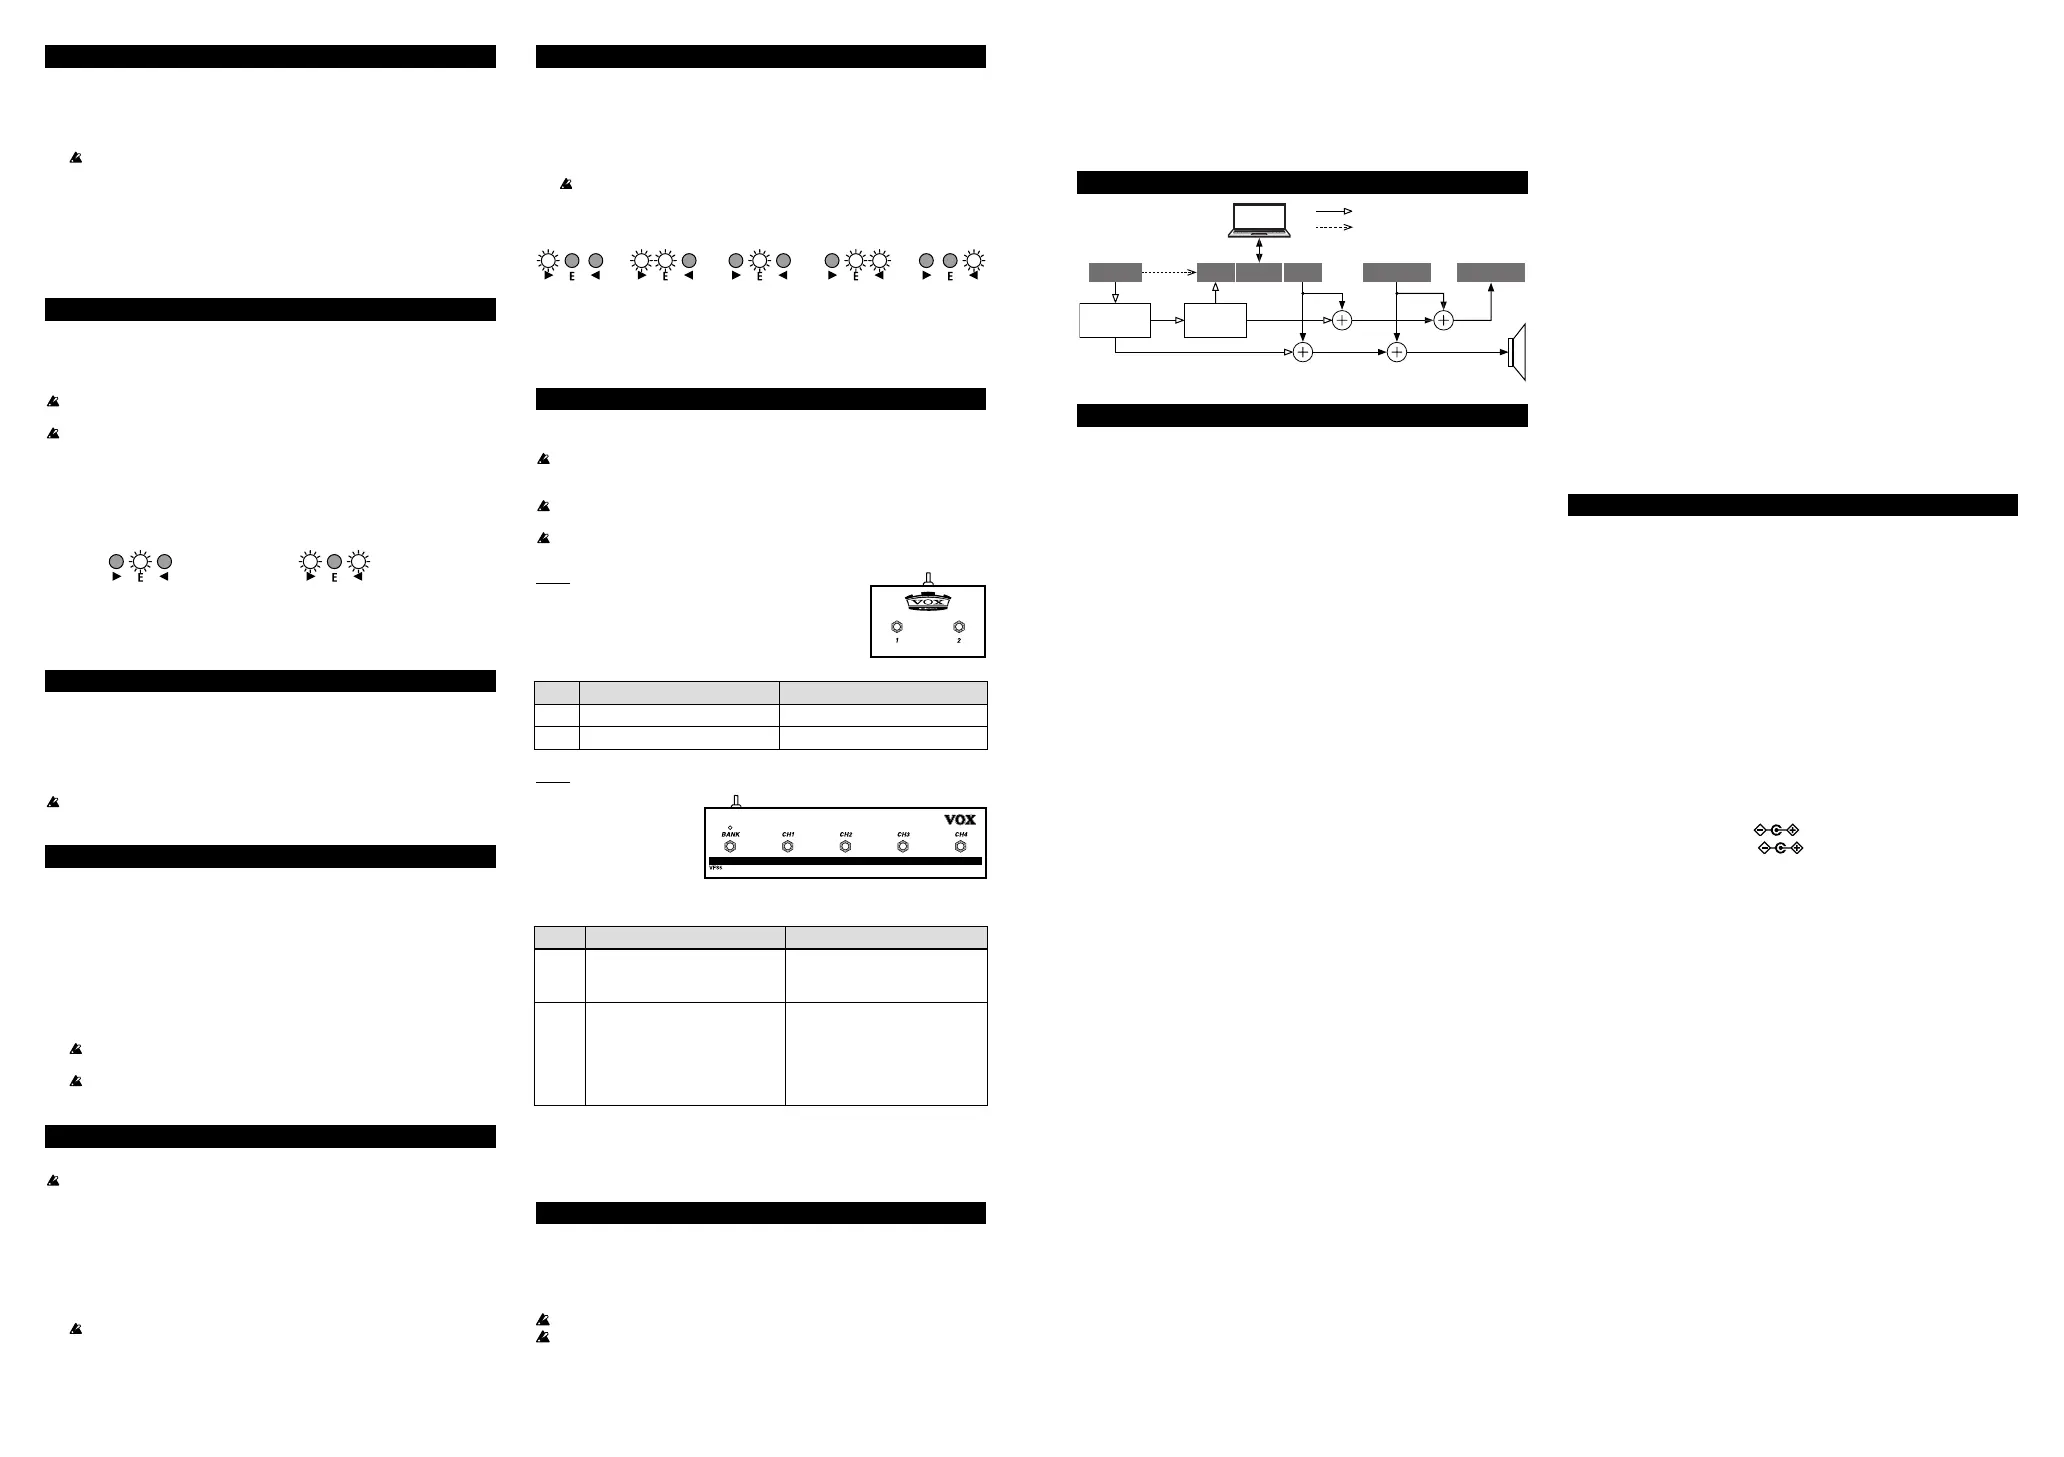
Flat Slightly flat In tune Slightly sharp Sharp
4. Press the TAP button to stop tuning and cancel bypass.
Tip After using the tuner to tune the 6th string to the reference pitch, tune
the other strings based on the 6th string.
Using a foot switch
If an optional foot switch (sold separately) is connected to the FOOT SW jack on
the rear panel, you will be able to switch programs using your foot.
You must connect or disconnect the foot switch while the power is o. Mal-
functions or damage may occur if you connect or disconnect the foot switch
while the power is on.
Do not connect any foot switch other than the VOX VFS2 or VFS5. Other-
wise, a malfunction or damage may occur.
Do not press two or more foot switches simultaneously. Doing so may cause
malfunctions.
VFS2
When the VFS2 is connected, you can switch between
user programs A and B (USER A and B).
Functions corresponding to switches
Switch Function during normal operation Function when saving programs
1 Switches to USER A. Selects USER A as the save location.
2 Switches to USER B. Selects USER B as the save location.
VFS5
When the VFS5 is con-
nected, there can be up to
four variations (A1 to A4
and B1 to B4) for each of
the user programs A and
B (USER A and B), totaling
eight programs.
Functions corresponding to switches
Switch
Function during normal operation Function when saving programs
BANK
Switches between USER A and B.
(A green or red BANK LED indicates
USER A or B, respectively.)
Selects the save location (USER
A or B).
CH1–4
When the BANK LED lights up in
green: Switches between USER A1
through A4.
When the BANK LED lights up in
red: Switches between USER B1
through B4.
Selects the save location (USER A1
through A4 or B1 through B4).
When held down for at least 2 sec-
onds, the program is saved at the
same time that the save location
is selected.
Setting time by tapping (CH1 to CH4 switches)
Press the switch with the same number as the selected program to set the time
for delay/reverb eects. The interval between two presses of the switch will be
set as the time.
Connecting to a computer via USB (VX II only)
By connecting the amp to a computer using a standard USB cable, user programs
can be managed with the Editor/Librarian software on your computer. The amp
can also be used as a USB audio interface.
The VX II can also be connected to an iOS device (iPad or iPhone) by using the
Apple USB camera adapter.
VX I is not equipped with the USB port.
The input to the AUX IN jack is not output to the USB port.
Tip Install a USB-MIDI driver in order to use the Editor/Librarian software on
the computer. In addition, install a USB-ASIO driver in order to transfer au-
dio data with a computer running Windows. Download the newest versions
of the drivers and software from the VOX website (www.voxamps.com).
Tip While holding down the TAP button, press the PROGRAM button to oper-
ate the amp as an audio interface (PROGRAM LED off and TAP LED lit).
The input to the INPUT jack is directly output from the USB port, and the
built-in amp models and effects are muted. Use this feature when you want
to finish creating a sound using software such as JamVOX III on the com-
puter. If the PROGRAM button, TAP button or AMP selector is operated, the
amp returns to its normal operation.
Signal path
USB
OUT
Headphones
INPUT AUX IN
AMP Model
and Effects
IN
Cabinet
Simulator
VX II only
Only during normal operation.
Only when operating as audi
interface.
PC
About the amp models and eect types
Amp models
Including presets modeled on your favourite songs.
1.
DELUXE CL (Get Lucky)
This dual channel 22W blackface 60’s design used 6V6 power tubes and a tube
driven reverb to produce a big sound at a lower waage. Our modeling is based
on the Vibrato channel.
2.
TWEED 4x10 (Crow Jane)
This models a 4x10" combo amp from 1959 that was originally designed for bass
guitar. Its smooth and crisp overdrive sound will respond sensitively to your
picking dynamics and to the volume of your guitar.
3.
BOUTIQUE CL (Gravity)
This models the clean channel of a high-quality amp that was produced only
on special order, and was known as the overdrive special. With a beautifully
rounded low range, a sharp midrange aack, and a sweet treble register, this is
ideal for single coil pickups.
4.
BOUTIQUE OD (Room 335)
This models the overdrive channel of a 100W high-quality amp that was
produced only on special order, and was known as the overdrive special. The
wonderful sustain obtained by raising the GAIN control is smooth and soulful.
5.
VOX AC30 (Message in a Bottle)
This models the Normal channel of the AC30.
The clear high range of the Celestion alnico “Blue” speaker, as well as the rich
midrange, deliver a captivating clean sound.
6.
VOX AC30TB (Sex on Fire)
This models an AC30 amp with the “top boost” circuit of the 1964 AC30. It
delivers a smooth and rened top end, a majestically deep overdrive, and a rich,
brilliant clean sound.
7.
BRIT 1959 (Black Dog)
This models the high treble channel of a hand-wired amp head made in England
during the early 60’s. Raising the volume of this 100W output amp all the way
produces the crunch that will forever be the sound of rock‘n’roll.
8.
BRIT 800 (Sweet Child O’ Mine)
This models a UK-manufactured 100W single-channel head with master volume
made in 1983. Turn the GAIN control all the way up to get the thick, snarling
hard rock and heavy metal sound that dominated the 80’s.
9.
BRIT VM (For the Love of God)
This models an English-made 100W amp head released in 2007 that boasts a
four-channel design with powerful tone. We’ve used the “Overdrive 2” channel,
which produces a tight low-end and transparent high-gain metal sound.
10.
SL-OD (Raining Blood)
This models the overdrive channel of a snakeskin-covered 100W amp head built
in 1991. With an open low-end and a compressed mid/high range, its powerful,
heavy sound delivers a forceful tone that will not break down even with the
most extreme gain seings.
11.
DOUBLE REC (Enter Sandman)
This models the modern high-gain channel from a wild beast of an amp. Its deep
and loose low-end, sparkling highs, and monstrous gain are ideal for guitars
tuned as low as possible, or for metal acts wielding seven-string guitars.
Eects
MODULATION knob: Modulation types
1.
CHORUS
This models a standard analog chorus, which creates a rich and spacious sound.
Adjust the modulation speed with the knob.
2.
FLANGER
This models an analog anger, which can create a sound with a distinctive swell,
like the sound of a jet plane. Adjust the modulation speed with the knob.
3.
ORG PHASE
This models a popular analog phaser in a banana-colored box. Adjust the modu-
lation speed with the knob.
4.
TWIN TREM
This models the tremolo that gives periodic strength to sound and is built into
US-made combo amps. Adjust the tremolo speed with the knob.
DELAY/REVERB knob: Delay/reverb types
1.
A.DELAY
This models an analog delay that uses a Bucket Brigade Device (BBD). Its audio
quality is lo-, but it is popular for its warm sound. Adjust the mix amount of
the delay sound with the knob.
Set the delay time with the TAP buon. The maximum delay time is approxi-
mately 1.1 seconds.
2.
TAPE ECHO
This models an acclaimed analog tape echo. Originally, echo was created by a
tape head, and the delay time was specied by changing the speed of the motor.
The operation of the knob and buon and the maximum delay time are the same
as with A.DELAY.
3.
SPRING
This simulates the spring reverb that’s built into many guitar amps.
Adjust the mix amount of the reverb sound with the knob. Set the reverb time
with the TAP buon.
4.
HALL
This models the reverberation of a concert hall containing numerous echo
components.
The operation of the knob and buon is the same as with SPRING.
Specications
Number of amp models: 11
Number of eects: 8
Number of preset programs: 11
Number of user programs: 2 (8 when using VFS5)
Input/output jacks: INPUT jack, Headphones jack, AUX IN jack, FOOT SW jack,
USB (Type B) port (*VX II only)
Power amp output
VX I: Maximum approx. 15 W RMS @ 4 ohms
VX II: Maximum approx. 30 W RMS @ 4 ohms
Speaker
VX I: 6.5" 4 ohms
VX II: 8" 4 ohms
Signal processing
A/D conversion: 24-bit
D/A conversion: 24-bit
Sample rate: 44.1 KHz
Power supply
VX I: AC adapter jack (DC 12V )
VX II: AC adapter jack (DC 15V )
Current consumption
VX I: 2.5 A
VX II: 3.3 A
Dimensions (W x D x H)
VX I / VX II: 13.94 x 7.56 x 12.32 inches / 354 x 192 x 313 mm
Weight
VX I / VX II: 8.38 lbs / 3.8 kg
Included items: AC adapter, owner’s manual
Options (sold separately): VOX VFS2 / VFS5 foot switch
* Specications and appearance are subject to change without notice for im-
provement.
 Loading...