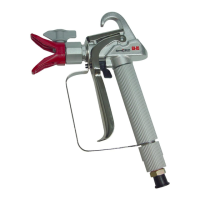
OPERATING INSTRUCTIONS
LOCKING AND UNLOCKING THE GUN
Always lock the gun off when it is
not in use. To lock the gun, turn
the trigger lock forward and slightly
down until it stops. To unlock the
gun, turn the trigger lock so that it
is vertical and pointing up.
POSSIBLE INJECTION HAZARD.
Do not spray without the tip guard in place. Never trigger the gun
unless the tip is in either the spray or the unclog position. Always lock
the gun off before removing, replacing or cleaning the tip.
A
TTACHING THE TIP
1. Thread the spray tip onto the gun. Tighten
the nut first by hand, then tighten more firmly
with a wrench.
A
TTACHING THE FILTER
1. Insert the tapered plastic end of the paint filter into the fit-
ting on the spray gun.
2. Place the spring into the filter housing.
3. Place the white sealing washer into the filter housing with
the lipped side up.
4. Slide the filter housing over the filter and screw the filter
housing securely to the fitting.
UNCLOGGING THE SPRAY TIP
Do not attempt to unclog or clean the tip with your finger. Do not use a
needle or other sharp pointed instrument to clean the tip. The hard
tungsten carbide is brittle and can be chipped.
The spray gun is equipped with a reversible tip which allows you to blow
out any particles of old paint or other contaminants that may obstruct the
paint flow through the tip. If the spray pattern becomes distorted or
stops completely while the gun is triggered, follow these steps:
1. Release the trigger and lock the gun off.
2. Rotate the reversible tip cylinder arrow 180° so that
the point of the arrow is toward the rear of the gun.
3. Unlock the gun and squeeze the trigger, pointing
the gun at a scrap piece of wood or cardboard.
This allows pressure in the spray hose to blow out
the obstruction. When the nozzle is clean, paint will
come out in a straight, high pressure stream.
4. Release the trigger and lock the gun off.
5. Reverse the tip so the arrow points forward again.
6. Unlock the gun and resume spraying.
If spraying with latex paint, use warm soapy water for cleaning. If using
oil or alkyd-based paints, use mineral spirits or paint thinner. Refer to
the paint manufacturer’s instructions for specific recomendations.
Do not use mineral spirits or paint thinner on latex paint, or the mixture
will turn into a jellylike substance which is difficult to remove.
CLEANING THE SPRAY GUN FILTER
The spray gun includes a filter to catch particles before they reach the spray
tip. If this filter becomes clogged or obstructed it will reduce the flow of paint,
changing the spray pattern and possibly damaging the filter.
This filter must be cleaned daily. If the material being used is old or contains
hardened particles, then the filter should be cleaned approximately every 4
hours. If the filter is not cleaned at the proper time, it will plug and blow pin
holes in the filter. Holes in the filter will allow unwanted particles to get into
the spray tip, causing the spray tip to clog.
Clean the filter by rinsing it thoroughly in water or the type of solvent appropri-
ate to the paint you are using. If this is not sufficient, use a natural or nylon
bristle brush dipped in water or the appropriate solvent. Do not use a wire
brush or any sharp instrument on the filter.
CLEANING THE GUN
1. Check that the spray tip assembly has been removed from the gun.
2. Remove the filter and reattach the filter housing to the gun.
3. Run the appropriate solvent through the pump.
4. Hold the metal part of the gun against a metal
container to ground the gun.
5. Trigger the gun into the container until it is flushed
clean. Use the lowest possible pressure.
REPLACING THE VALVE SPRING UNIT
1. Unscrew the spray tip.
2. Lock the gun in the ON position
and remove the diffuser with a
wrench.
3. Unlock the gun.
4. Unscrew the nut with a wrench and
remove the retainer block.
5. Remove the sliding pins with care
and store them in a safe place so
they will not be lost.
6. Drive the valve spring unit forward
from the back of the retainer block. Use the handle of a wooden ham-
mer or similar soft tool to avoid damaging the valve spring unit.
P
ARTS LIST
Item Part # Description
1Tip
2 0501011 Holder assembly
3 0296261 Diffuser, 7/8”
4 0296270 Valve spring unit
5 0296230 Trigger guard
6 0296285 Trigger assembly
7 0296284 Trigger screw (short)
8 0296228 Gun housing
9 9910201 Hex nut
Item Part # Description
10 0296222 Retainer block
11 0296286 Sliding pin
12 0296287 Trigger screw (long)
13 0034377 Filter, white
14 0296289 Washer
15 0296342 Handle
16 0043590 Spring
17 0296283 Sealing ring
18 0296301 Fitting
Part No. Application Filter
Qty.
 Loading...