Installation Instructions
Valve should be installed and adjusted by a licensed contractor in accordance with
local codes and ordinances. Further, this valve should be installed in a location where
it is accessible for cleaning, service or adjustment.
1. Close both the hot and cold water shutoff valves upstream nearest to the intended
installation.
2. Bleed the remaining water from the system.
3. Connect the water supply to valve as shown in Figure 1, 2 or 3 depending on appli-
cation. Supply piping must be flushed clean before making connections to the valve.
4. Valve can be installed in any position. Note: the inlet hot supply is to be connected
to the “H” side of the valve, the cold supply side to the “C” side and the mixed water
outlet to the “M” side.
5. Make sure union nuts are placed over tailpieces prior to soldering or threading to pipe.
6. For valves with Quick-Connect tailpieces refer to "Quick-Connect Installation"
instructions below
Note: To prevent damage to valve from excessive heat during
soldering, remove unions and gaskets from valve body prior
to soldering.
7. After soldering, flush piping and install valve using filter washer
on hot and cold water inlet and fiber washer on the mixed
water outlet.
8. Start-up: Open cold water supply, then hot water supply.
Inspect for leaks.
9.
Adjust temperature to desired setting (see Temperature
Adjustment Section). Watts recommends a maximum
temperature of 110°F (43°C) for shower and bathing fixtures.
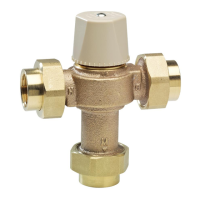
Series MMV and LFMMV
Thermostatic Tempering Valves
Sizes:
1
⁄2",
3
⁄4", 1" (15, 20, 25mm)
IS-MMV-M1
LFMMV-UT-M1
MMV-QC-M1
Quick-Connect Installation
1. Mark pipe as shown.
This is pipe insertion depth.
2. Clean pipe end.
1. Remove collet clip.
2. Depress collet.
3. Pull tubing from tailpiece.
3. If using PEX tubing, insert pipe
stiffener (provided) into end of pipe.
4. Push tubing into tailpiece up to mark.
5. Insert collet clip.
To Connect
To Disconnect
PEX tubing only
Pipe Stiffener
Tail Piece
Mark
Collet clip
Collet depressed
1
1
/2 in. (38.1mm)
1
3
/4 in. (44.45mm)
1
7
/8 in. (47.63mm)
1
/2 in.Pipe (12.7mm)
3
/4 in.Pipe (19.05mm)
1 in.Pipe (25.4mm)
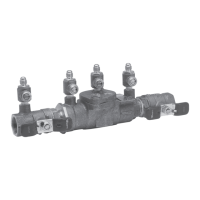
Figure 1 – Typical ASSE 1069 Application
Typical MMV-M1 and LFMMV-M1 Applications
Cold
Hot
MMV-M1 or
LFMMV-M1
Mixed
Triple Listed!
ASSE 1017,
ASSE 1069 & ASSE 1070