RM1x SEQUENCE REMIXER 17
PHANTOM +48V
OFF
ON
PHANTOM +48V
INPUT (BAL)
2TR
PHONES
L
R
IN
LEVEL LEVELGAIN
13/14 15/16
PHONES
MONITOR
OUT
OUT
MONITOR
2TR IN
15/16
2TR IN
13
14
15
16
26dB
1
26dB
2
26dB
3
26dB
4
26dB
5
26dB
6
26dB
7
26dB
8
26dB
9
26dB
10
26dB
11
26dB
12
PAD
DIGITAL MIXING CONSOLE
L STEREO R
CLIP
–3
–6
–9
–12
–15
–18
–24
–30
–36
–42
–48
EQ
SOLO
1 RETURN 2
PARAMETER
HIGH
SELECTED CHANNEL
1 RETURN 2
FUNCTION
MEMORY
HI-MID
LO-MID
LOW
PAN
F
G
PAN
F
G
UTILITY MIDI SETUP VIEW
EFFECT 1 EFFECT 2 OPTION I/O REMOTE
AUX 1
HOME
AUX 2 AUX 3 AUX 4
DYNAMICS EQ/ATT Ø/DELAY
PAN/
ROUTING
SELSEL
MASTER
STEREO
STEREO
MASTER
SEL
SOLO SOLO
MEMORY
ON
–1/DEC
ENTER
+1/INC
CURSOR
ON ON
0
–5
–10
–15
–20
–30
–40
–50
–70
–
15/16
15/16
SEL
SOLO
ON
6
0
5
10
20
40
60
13/14
13/14
SEL
SOLO
ON
6
0
5
10
20
40
60
12
12
SEL
SOLO
ON
6
0
5
10
20
40
60
11
11
SEL
SOLO
ON
6
0
5
10
20
40
60
10
10
SEL
SOLO
ON
6
0
5
10
20
40
60
9
9
SEL
SOLO
ON
6
0
5
10
20
40
60
8
8
SEL
SOLO
ON
6
0
5
10
20
40
60
7
7
SEL
SOLO
ON
6
0
5
10
20
40
60
6
6
SEL
SOLO
ON
6
0
5
10
20
40
60
5
5
SEL
SOLO
ON
6
0
5
10
20
40
60
4
4
SEL
SOLO
ON
6
0
5
10
20
40
60
3
3
SEL
SOLO
ON
6
0
5
10
20
40
60
2
2
SEL
232221201918
SOLO
ON
6
0
5
10
20
40
60
1
1
SEL
17
SOLO
ON
6
0
5
10
20
40
60
17 18 19 20 21 22 23 24
+10 –34
–60–16
GAIN
+10 –34
–60–16
GAIN
+10 –34
–60–16
GAIN
+10 –34
–60–16
GAIN
+10 –34
–60–16
GAIN
+10 –34
–60–16
GAIN
+10 –34
–60–16
GAIN
+10 –34
–60–16
GAIN
+10 –34
–60–16
GAIN
+10 –34
–60–16
GAIN
+10 –34
–60–16
–20+10 100 100
GAIN
–20+10
GAIN
+10 –34
–60–16
GAIN
OFF
ON
FADER MODE
24
–10dBV (UNBAL)
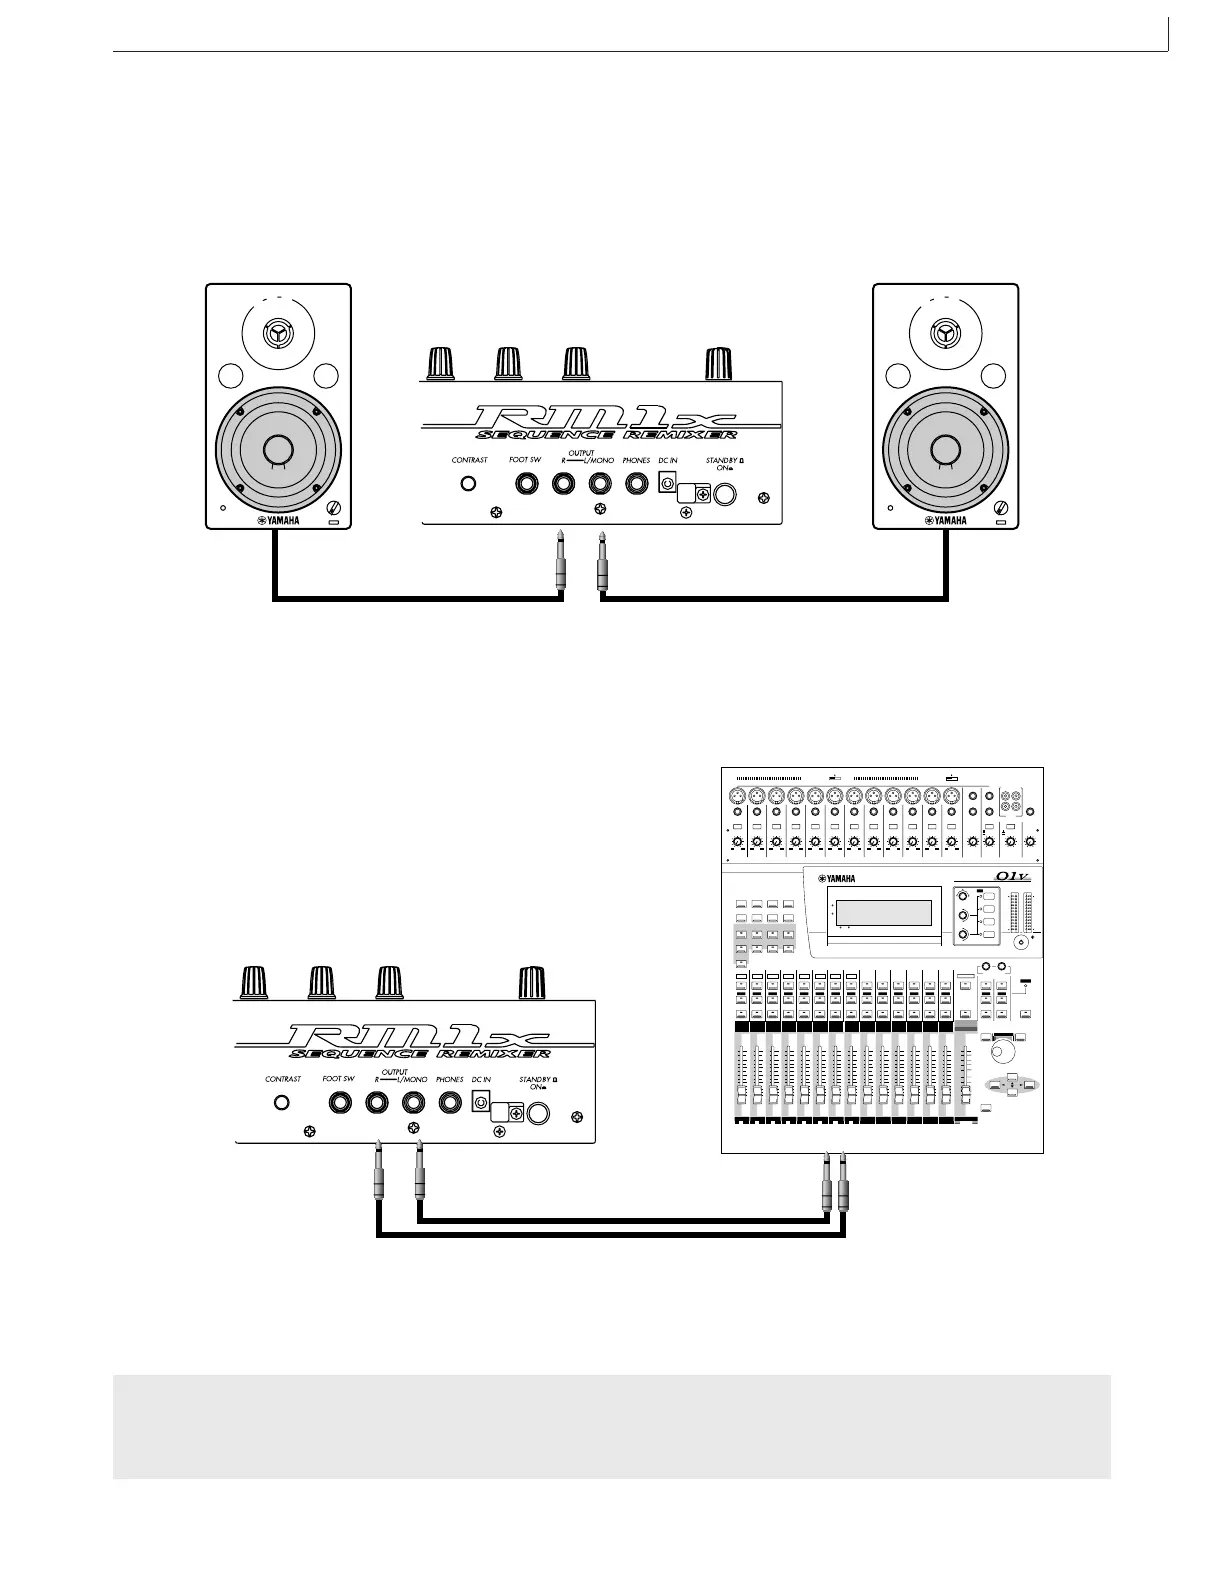
❏ Audio equipment connections
To output the sound of the RM1x, connect an amp or mixer to the output jacks.
Connection to powered speakers
Connect two powered speakers (left and right) to the output jacks (L/MONO, R). If you are connecting only one powered
speaker, use the L/MONO jack.
VOL
Connection to a mixer
Connect the output jacks (L/MONO, R) to two channels of the mixer. The channel connected to the L/MONO jack should
be panned left, and the channel connected to the R jack should be panned right. Make the same type of connections if you
are connecting the RM1x to an MTR or cassette deck.
Using headphones
If you are using headphones, connect them to the rear panel PHONES (headphones) jack.
When using headphones, adjust the volume to an appropriate level that will not harm your hearing.
CAUTION !
Do not connect the output jacks of the RM1x to the mic input jacks of an amp or cassette deck etc. If they are connected to mic
inputs, the sound quality may be impaired, and the device may be damaged. Also, when connecting the RM1x to a mixer or
similar device, set the mixer channels to the Line Input position.
SETUP
 Loading...