57
EN
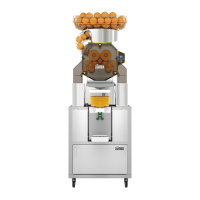
Individual features for Podium Tank S
+plus
All-in-One (90)
For the Tank stand, secure the drip tray with its filter in the display stand.
Component 90.7 varies depending on the stand model purchased:
Self Service stand: Component SS stand filter (90.7A).
Tank stand: Component TANK tank guides (90.7B).
The position of components Tray front (90.8) and Tray filter (90.9), can be adjusted to be able
to adapt them to different bottle and glass formats.
Individual features for Podium Black and Mirror All-in-One (90+)
The (90+) Podium SS S +plus has two independent waste bins.
Remember to insert both of them every time.
Individual features for Podium Cooler (100)
See Fig. 6 and 9.1 on how to fit the components correctly.
Pass the power cable of the Cooler unit through the hole on the rear door. To do this, you can
unscrew the door if necessary (Fig. 9.2).
Drain&Clean System Installation
Important! Unplug the machine from the wall socket.
Podium Tank All-in-One (90)
If fitted, remove the Peel chute (90.6), the SS stand filter (90.7A) and the Stand hopper (90.3)
(Fig. 8). Open the front door. If it is connected then remove the Injection securing knob (6),
and the Podium Tank Lid (80.5).
Find the upper hole (Fig. 7.2) and insert your hand, taking hold of the Flexible tube (80.4) and
placing it in the hole (Fig. 7.1). Do not pull or hold any other part of the machine.
Later, place the lower cover of the tube with the two securing knobs supplied and fit all the
previously removed parts back on (Fig. 7.2).
See parts breakdown on how to fit the components (Fig. 8).
!
Podium Podium Black and Mirror All-in-One (90+)
Open the front doors and remove the waste bins (Fig. 8.1 and 8.2). If it is connected then
remove the Injection securing knob (6), and the Podium Tank Lid (80.5).
Find the upper hole (Fig. 7.2) and insert your hand, taking hold of the Flexible tube (80.4) and
placing it in the hole (Fig. 7.1). Do not pull or hold any other part of the machine.
Later, place the lower cover of the tube with the two securing knobs supplied and fit all the
previously removed parts back on (Fig. 7.2).
See parts breakdown on how to fit the components (Fig. 8.1 and 8.2).
 Loading...