EasyManua.ls Logo

Acom 600S User Manual

Acom 600S
35 pages
To Next Page IconTo Next Page
To Previous Page IconTo Previous Page
Page #28 background imageLoading...
Page #28 background image
Page 27 of 33
7. MAINTENANCE
W A R N I N G HIGH VOLTAGE!
The mains line voltage plus a high DC voltage up to 500V inside the
ACOM 600S amplifier are LETHAL! For your safety, pull the amplifier
power plug out of the mains wall outlet and WAIT AT LEAST three
minutes EACH TIME BEFORE servicing the amplifier!
7-1. Periodic maintenance; general checks and cleaning
a) Periodically (but not less than once per year) check the connection reliability, contacts cleanliness and the
tightening of all connectors, in particular the coaxial ones – including their outer conductors.
Check the integrity of the cables, in particular if they are lying on the floor. Check also if the cables are secured
well in the area where they come out of the connector body.
Pay particular attention to the mains plug and the wall outlet for it – if you have any doubts consult with an
electrician.
Periodically check the SWR of the antennas and whether it is changing over time. Problems could occur more
often in poor weather conditions – rain, snow, strong wind etc.
b) Periodically (more often in a dusty environment, but at least once per year) clean the air filter without
opening the amplifier.
W A R N I N G
The air filter may be too dusty - be careful how you clean it so that
you DO NOT INHALE (BREATHE IN) neither spill the dust over! Wrap
it, for instance, in a wet cloth before cleaning!
Use a Philips-1 screwdriver to remove the square filter cover from the rear panel center – see the four screws in
Fig. 2-1. Remove the cover and take out gently the foam-like plastic filter. Clean up the filter and the cover
carefully from dust, wash them with tap water and leave them to dry up before you mount them back.
While the air filter is drying, clean the fan propeller and its body with a vacuum cleaner and a soft brush. Clean
also (as far as possible from outside without opening the amplifier) all ventilation apertures on the cover and the
chassis, including at the bottom. Finally, mount the air filter in reverse order and screw in its four screws tightly.
C A U T I O N
Do not use solvents for cleaning – they can be dangerous to you, as well
as to the coating or the amplifier plastic parts.
In case of need, clean the outside amplifier surfaces also without opening it. Use a soft piece of cotton cloth,
slightly moistened with clean water.
7-2. Replacement of fuses
W A R N I N G HIGH VOLTAGE!
If replacement of fuses is necessary, first pull out the amplifier mains
plug from the mains outlet and wait for at least 3 minutes!
The main mains fuses of the amplifier are located on the rear panel – Fig. 2-1. Your amplifier may be fitted with
one or two main fuses – see S. 2-3(g).
The fuses must be of the fast type, European size 5x20mm, rated for 250VAC and a current as follows:
C A U T I O N
The fuses must be rated for a current corresponding to your mains nominal
voltage: 10А for operation from 100-120VAC mains voltage or 6.3А for
operation from 200-240VAC. Use only standard fuses!

Table of Contents

Question and Answer IconNeed help?

Do you have a question about the Acom 600S and is the answer not in the manual?

Acom 600S Specifications

General IconGeneral
Input Impedance50 ohms
Output Impedance50 ohms
CoolingForced air
Frequency Range1.8-54 MHz
Primary Power220-240V AC, 50/60Hz
Tube4CX800A
Harmonic Suppression-50 dB

Summary

GENERAL INFORMATION

1-1. Introduction and description

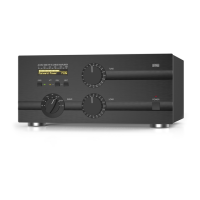
Overview of the ACOM 600S linear amplifier's capabilities, features, and control methods.

1-5. Safety considerations, explicit definitions

Details critical safety warnings, precautions, and explicit definitions for safe amplifier operation.

INSTALLATION

2-3. Connecting the amplifier within the shack

Covers crucial connection steps, including grounding and interfacing with the transceiver.

INITIAL POWER ON AND SETTING INTO OPERATION

3-2. Front panel - controls and indication

Details the functions of front panel buttons, LED indicators, and the main display screen.

3-3. Initial turning on – activation of the main power supply

Guides the user on how to power on the amplifier and activate its main supply.

3-5. Control system – buttons and menus

Explains the use of front panel buttons and the menu navigation system for control.

3-6. Test transmission

Provides detailed procedures for testing the amplifier's installation and functionality.

e) Test transmission.

Performs a basic test transmission to check amplifier indicators and settings.

f) Setting of drive level and typical regime.

Guides on setting the drive level and monitoring typical operating parameters for optimal performance.

OPERATION WITH THE AMPLIFIER

4-1. Change of modes RX / TX and Operate / Stand-by; option AUTO OPERATE

Explains how to switch between operating modes and configure the AUTO OPERATE function.

4-6. Automatic protection system

Details the amplifier's comprehensive automatic protection system against potential faults.

a) The first protection level is the WARNING type.

Explains the WARNING protection level, displaying messages without automatic action.

b) The second protection level is the SOFT FAULT type.

Describes the SOFT FAULT protection level and required operator response.

c) The third and most serious protection level is the HARD FAULT type.

Details the HARD FAULT protection level, which automatically shuts down the unit to prevent damage.

MENUS – USEFUL INSTRUMENTS AND OPTIONS

5-1. Menu “Measurements in the amplifier” – AMP MEASURE

Introduces the AMP MEASURE menu for digitally displaying 11 operating parameters.

5-3. Menu "Selection of CAT/AUX interface" – CAT/AUX SETTINGS

Guides on configuring the CAT/AUX interface for transceiver communication and band control.

REMOTE MONITORING AND CONTROL

MAINTENANCE

Related product manuals