9 8
Safety Warnings
• Proper precautions must be made to avoid burns from sprays of hot water or steam.
• Avoid touching any hot surfaces on the machine or any parts of the lter basket holder, lter basket, or
any parts of the steam wand while the Espresso Maker is in use or after it is just been used to prepare
hot beverages.
• To avoid water spillage, it is necessary to wipe the drip tray clean. Lift the drip plate up and off the unit.
Empty water, wipe dry, and replace drip plate.
Before Using for the First Time
1. Before brewing your rst cup of espresso, we suggest you pre-clean the machine. Place the Espresso
Maker on a level surface, within close proximity to a sink to discard water.
2. Make sure the Espresso Maker is unplugged.
3. Brew 2 carafes of water without coffee, following the procedures outlined in the Brewing Espresso
section of this Instruction Manual. This will thoroughly clean the unit.
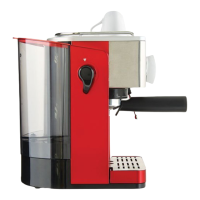
Brewing Espresso
1. Make sure the function knob is in the OFF position. Plug the Espresso Maker into a 120V AC electrical
outlet. The blue POWER light should be off.
2. Remove the water tank safety lid by turning it counter-clockwise.
3. To brew fresh espresso, ll glass carafe with 2 to 4 cups of cold water, using the markings on the carafe
for reference. Pour water into the water tank.
4. Turn the water tank safety lid clockwise until it is tightly sealed.
5. If the lter basket holder is locked into the Espresso Maker, remove from the brew head. Grasp the
handle rmly and turn clockwise until the handle faces the left, unlocked position. The lter basket
holder will drop down and out from the brew head.
6. With the measuring spoon, measure ground espresso coffee and place into the lter basket until the “4”
level mark indicated inside the lter. Gently tamp the coffee to pack it.
To assure a proper t into the Espresso Maker’s brew head, do not add coffee above this “4” level mark.
For best results, use MEDIUM to FINE (espresso) ground coffee.
7. Place the lter basket into the lter basket holder.
8. Align the lter basket holder with slots up in the Espresso Maker’s brew head.
Turn handle counter-clockwise (to the right) until the lter basket holder is securely locked.
9. Place the cover on the carafe and return the carafe to the Drip Tray Cover.
Align hole in lid under nozzle.
10. Turn the function knob to
(espresso). The blue POWER light will illuminate.
11. a.
When brewing only 4 cups of espresso (4 cups of water will be added into the water tank), espresso
will begin to ow into the carafe after approximately 2 minutes.
b.
When brewing 4 cups of cappuccino (4 cups of water + 1 steam level of water will be added
into the water tank), espresso will begin to ow into the carafe after approximately 3 minutes.
NOTE: For cappuccino, refer immediately to the Preparing Cappuccino section in this Instruction Manual.
12. When the coffee has stopped owing into the carafe, turn the function knob to OFF.
The blue POWER light will turn off.
13. To rell the water tank for additional servings, make sure the water tank is cooled and empty and the
blue POWER light is off.
CAUTION: This Espresso Maker will continue to heat water under pressure until the water tank is empty.
Before removing the Filter Holder, or the water tank safety lid, turn the function knob to
(steam) .
When no further steam is emitted from the steam jet, turn the function knob OFF. The blue POWER light
will turn off.
CAUTION: To avoid scalding or burns, do not open the water tank safety lid or remove the Filter Holder
during the brewing process, or when the blue POWER light is illuminated.
Preparing Cappuccino
Cappuccino is a delicious blend of espresso, steamed milk and frothed milk.
CAUTION: To avoid scalding or burns, do not open the water tank safety lid or remove the Filter Holder during
the brewing process or when the POWER light is illuminated.
NOTE: To prepare 4 cups of cappuccino, ll the carafe with 4 cups of cool, clean water for espresso +
1 steam
level of water for steaming.
1. Follow the detailed procedures for brewing espresso outlined in this Instruction Manual.
This should be added making reference to the previous espresso description.
2. While espresso coffee is brewing, ll a deep, metal or ceramic pitcher half full with fresh,
cold skim milk and place it next to the Espresso Maker.
3. Once espresso coffee has nished brewing to the desired 4 cup mark on the Glass Carafe, turn the
function knob to OFF.
4. Hold the pitcher by the handle and bring up to the steam jet. Insert the “Perfect Froth” tip just under
the surface of the milk. Turn the function knob gradually to
(steam). Move the pitcher in a slightly
circular motion, and continue to froth the milk.
REMINDER: To avoid splattering, the tip must remain just under the surface of the milk.
Otherwise,splattering may occur.
IMPORTANT: When frothing milk, the volume of milk will double. The top half will be frothed,
thebottom half will be milk.
5. After frothing, turn the function knob back to OFF.
6. Remove the pitcher from the steam jet.
CAUTION: Before removing the Filter Holder, or the water tank safety lid, turn the function knob to
(steam) and wait until no further steam is emitted from the steam jet. This will allow any extra steam to
be released and will clean the steam jet of any excess milk. Then turn the function knob back to the OFF
position.
7. Fill a cappuccino cup 1/3 full of freshly brewed espresso. Pour in an equal amount of warm milk and
spoon frothed milk on top.
8. Dust froth with cocoa powder, fresh grated nutmeg or cinnamon and enjoy a delicious, freshly brewed
cappuccino.
User Maintenance Instructions
This appliance requires little maintenance. It contains no user serviceable parts. Do not try to repair it yourself.
Any servicing requiring disassembly must be performed by a qualied appliance repair technician.
Care & Cleaning Instructions
CAUTION: NEVER IMMERSE THE ESPRESSO MAKER IN WATER OR ANY OTHER LIQUID.
1. Unplug the Espresso Maker from the electrical outlet and allow to cool completely before cleaning.
CAUTION: The Espresso Maker creates hot water and steam under pressure. To avoid burns on ngers
or hands, always make sure the POWER light is off. NEVER touch the lter basket holder or steam wand
immediately after brewing or steaming. Allow all parts to cool thoroughly before touching.
IMPORTANT: The lter basket holder and lter basket should be emptied and rinsed thoroughly with
warm water after every use.
2. Grasp the lter basket holder handle rmly and turn clockwise until the handle faces the left, unlocked
position. The lter basket holder will drop down and out of the unit.
3. Remove the lter basket and empty the used coffee grounds.
4. If necessary, clean the lter basket with a kitchen brush. A pin may be used to clear clogged holes of
either lter basket or the steam wand. Dry thoroughly.
5. Remove the drip plate. Empty water from drip tray. Dry with a clean cloth.
6. Rinse and replace clean drip plate.
7. Wipe the outside of the Espresso Maker and the steam wand with a damp cloth.
WARNING: Never use solvents or any detergents that may scratch or damage the surface of the machine.
8. Clean the carafe and carafe lid with warm, soapy water. Handle with extreme care, as glass will become
slippery when wet.
SO-312601_13683_BELLA_Steam espresso Eng-Spa_Macy's_IM_R4.indd 8-9 2018-10-02 9:07 AM
 Loading...