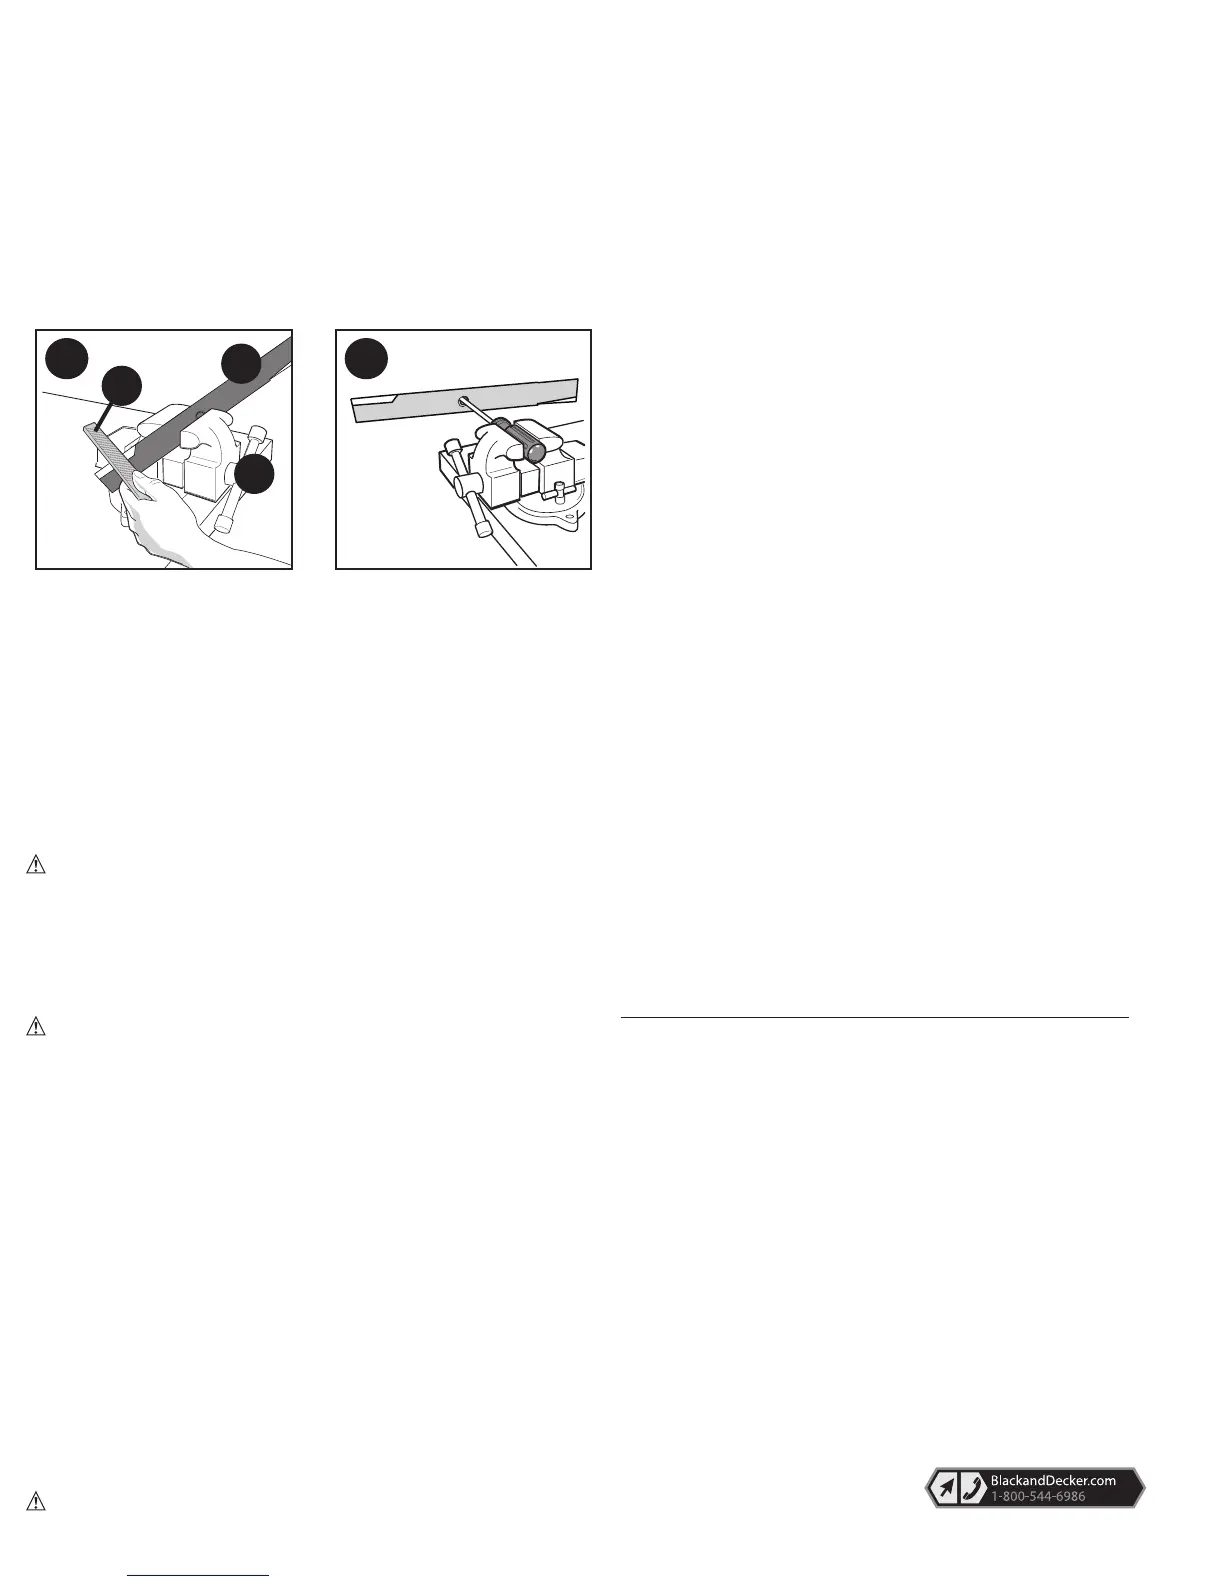
TO SHARPEN BLADE IN A VISE (FIG. Q):
1. Be sure the bail handle or switch lever (2) is released, the blade has
stopped and the mower is unplugged.
2. Remove blade from mower. See instructions for removing and
installing blade.
3. Secure blade (23) in a vise (24).
4. Wear proper eye protection and gloves and be careful not to cut yourself.
5. Carefully file the cutting edges of the blade with a fine tooth file (25)
or sharpening stone, maintaining the original cutting edge.
6. Check balance of blade. See instructions for blade balancing.
7. Replace blade on mower and tighten securely.
BLADE BALANCING (FIG. R)
Check balance of blade (23) by placing center hole in blade over a nail
or round shank screwdriver, clamped horizontally in a vise. If either end
of the blade rotates downward, file that end. Blade is properly balanced
when neither end drops.
LUBRICATION
No lubrication is necessary. Do not oil the wheels. They have plastic
bearing surfaces which require no lubrication.
CLEANING
Release bail handle (switch lever) (2) to turn mower off, let the blade
come to a stop and then unplug mower. Use only mild soap and a
damp cloth to clean the mower. Clean out any clippings which may
have accumulated on the underside of the deck. After several uses,
check all exposed fasteners for tightness.
PREVENTING CORROSION
Fertilizers and other garden chemicals contain agents which greatly
accelerate the corrosion of metals. If you mow in areas where fertilizers
or chemicals have been used, the mower should be cleaned immediately
afterward as follows: (1) Release bail handle (switch lever) (2) to turn
mower off and unplug mower. Wipe all exposed parts with a damp cloth.
CAUTION: DO NOT POUR OR SPRAY WATER ON THE MOWER
IN AN ATTEMPT TO CLEAN IT. Do not store the tool on or adjacent to
fertilizers or chemicals. Such storage can cause rapid corrosion.
STORAGE POSITION
For more compact storing the mower can be stored in an upright
position, with the handle folded over.
Loosen the two lower knobs (5) and lower the upper handle section. Be
careful not to pinch power cord. Tighten the two lower knobs.
CAUTION: Pinch point. To avoid being pinched, keep fingers
away from area between handles when lowering.
HINTS FOR OPTIMUM USE
• If the grass is longer than approximately 4 inches (10 cm), make two
cuts to obtain a better finish. First mow at maximum height of cut, then
use a low or medium height of cut.
• In order to achieve optimum results, only mow dry grass.
MOWER OVERLOAD
To prevent damage due to overload conditions, do not try to cut too much
grass at one time. Slow down your cutting pace, or raise the cut height.
MEETS CPSC SAFETY REQUIREMENTS
Black and Decker Mowers conform to the safety standards of the
American National Standards Institute, and the U.S. Consumer Product
Safety Commission. The Blade turns when the motor is running.
MAINTENANCE
IMPORTANT: To assure product SAFETY and RELIABILITY,
repairs, maintenance and adjustment (including brush inspection and
replacement) should be performed by BLACK & DECKER Service
Centers or other qualified service organizations, always using Black
& Decker replacement parts. When servicing use ONLY IDENTICAL
REPLACEMENT PARTS.
ACCESSORIES
Recommended accessories for use with your mower are available from
your local dealer or authorized service center. If you need assistance
regarding accessories, please call: 1-800-544-6986
WARNING: The use of any accessory not recommended for use
with this tool could be hazardous.
SERVICE INFORMATION
All Black & Decker Service Centers are staffed with trained personnel to
provide customers with efficient and reliable power tool service. Whether
you need technical advice, repair, or genuine factory replacement parts,
contact the Black & Decker location nearest you. To find your local
service location, call: 1-800-544-6986 or visit
www.blackanddecker.com
TWO-YEAR LIMITED WARRANTY
Black & Decker (U.S.) Inc. warranties this product to be free from
defects in material or workmanship for a period of two (2) years following
the date of purchase, provided that the product is used in a home
environment. This limited warranty does not cover failures due to abuse,
accidental damage or when repairs have been made or attempted by
anyone other than Black & Decker and its Authorized Service Centers. A
defective product meeting the warranty conditions set forth herein will be
replaced or repaired at no charge in either of two ways:
The first, which will result in exchanges only, is to return the product to
the retailer from whom it was purchased (provided that the store is a
participating retailer).Returns should be made within the time period of
the retailer’s policy for exchanges. Proof of purchase may be required.
Please check with the retailer for its specific return policy regarding time
limits for returns or exchanges. The second option is to take or send
the product (prepaid) to a Black & Decker owned or authorized Service
Center for repair or replacement at Black & Decker’s option. Proof of
purchase may be required. Black & Decker owned and authorized
service centers are listed online at www.blackanddecker.com.
This warranty does not apply to accessories. This warranty gives you
specific legal rights and you may have other rights which vary from state
to state. Should you have any questions, contact the manager of your
nearest Black & Decker Service Center. This product is not intended for
commercial use, and accordingly, such commercial use of this product
will void this warranty. All other guarantees, express or implied, are
hereby disclaimed.
LATIN AMERICA: This warranty does not apply to products sold in Latin
America. For products sold in Latin America, check country specific
warranty information contained in the packaging, call the local company
or see the website for such information.
6
TROUBLESHOOTING
Problem Possible Cause Possible solution
• Machine fails to operate. • Power turned off. • Turn power on.
• Fuse faulty/blown. • Replace fuse.
• Grass too long. • Increase the height of cut
and
move machine to shorter
grass to start.
• Thermal cut out • Allow motor to cool and
activated. increase height of cut.
• Machine functions • Thermal cut out • Allow motor to cool and
intermittently. activated. increase height of cut.
• Machine leaves ragged • Height of cut • Increase height of cut.
finish or motor labors. too low.
• Cutting blade blunt. • Replace the blade.
• Underside of • Check underneath the
machine clogged. machine and clear out as
necessary (always wear heavy
duty gloves).
• Blade attached • Attach blade correctly.
upside-down.
Imported by
Black & Decker (U.S.) Inc.,
701 E. Joppa Rd.
Towson, MD 21286 U.S.A.
RQ
23
24
25
 Loading...