Poor signal quality
Špatná kvalita signálu
Zlá kvalita signálu
Zła jakość sygnału
Gyenge jelminőség
Slaba kakovost signala
Loša kvaliteta signala
Acceptable signal quality
Přijatelná kvalita signálu
Prijateľná kvalita signálu
Dopuszczalna jakość sygnału
Elfogadható jelminőség
Sprejemljiva kakovost signala
Zadovoljavajuća kvaliteta signala
Excellent signal quality
Vynikající kvalita signálu
Vynikajúca kvalita signálu
Dobra jakość sygnału
Kiváló jelminőség
Odlična kakovost signala
Odlična kvaliteta signala
Indoor temperature/ Vnitřní
teplota/ Vnútorná teplota/
Temperatura wewnętrzna/
Belső hőmérséklet/ Notranja
temperatura/ Unutarnja
temperatura
Indoor temperature/ Vnitřní
teplota/ Vnútorná teplota/
Temperatura wewnętrzna/
Belső hőmérséklet/ Notranja
temperatura/ Unutarnja
temperatura
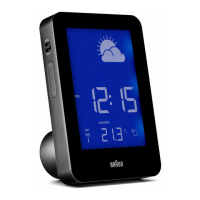
Sunny/ Slunečno/ Slnečno/ Słonecznie/
Napos/ Sončno/ Sunčano
Time/ Čas/ Čas/ Czas/ Idő/
Čas/ Vrijeme
Alarm time/ Čas budíku/
Čas budíka/ Czas budzika/
Ébresztési idő/ Čas budilke/
Vrijeme alarma
Cloudy/ Zataženo/ Zamračené/
Zachmurzenie/ Felhős/ Oblačno/ Oblačno
Outdoor temperature/ Venkovní
teplota/ Vonkajšia teplota/
Temperatura zewnętrzna/
Külső hőmérséklet/ Zunanja
temperatura/ Vanjska
temperatura
Outdoor temperature/ Venkovní
teplota/ Vonkajšia teplota/
Temperatura zewnętrzna/
Külső hőmérséklet/ Zunanja
temperatura/ Vanjska temperatura
Mode 2 / Režim 2 / Režim 2 / Tryb 2 / 2. mód / Režim 2 / Režim 2
Mode 1 / Režim 1 / Režim 1 / Tryb 1 / 1. mód / Režim 1 / Režim 1
Outdoor humidity/ Venkovní vlhkost/
Vonkajšia vlhkosť/ Wilgotność
zewnętrzna/ Külső páratartalom/
Zunanja vlažnost/ Vanjska vlažnost
Outdoor humidity/ Venkovní
vlhkost/ Vonkajšia vlhkosť/
Wilgotność zewnętrzna/
Külső páratartalom/ Zunanja
vlažnost/ Vanjska vlažnost
Slightly cloudy/ Lehce zataženo/ Polojasno/ Lekkie
zachmurzenie/ Enyhén felhős/ Rahlo oblačno/
Umjereno oblačno
Indoor humidity/ Vnitřní vlhkost/
Vnútorná vlhkosť/ Wilgotność
wewnętrzna/ Belső páratartalom/
Notranja vlažnost/ Unutarnja vlažnost
Indoor humidity/ Vnitřní
vlhkost/ Vnútorná vlhkosť/
Wilgotność wewnętrzna/
Belső páratartalom/ Notranja
vlažnost/ Unutarnja vlažnost
Rainy/ Deštivo/ Dážď/ Deszcz/
Esős/ Deževno/ Kišovito
Radio controlled weather station, BNC013-RC
Battery precautions
1. Do not use rechargeable batteries.
2. Use only alkaline batteries of the same or equivalent type.
3. Insert batteries with the correct polarity
4. Keep batteries away from children.
5. Dispose of exhausted batteries according to local legal requirements. Do not dispose them by throwing away
with normal household rubbish.
6. Avoid short circuiting the contacts in the battery compartments and battery terminals.
7. Remove batteries from the units if they will not be used for a long period of time.
8. Exhausted batteries should be removed from the battery compartments to prevent over-discharging, which
can cause leakage and may cause damage to the units.
GB
Getting started
1. Insert 3×AA new batteries in the main unit and 2×AAA new batteries in the sensor as indicated in the battery
compartments.
2. To pair the main unit with the sensor, press the RESET key at the back of the main unit rst, and then press
the RESET key inside the battery compartment of the sensor.
3. In some cases the main unit and the sensor will not pair immediately. You can reset the unit and the sensor
again as described in the above section. Due to the atmospheric disturbance, the best reception often occurs
during nighttime.
4. Slide the OFF/US/UK/DE switch to your desired country mode. After 8 seconds, the clock will automatically
start scanning for the radio controlled time signal.
Function keys - main unit
TIME /OFF/ALARM switch
• Slide to the TIME position to set the clock time.
• Slide to the ALARM position to set the alarm time.
• Slide to the OFF position to exit the setting mode and return to normal display.
+ key
• In normal display, press to switch between 12/24 hour format. In setting mode press to increase the setting
value. Press and hold to speed up the setting.
- key
• In setting mode press to decrease the setting value. Press and hold to speed up the setting.
ALARM ON/OFF button
• Press to turn the alarm on/o.
SNOOZE/LIGHT button
• Press to turn on the backlight for 10 seconds.
• Press to stop the alarm and activate the snooze function.
• Press and hold for 2 seconds to turn the backlight on/o permanently (when DC adaptor is being used only).
MEMO button
• Press to check the MAX. and MIN. temperature/humidity.
• Press and hold it for 3 seconds to delete the MAX. and MIN. temperature/humidity records.
MODE 1 button
• Press to switch between normal time, outdoor temperature, indoor temperature, outdoor humidity and
indoor humidity in the normal time window.
MODE 2 button
• Press to switch between outdoor temperature, indoor temperature, outdoor humidity, indoor humidity and
alarm time in the alarm time window.
OFF/US/UK/DE switch
• Slide to switch between US/UK/DE mode, and to turn o the RC function.
°C / °F key
• Press it to switch between °C / °F display.
RCC key
• Press to receive the RC signal in order to test the reception.
LINK key
• Press to receive 433 MHz signal for reception testing.
• Press and hold for 3 seconds during the 433 MHz signal receiving period to turn o the reception.
RESET key
• Press by using a pin to reset all values to default. In case of a malfunction, the unit has to be reset.
Function keys - sensor
°C / °F key
• Press to switch between °C / °F display.
RESET key
• Press by using a pin to reset all values to default. In case of a malfunction, the unit has to be reset.
Product description - main unit (Image 1)
1. LCD display
2. SNOOZE/LIGHT button
3. ALARM ON/OFF button
4. TIME /OFF/ALARM switch
5. + key
6. - key
7. MEMO button
8. MODE 1 button
9. MODE 2 button
10. OFF/US/UK/DE switch
11. °C/°F key
12. RCC key
13. LINK key
14. RESET key
15. Battery compartment
16. DC jack
Product description - sensor (Image 2)
A. LCD display
B. Wall mounting holder
C. Battery compartment
D. °C/°F key
E. RESET key
Time zone setting (US version only)
In US mode, the default time zone is PACIFIC. If your location is not in the Pacic zone, set the time zone as follows:
1. In normal time mode, slide the OFF/US/UK/DE switch to the US position in order to enter the time zone
setting mode.
2. Press “+” “-” key again to select the relevant time zone: P=Pacic M=Mountain C=Central E=Eastern.
RC signal strength indicator (Image 3)
The signal indicator displays signal strength in 3 levels. Wave segment ashing means time signals are being
received.
Note: You may use the RCC key to receive the time signal manually. The receive mode stops automatically after 6–12
minutes.