EasyManua.ls Logo

Canon imagePROGRAF iPF6400S Series User Manual

Canon imagePROGRAF iPF6400S Series
12 pages
To Next Page IconTo Next Page
To Previous Page IconTo Previous Page
Page #4 background imageLoading...
Page #4 background image
4
Install both printheads.
Install the Printheads
1
When the display screen shows Open
Upper Cover, open the top cover.
2
Pull the printhead fixer lever forward all
the way to open it completely.
3
Lift the printhead fixer cover to open it
fully.
4
Hold the printhead by the grips (a) as you
remove it from the pouch.
a
a
5
Remove the orange protective part (a). To
remove the other orange protective part
(b), push the grip (c) as you remove it.
a
b
c
Never touch the parts covered by the
protective parts. Doing so may damage
the printhead and affect printing quality.
The printhead contains ink, so be
careful not to spill it once the protective
parts are removed.
Do not reattach the protective parts
after removing them. Dispose of these
materials according to local regulations.
.
6
Insert the printhead into the carriage (b)
with the ink holes (a) up and facing the
front of the printer as shown in the figure.
Carefully push the printhead firmly into
the carriage (b), ensuring that the parts
that were covered by the protective parts
do not touch the carriage (b).
b
a
7
Pull the printhead fixer cover down toward
the front to lock the printhead in place.
8
Press the printhead fixer lever inwards
until it clicks into place.
9
Repeat steps 2 to 8 to install the second
printhead set.
Close the top cover.
Question and Answer IconNeed help?

Do you have a question about the Canon imagePROGRAF iPF6400S Series and is the answer not in the manual?

Canon imagePROGRAF iPF6400S Series Specifications

General IconGeneral
Hard Drive80 GB
Weight138 lb
Print Width24 inches (610 mm)
Maximum Print Resolution2400 x 1200 dpi
Number of Nozzles15, 360 Nozzles Total MBK: 5, 120 nozzles C, M, Y, BK: 2, 560 nozzles each
Ink Droplet Size4 picoliter
Ink ColorsCyan, Magenta, Yellow, Black, Matte Black
Ink Cartridge Capacity130 ml
Media Width24 inches (610 mm)
Media TypesCoated Paper, Photo Paper
Media Core Size2"
Borderless Printing Width24 inches (610 mm)
Media HandlingRoll Paper Feeder, Automatic Sheet Feeder
Interface TypeUSB 2.0, Ethernet (10/100/1000BASE-T)
InterfaceUSB, Ethernet
ConnectivityUSB, Ethernet
Operating System CompatibilityWindows, macOS
Operating SystemsWindows
Power SupplyAC 100-240V (50-60 Hz)
Maximum Roll Outer Diameter150 mm (6 inches)
Dimensions (W x D x H)1, 180 x 720 x 540 mm
Dimensions (Width x Depth x Height)1, 180 x 720 x 540 mm

Summary

Preparations

Attach the Ink Tanks

Installing Ink Tanks

Detailed steps for inserting and locking ink tanks into their respective holders.

Install the Printheads

Printhead Protective Parts

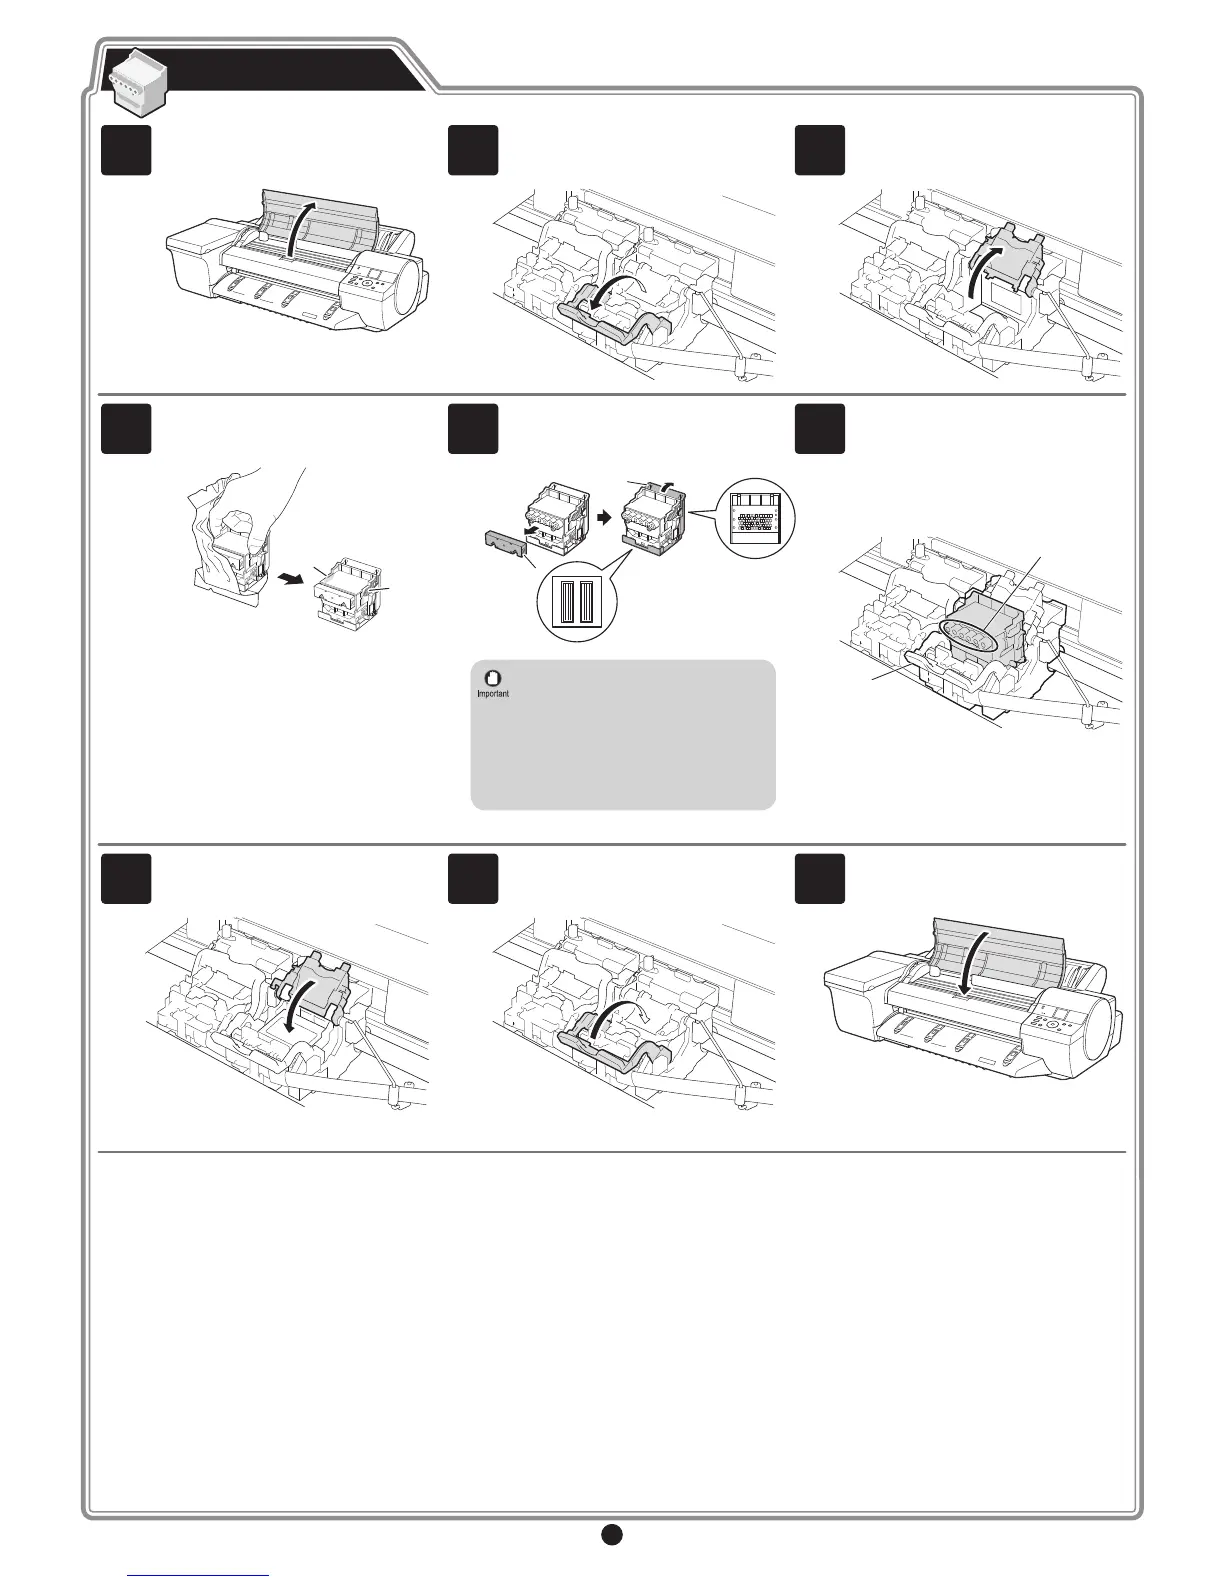
Guidance on safely removing orange protective parts from printheads.

Inserting and Securing Printheads

Instructions for correctly inserting printheads and locking them into place.

Load Paper to Adjust the Printheads

Printhead Adjustment Process

Details the automatic ink charging and printhead adjustment sequence.

Install the Software

Windows USB Installation

Steps for installing printer software on Windows via USB connection.

Install the Software (Network)

Windows Network Installation

Steps for installing printer software on Windows via network connection.

When the printer cannot be found on the network

Manual IP Address Setup

Procedure to manually set an IP address on the printer and configure it.

Macintosh Software Installation

Macintosh Software Installation Steps

Step-by-step guide for installing printer software on a Mac.

Responding to Messages

Common Error Messages

Lists common error messages and their corrective actions during setup.

Related product manuals