EasyManua.ls Logo

CARVIN Vintage 16 - User Manual

CARVIN Vintage 16
7 pages
Print Icon
To Next Page IconTo Next Page
Loading...
- 1 -
How to bias:
Vintage 16
Rev C
6/27/2012
carvinservice.com

Other manuals for CARVIN Vintage 16

Question and Answer IconNeed help?

Do you have a question about the CARVIN Vintage 16 and is the answer not in the manual?

Summary

How to Bias: Vintage 16

Safety First: Handling Tube Amps

Emphasizes danger, need for certified technician, and careful handling of hot tubes.

STEP 1: Gathering Necessary Tools

Lists essential tools including a multimeter, screwdriver, and clip leads.

STEP 2: Preparing the Amplifier Chassis

Instructs to remove the amp from its enclosure and place it securely.

STEP 3: Setting Internal Load

Directs to set the rear switch to 'Internal Load' for safe operation.

STEP 4: Selecting Normal Mode

Ensures the amplifier mode switch is set to 'Normal' for accurate bias reading.

STEP 5: Input Preparation

Guides to lower the volume and disconnect the guitar cord from the input.

STEP 6: Meter Setup for Bias Measurement

Details setting the multimeter to the milliamp (mA) position correctly.

STEP 7: Modifying Circuit for Measurement

Explains moving a wire to create a break in the circuit for current measurement.

STEP 8: Connecting Measurement Leads

Connects meter clips to specific spade connectors (QC2 and QC9).

STEP 9: Powering the Amplifier

Instructs to plug in the AC cord and turn the power button ON.

STEP 10: Adjusting the Bias

Guides on adjusting the bias potentiometer to achieve the target 40mA reading.

STEP 11: Powering Down and Reassembly

Covers turning off the amp, disconnecting leads, waiting for cool-down, and reconnecting wires.

Important Notes and Troubleshooting

Provides final notes on tube heat, method validity, and common issues.

Overview

The provided document is a bias adjustment guide for the Carvin Vintage 16 tube amplifier. It outlines a detailed procedure for setting the bias, emphasizing safety precautions due to the high voltages and heat involved in tube amplifiers.

Function Description

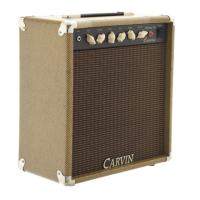
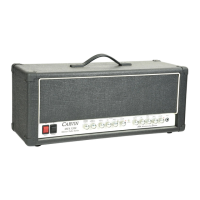
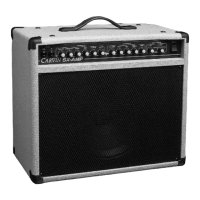
The Carvin Vintage 16 is a tube amplifier, likely for musical instruments such as guitars, given the reference to "guitar cord" and "amp stand." The core function of this document is to provide instructions for adjusting the "bias" of the amplifier's power tubes. Bias adjustment is crucial for optimizing the performance, longevity, and sound quality of tube amplifiers. It ensures that the power tubes (EL84 in this case) operate at their correct quiescent current, preventing issues like overheating, premature tube failure, or poor sound. The amplifier features various controls and connections, including speaker outputs (8Ω, 16Ω, Internal Load), a line out with cabinet voicing, power mode settings (Triode 5W, Normal), preamp tubes (12AX7), and power tubes (EL84). It also includes an input jack and a "Soak" control, which might relate to power attenuation or gain staging.

Important Technical Specifications

  • Power Tubes: (2) EL84
  • Preamp Tubes: 12AX7
  • Recommended Bias Setting: 40mA at Power Mode to Normal setting, with 120VAC.
  • Speaker Outputs: 8Ω, 16Ω, Internal Load (Speaker Off)
  • Power Modes: Triode 5W, Normal
  • Voltage Compatibility: The guide primarily focuses on 120VAC operation but mentions "EXPORT(230-240VAC 50Hz)" with the instruction to "Follow the same instructions," implying international voltage compatibility with similar bias procedures.

Usage Features

The amplifier is designed for use with external speakers, offering 8Ω and 16Ω output options. It also has an "Internal Load" setting, which allows the amplifier to be operated without an external speaker connected, a useful feature for silent practice or maintenance. The "Line Out Cabinet Voiced" feature suggests an output designed for direct recording or connecting to a PA system, with a simulated speaker cabinet sound. The "Triode 5W" power mode likely offers a lower wattage output, possibly for practice or achieving earlier power tube saturation at lower volumes, while "Normal" provides the full power output. The "Soak" control could be a built-in attenuator, allowing the user to drive the power tubes harder for desired tone without excessive volume.

Maintenance Features

The document itself is a maintenance guide, specifically for bias adjustment. Key maintenance features and considerations highlighted include:

  • Bias Adjustment: The primary focus is on adjusting the bias potentiometer to achieve a 40mA current reading. This is a critical maintenance task for tube amplifiers, especially after changing power tubes.
  • Tube Replacement: The guide explicitly states, "NOTE: REBIAS AMP WHEN CHANGING POWER TUBES OR FAILURE MAY RESULT," indicating that bias adjustment is a necessary step after replacing the EL84 power tubes. It also mentions that tubes should be a "matched set."
  • Safety Warnings: Extensive safety warnings are provided, emphasizing that "Only a certified technician should bias Carvin amps," due to the "very dangerous" nature of working with high-voltage tube amps. Warnings include "DANGER Electric shock risk," "CAUTION - HOT TUBES!", and instructions not to touch hot tubes to avoid burns. It also warns against operating the amp without a speaker load (unless on "Internal Load") to prevent damage.
  • Troubleshooting during Bias: The guide offers troubleshooting tips, such as checking the meter's fuse if it reads 0mA, and turning off the amp immediately if there's a "burning smell or loud crackling noise," or if the meter reads above 150mA, or if tubes glow red, as these indicate a "bad tube" or "major problem."
  • Cool-down Period: Users are instructed to "wait 30 minutes before handling the unit to ensure the amp cooled down" after operation, highlighting the significant heat generated by tube amplifiers.
  • Approved Method: The bias procedure described is the "Carvin Approved method which is used on the Production line in the San Diego, California Factory," assuring users of its validity and reliability.

The document provides a step-by-step procedure for bias adjustment, including:

  1. Preparation: Removing the amp from its enclosure, supporting the chassis, and gathering tools (screwdriver, multi-meter with milliamp reading, banana to clip leads, optional amp stand).
  2. Amp Configuration: Setting the speaker output to "Internal Load," power mode to "Normal," lowering the volume, and unplugging the guitar cord.
  3. Meter Setup: Connecting meter leads, setting the meter to milliamp (mA) position, and ensuring the meter's fuse is good.
  4. Circuit Modification: Moving a wire from QC2 to QC9 to open the circuit for current measurement.
  5. Power On and Adjustment: Plugging in the AC cord, turning on the power, waiting 2 minutes for tubes to heat up, and then adjusting the bias potentiometer to achieve 40mA.
  6. Power Down and Reassembly: Turning off the amp, disconnecting meter leads, unplugging the AC cord, waiting for tubes to cool, and moving the wire back from QC9 to QC2 before reassembling the amp.

The guide is comprehensive in its instructions and safety emphasis, making it a valuable resource for maintaining the Carvin Vintage 16 amplifier.

CARVIN Vintage 16 Specifications

General IconGeneral
BrandCARVIN
ModelVintage 16
CategoryMusical Instrument Amplifier
LanguageEnglish

Related product manuals