Operation Guide 4319
3
World Time
The World Time Mode digitally displays the current time
in 30 cities (29 time zones) around the world.
• Pressing A in the World Time Mode causes the
applicable city code to appear on the digital display for
about two seconds.
• If the current time shown for a city is wrong, check your
Home City time settings and make the necessary
changes.
• The watch will perform a signal reception even if it is in
the World Time Mode when a calibration time is
reached. If this happens, the World Time Mode time
settings will be adjusted in accordance with the
Timekeeping Mode’s Home City time.
• All of the operations in this section are performed in the
World Time Mode, which you enter by pressing C.
l
l
l
l
l
l
l
l
l
l
l
City Code
Current time in the
selected city code
To view the time in another city
While in the World Time Mode, press D to scroll through the city codes (time zones).
• For full information on city codes, see “City Code Table”.
To toggle a city code time between Standard Time and Daylight Saving Time
1. In the World Time Mode, use D to display the city
code (time zone) whose Standard Time/Daylight
Saving Time setting you want to change.
• Pressing A in the World Time Mode causes the
applicable city code to appear on the digital display
for about two seconds.
2. Hold down A to toggle Daylight Saving Time (DST
indicator displayed) and Standard Time (DST indicator
not displayed).
• Note that you cannot use the World Time Mode to
change the DST setting of the Home City code you
currently have selected in the Timekeeping Mode. See
for information about turning the Home City code DST
setting on and off.
DST indicator
• The DST indicator will appear on the display whenever you display a city code for
which Daylight Saving Time is turned on.
• Note that you cannot switch between Standard Time and Daylight Saving Time
while
GMT is selected as the city code.
• Note that the DST/Standard Time setting affects only the currently displayed city
code. Other city codes are not affected.
Alarms
You can set three independent Daily Alarms. When an
alarm is turned on, the alarm tone sounds when the alarm
time is reached. You can also turn on an Hourly Time
Signal that causes the watch to beep twice every hour on
the hour.
• The alarm and Hourly Time Signal operate in
accordance with the current digital time.
• The alarm number (AL1 though AL3) indicates an alarm
screen. SIG appears in place of the alarm number when
the Hourly Time Signal screen is shown.
• All of the operations in this section are performed in the
Alarm Mode, which you enter by pressing C.
Alarm number
Alarm time
(Hour : Minutes)
On/Off status
Alternate at
two-second
interval
To set an alarm time
1. In the Alarm Mode, press D to select the alarm (AL1,
AL2, AL3) whose time you want to set.
AL1 AL2 AL3 SIG
2. Hold down A until the hour setting of the alarm time
starts to flash, which indicates the setting screen.
• This turns on the alarm automatically.
3. Press C to move the flashing between the hour and minute settings.
4. While a setting is flashing, use D (+) and B (–) to change it.
• When setting the alarm time using the 12-hour format, take care to set the time
correctly as a.m. (no indicator) or p.m. (P indicator).
• If you have 24-hour timekeeping selected in the Timekeeping Mode, the alarm
time is also displayed in 24-hour format.
5. Press A to exit the setting screen.
On/Off status
Alarm Operation
The alarm sounds in all modes at the preset time for about 10 seconds, or until you
stop it by pressing any button.
To test the alarm
In the Alarm Mode, hold down D to sound the alarm.
To turn an alarm and the Hourly Time Signal on and off
1. In the Alarm Mode, press D to select an alarm or the Hourly Time Signal.
2. When the alarm or the Hourly Time Signal you want to set is selected, press A to
turn it on (
ON
) and off (
OF
).
Stopwatch
The stopwatch lets you measure elapsed time, split times,
and two finishes.
• The display range of the stopwatch is 99 minutes, 59.99
seconds.
• The 1/100-second value appears while the elapsed time
operation is stopped or while a split time is frozen on the
display.
SecondsMinutes
Seconds
1/100
second
More than
one minute
l
l
l
l
l
l
l
l
l
l
l
l
Split indicator
Split time
(Minutes : Seconds)
1/100 second
Split Time Screen
Elapsed Time Screen
Elapsed time
(Minutes : Seconds)
1/100 second
• The stopwatch continues to run, restarting from zero after it reaches its limit, until
you stop it.
• Exiting the Stopwatch Mode while a split time is frozen on the display clears the split
time and returns to elapsed time measurement.
• The stopwatch measurement operation continues even if you exit the Stopwatch
Mode.
• All of the operations in this section are performed in the Stopwatch Mode, which you
enter by pressing C.
To measure times with the stopwatch
D
Start Stop
Elapsed Time
➤
Re-start Clear
D
➤
Stop
D
➤
D
➤
A
Split Time
D
Start Split
➤
Split release
Clear
A
➤
Stop
A ➤
D
➤
A
Two Finishes
D
Start Split
➤
Stop Clear
A
➤
Split release
D ➤
A
➤
A
First runner
finishes.
Display time of
first runner.
Second runner
finishes.
Display time of
second runner.
Timekeeping
Use the Timekeeping Mode to set and view the current time and date. This section
also explains how to set the current date and time manually.
• In the Timekeeping Mode, press D to display the last signal screen. The last signal
screen shows the date and time of the last successful time calibration signal
reception.
• In the Timekeeping Mode, press A to cycle through the digital time screens as
shown below.
• All of the operations in this section are performed in the Timekeeping Mode, which
you can enter by pressing C.
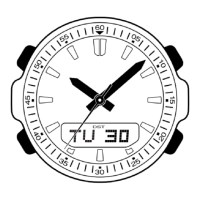
You can select either Japanese (kanji) or English for the day of the week indicator.
• For more information, see “To set the current digital time and date manually”.
Day of the Week Indicators
Sunday: SU/ Monday: MO/ Tuesday: TU/ Wednesday: WE/ Thursday: TH/
Friday: FR/ Saturday: SA/
Press A.
▲
Receiving indicator
▲
A
2 seconds
A
Reception Time
Receiving
Indicator and
Seconds Count
▲
Seconds
Hour :
Minutes
PM indicator
Current Time
Screen
2 seconds
2 seconds
Day of week
Day
Date Screen
Last Signal Screen
Reception date
▲
▲
Press D.
Or
Setting the Digital Time and Date Manually
Make sure you select your Home City code before you change the current time and
date settings. World Time Mode times are all displayed in accordance with the
Timekeeping Mode settings. Because of this, World Time Mode times will not be
correct if you do not select the proper Home City code before setting the time and
date in the Timekeeping Mode.
To set the current digital time and date manually
1. In the Timekeeping Mode, hold down A until the city
code starts to flash, which indicates the setting screen.
• The second hand will move at high speed to the 12
o’clock position, where it will stop.
2. Use C to move the flashing in the sequence shown
below to select other settings.
Seconds
Hour
12/24-Hour
Format
Year
DST
DayLanguage
Power
Saving
City Code
Month
Minutes
City code
 Loading...