Operation Guide 5031
4
Configuring Time and Date Settings Manually
You can use the following procedures to adjust the time and date settings when the
watch is unable to receive a time calibration signal for some reason.
1. In the Timekeeping Mode, keep A depressed (for about five seconds) as the
second hand moves to the last signal reception result (“Y” or “N”), then to “READY”
(or “R” for some models), and then to the city code of the currently selected Home
City.
2. Use C to cycle through available settings in the sequence shown below.
C
• Home City
• DST setting
Hour and
minute
C
Year
C
C
Month
C
Day
3. Press C.
• The second hand will move to 12 o’clock, and the left
dial hand will move to “0” (“60” for some models).
4. Use D (+) and B (–) to change the time setting in
one-minute increments.
• Check the bottom dial hand to make sure that it is
indicating the correct 24-hour setting.
5. Press C to advance to the year setting.
• The year setting consists of a tens digit and a units
digit setting.
3
0
30
Units digit
Tens digit
Second hand
6. Use D (units digit) and B (tens digit) to change the
year setting.
• D: Increases the one’s digit by 1.
• B: Increases the tens digit by 10.
7. Press C to advance to the month setting.
0
1
2
3
4
5
6
7
8
9
00
50
1090
2080
3070
40
60
Second
hand
Left dial hand
30
8. Press D to move to the next month.
9. Press C to advance to the day setting.
10. Use D (+) and B (–) to change the day setting.
11. When everything is the way you want, press A.
• This will exit the setting procedure and reset the
seconds count to zero.
• Press A to restart timekeeping on a time signal on the
TV or radio.
• The day of the week is calculated automatically.
DEC
JUN
JAN
FEB
MAR
APR
MAY
NOV
OCT
SEP
AUG
JUL
Second hand
Auto Hand Home Position Correction
Strong magnetism or impact can cause the hands and/or day setting to be off, even if
the watch is able to perform the signal receive operation. Auto hand home position
correction corrects the hand position automatically.
• Auto correction is performed in the Timekeeping Mode only.
• The auto correction operation corrects the positions of the second, minute, and hour
hands. Home position correction of the dial hands and day must be performed
manually, using the procedure under “Manual Home Position Correction”.
• Each hour, the watch performs automatic correction of the hand positions.
Correction can be performed for error up to 55 minutes slow or 5 minutes fast.
• You also can trigger the auto hand home position correction operation manually, if
you want. See “To trigger the auto hand home position correction operation
manually” for more information.
• The auto hand home position correction operation can take up to three and a half
minutes to complete.
• If hand positions are off by one hour or more, correct them using the procedure
under “To trigger the auto hand home position correction operation manually” or
“Manual Home Position Correction”.
To trigger the auto hand home position correction operation manually
• Perform the following procedure when the time setting is
off.
In the Timekeeping Mode, hold down D for about six
seconds until the second hand completes one full
revolution.
• Though the second hand will stop momentarily about
three seconds after you hold down D, do not release
the button yet. Wait until the second hand completes a
full revolution before you release D.
• To interrupt an ongoing correction operation and return
to the Timekeeping Mode, press D again.
30
• If you release D when the second hand stops the first time (after about three
seconds) in the above operation, the watch will enter the manual home position
correction mode, which is described under “Manual Home Position Correction”. If
this happens, press A to return to the Timekeeping Mode and then perform the
above operation again.
The manually triggered auto home position correction operation performs the
following two steps.
1. The hands will move automatically in order to determine the home positions of
the watch.
2. After the hand home positions are determined, the watch will return to normal
timekeeping automatically. This completes the correction operation.
Manual Home Position Correction
Strong magnetism or impact can cause the hands and/or day setting to be off, even if
the watch is able to perform the signal receive operation. If this happens, perform the
following home position correction procedure.
• Hand home position correction is not required if the time and day settings are
correct.
• You also can use auto hand home position correction to correct the home positions
of the second, minute, and hour hands.
1. In the Timekeeping Mode, hold down D for about three
seconds until the second hand stops. Release D at
this time.
3
0
Second hand
• Each press of C cycles through available settings in the sequence shown below.
C
Second
hand
Hour and minute
hands, bottom
dial hand
C
Right dial hands
(24-hour hour and
minute)
C
C
Left dial hand
(day of the
week)
C
Day
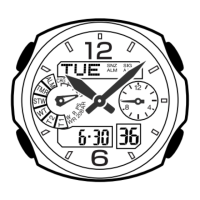
2. Check the second hand position.
• Home Position
Second hand: 12 o’clock
3. If the second hand home position is off, use D to move it clockwise to correct it.
4. Press C to change to hour and minute hand
correction.
• This will cause the hour and minute hands (24-hour
hands) to their home positions.
• Home Positions
Hour hand: 12 o’clock
Minute hand: 12 o’clock
24-hour hand: 24 o’clock
5. Use D (+) and B (–) to correct the hour and minute
hands.
• The bottom dial hand indicates the current hour on a
24-hour dial. Its position is synchronized automatically
with the hour and minute hands.
3
0
Hour hand Minute hand
24-hour hand
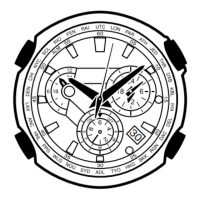
6. Press C to advance to change to right dial (24-hour
time) correction.
• This will cause the hour and minute hands of the right
dial to move to their home positions.
• Home Positions
Hour hand: 24 o’clock
Minute hand: 24 o’clock
7. Use D (+) and B (–) to correct the right dial hands.
8. Press C to change to left dial correction.
• This causes the left dial hand to move to its home
position.
• Home Position
Left Dial: 12 o’clock
9. Use D (+) and B (–) to correct the left dial hand.
30
Minute hand
Hour hand
30
Left dial hand
10. Press C to change to day correction.
• This causes the day to move to its home position.
• Home Position
Day: 1
11. Use D (+) and B (–) to correct the day indication.
• Each press of D or B moves the day indicator very
slightly. Keep pressing the applicable button until the
day is aligned the way you want.
12. Press A to exit home position correction and return to
normal timekeeping.
• If you press C instead of A, the watch will return to
step 1 (second hand home position adjustment) of this
procedure.
Check to make sure that the time, day, and day of the
week are being indicated correctly.
1
Day
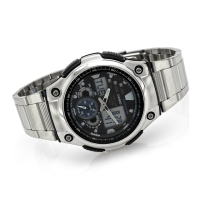
Power Supply
This watch is equipped with a solar cell and a special rechargeable battery (secondary
battery) that is charged by the electrical power produced by the solar cell. The
illustration shown below shows how you should position the watch for charging.
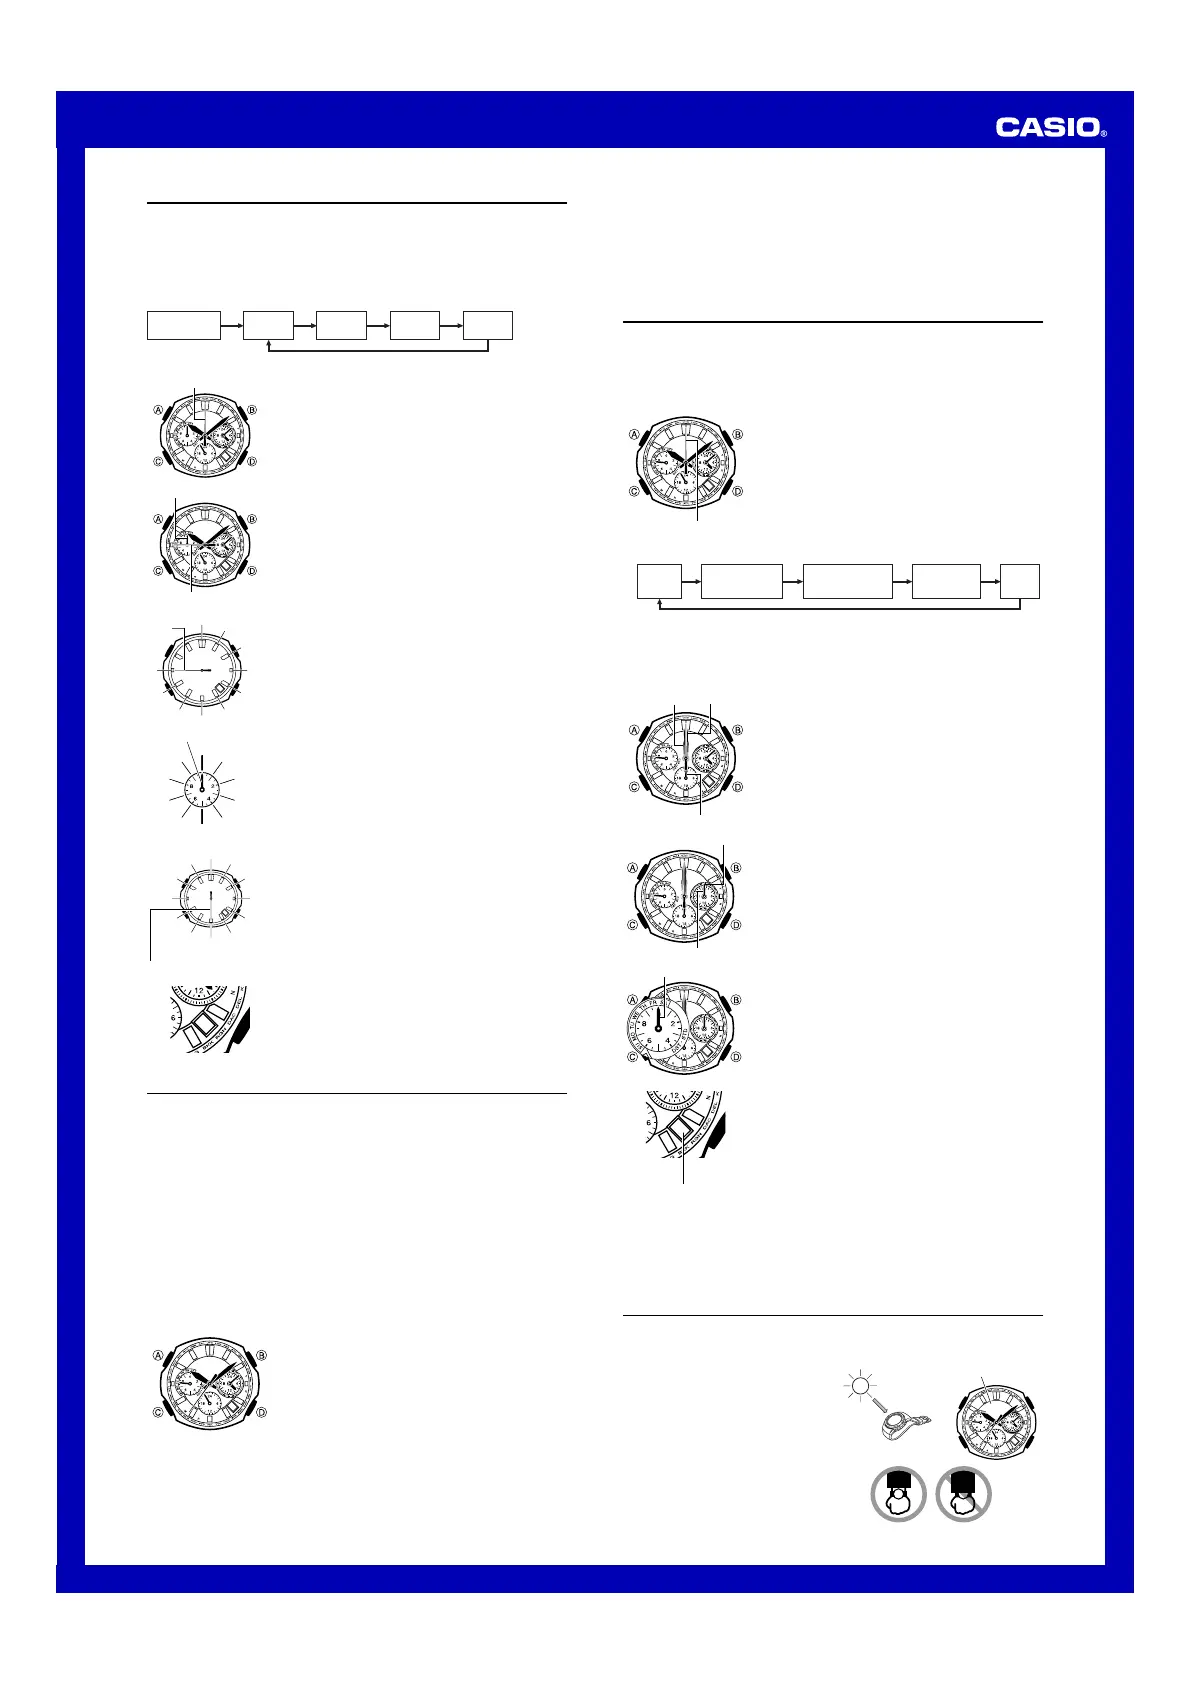
Example: Orient the watch so its face is
pointing at a light source.
• The illustration shows how to position
a watch with a resin band.
• Note that charging efficiency drops
when any part of the solar cell is
blocked by clothing, etc.
• You should try to keep the watch
outside of your sleeve as much as
possible. Even if the face of the watch
is blocked from light only partially,
charging will be reduced significantly.
30
Solar cell
 Loading...