Installing the Rear (OIM) Side Cosmetic Components
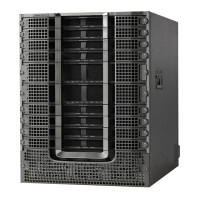
This section describes how to install the rear (OIM) side exterior cosmetic components, shown in Figure 2:
FCC Rear (OIM) Side Exterior Cosmetic Components—Fixed Configuration Power Shown, on page 3, on
the FCC.
While it is possible to install the various exterior components on the chassis in a different order, it is easier
to install them in the order outlined in this section.
Note
This section describes how to perform the following tasks:
Prerequisites
Before performing these tasks, you must first unpack and secure the chassis. See Cisco CRS Carrier Routing
System Fabric Card Chassis Unpacking, Moving, and Securing Guide .
Required Tools and Equipment
You need the following tools and part to perform this task:
• 8-inch long number 1 Phillips screwdriver—magnetic head preferable
•
2-mm hex key wrench
•
Rear cosmetic kit (Cisco product number: CRS-FCC-REAR-CM=)
•
Rear doors (Cisco product number: CRS-FCC-DRS-RR=)
Steps
To install the rear exterior cosmetic components, perform the following steps:
Cisco CRS Carrier Routing System Fabric Card Chassis Installation Guide
25
Installing and Removing Exterior Cosmetic Components
Installing the Rear (OIM) Side Cosmetic Components

 Loading...