Konserwacja / Maintenance
Uwaga!
:V]\VWNLHF]\QQRĞFLNRQVHUZDF\MQHPRJą
E\üZ\NRQ\ZDQHGRSLHURSRRGáąF]HQLXNOL
PDNRQZHNWRUDRGĨUyGáD]DVLODQLD
&RURNX]DOHFDQHMHVWSU]HSURZDG]HQLHVSHF
MDOQHMNRQVHUZDFMLREHMPXMąFHMNRPSOHNVRZH
F]\V]F]HQLHNOLPDNRQZHNWRUD:W\PFHOX
VNRQWDNWXMVLĊ]HVSU]HGDZFąOXEDXWRU\]RZD
Q\PSXQNWHPVHUZLVRZ\P
&]\V]F]HQLHXU]ąG]HQLD
'RF]\V]F]HQLDXU]ąG]HQLDZ\NRU]\VWDMV]PDWNĊ
GHOLNDWQLH]ZLOĪRQąZUR]WZRU]HZRG\LVSLU\WXVX
RPDNV\PDOQHMWHPSHUDWXU]H&
2VXV]XU]ąG]HQLHPLĊNNąV]PDWNąL]DVWRVXM
V]F]RWNĊGRRF]\V]F]HQLDNUDWHN
&]\V]F]HQLHILOWUD
8U]ąG]HQLH]RVWDáRZ\SURGXNRZDQH]]DVWRVRZD
QLHPQRZRF]HVQ\FKWHFKQRORJLLJZDUDQWXMąF\FK
SUDZLGáRZąSUDFĊLPDNV\PDOQąZ\GDMQRĞüSU]H]
FDá\F]DVXĪ\WNRZDQLDGODWHJRMHG\QąZ\PDJDQą
rHJXODUQąF]\QQRĞFLąNRQVHUZDF\MQąMHVWF]\V]
F]HQLHILOWUDSRZLHWU]D
&]\V]F]HQLHILOWUD]DSHZQLDGRVNRQDáąHIHNW\Z
QRĞüXU]ąG]HQLDLZ\MąWNRZRVNXWHF]QąILOWUDFMĊ
SRZLHWU]D
)LOWUQDOHĪ\F]\ĞFLüQDVXFKR]DSRPRFąRGNXU]D
F]DOXEP\üFRGQLZSU]\SDGNXSRPLHV]
F]HĔNWyUHQLHVąQDGPLHUQLH]DNXU]RQH
'HPRQWDĪILOWUD]XU]ąG]HQLD]ZORWHPSR
ZLHWU]DRGVSRGX]W\áX
2GNUĊüGZLHĞUXE\PRFXMąFH]QDMGXMąFHVLĊ
SRGSRGVWDZąNOLPDNRQZHNWRUD)LJ$±W\ONR
ZHUVMD9(
:\FLąJQLMILOWU)LJ%LZ\F]\ĞüJRZQDVWĊSX
MąF\VSRVyE
• )LOWUPRĪQDF]\ĞFLü]DSRPRFąRGNXU]DF]DOXE
P\MąFJRZUR]WZRU]HFLHSáHMZRG\LQHXWUDOQH
JRGHWHUJHQWX
• :SU]\SDGNXXP\FLDILOWUDSR]RVWDZJRGR
Z\VFKQLĊFLDZ]DFLHQLRQ\PPLHMVFX
8PLHĞüVXFK\ILOWUSRQRZQLHZUDPLHLSU]\PR
FXMĞUXEDPL5\V$±W\ONRZHUVMD9(
Uwaga!
1LHVWRVXMEHQ]\Q\UR]SXV]F]DOQLNyZFKH
PLF]Q\FKGHWHUJHQWyZSURV]NRZ\FKLOXE
ĞURGNyZĞFLHUQ\FKSROLWXU\GRPHEOLV]RUVW
NLFKWNDQLQOXESDSLHUXĞFLHUQHJR
'HPRQWDĪILOWUD]XU]ąG]HQLD]ZORWHPSR
ZLHWU]D]SU]RGXRGVSRGX
:VXĔĞUXERNUĊWZRWZyUNUDWNLZORWRZHMLGRFLĞ
QLMJRQDERNLDE\SROX]RZDü]DF]HS\)LJ&
=GHPRQWXMNUDWNĊLZ\FLąJQLMILOWU
:\F]\ĞüILOWU]JRGQLH]RSLVDQąSRZ\ĪHMSURFH
GXUą
8PLHĞüVXFK\ILOWUZUDPFHLSRQRZQLH]DPRQ
WXMNUDWNĊ
Uwaga!
=DSFKDQHILOWU\PRJąPLHüZSá\ZQDVSDGHN
Z\GDMQRĞFLNOLPDNRQZHNWRUD
Attention!
All maintenance operations must be perfor-
med after disconnecting the electrical power
supply from the fan coil unit.
Each year, it is advisable to perform spe-
cial maintenance for complete cleaning of
the fan coil unit, contacting the retailer or
the authorized technical customer service
center.
4.1 Unit cleaning
To clean the unit use a cloth slightly dampened
with water and alcohol at a maximum tempera-
ture of 45° C.
Dry with a soft cloth and use a brush to clean
the grilles.
4.2 Filter cleaning
The unit is manufactured with modern tech -
nologies which ensure proper operation and
maximum efficiency over time, therefore the
only regular maintenance to be performed is the
cleaning of the air filter.
This cleaning will ensure excellent performance
of the unit and especially good air filtration.
The filter must be cleaned dry with a vaccuum
cleaner or washed every 15-20 days for rooms
which are not overly dusty.
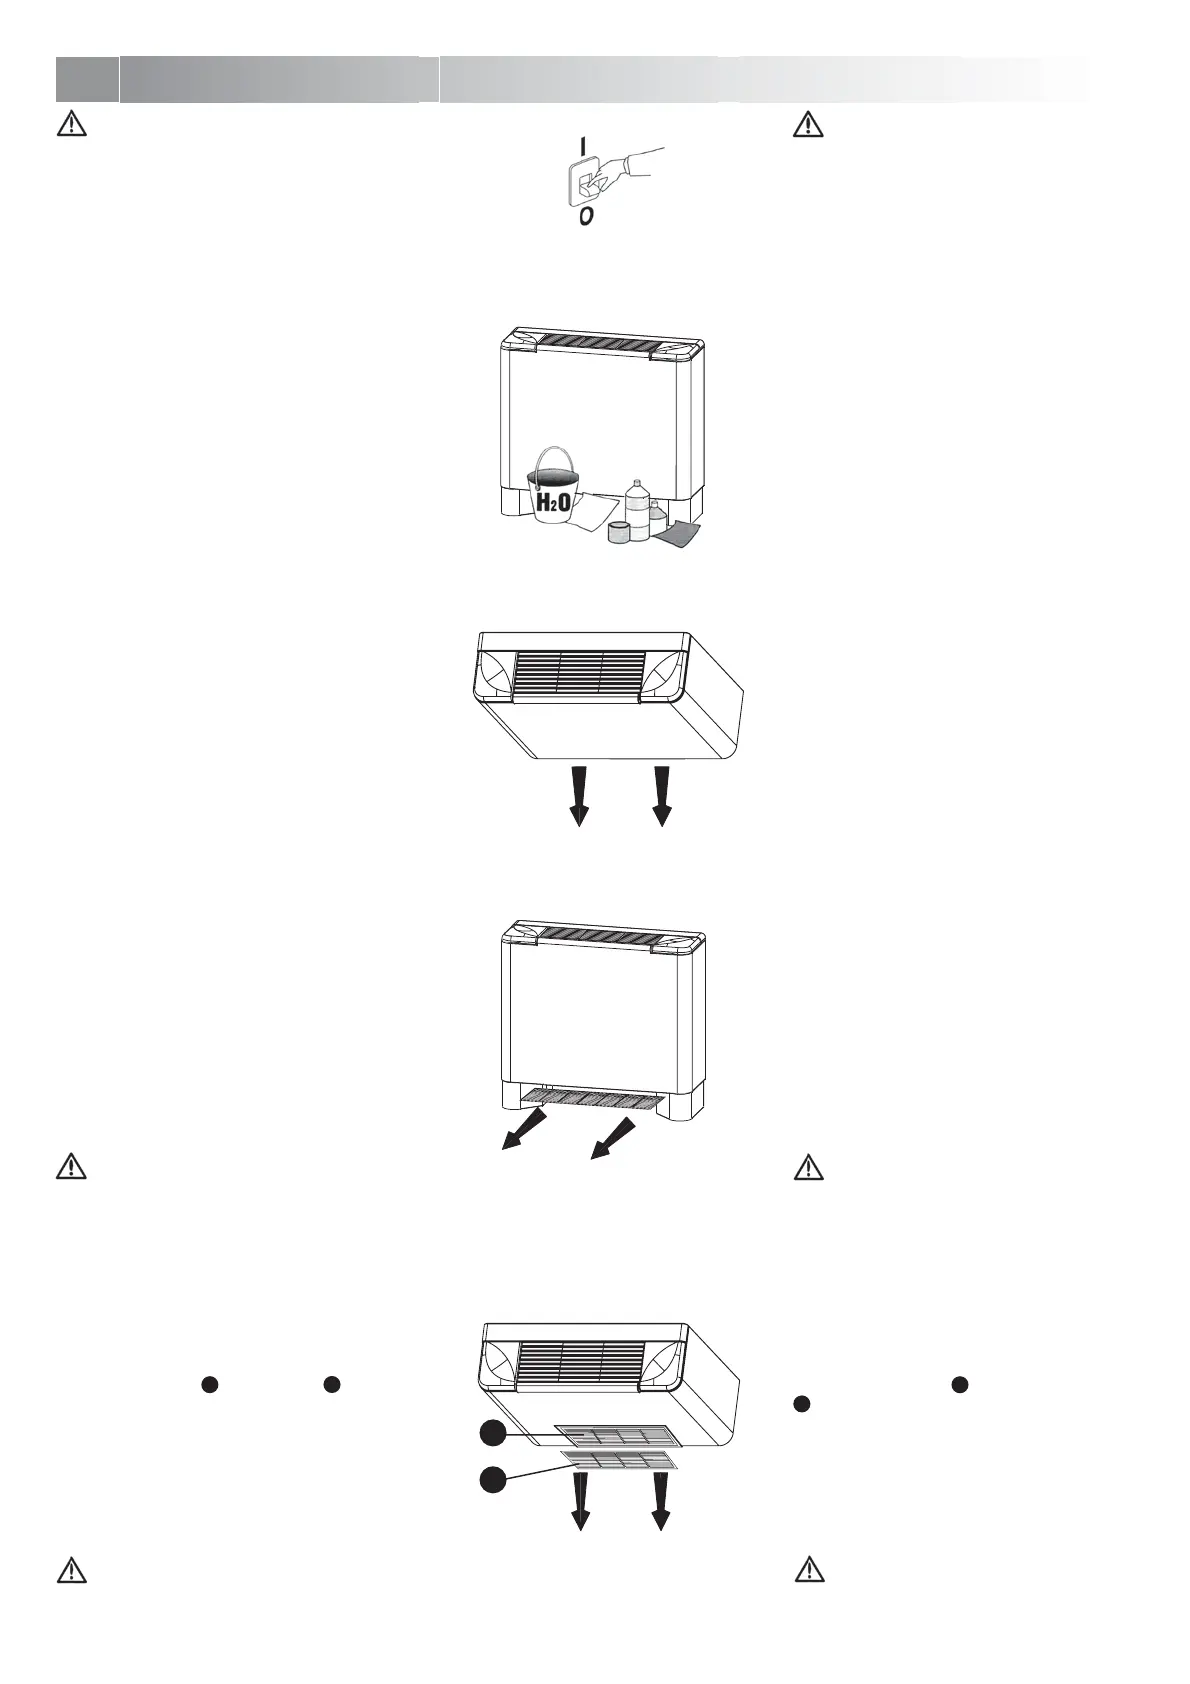
Extracting the filter from units with bottom/
back air intake.
1) Unscrew the two fastening screws located
under the base of the fan coil unit (Fig. A - VE
version only).
2) Extract the filter (Fig. B) and clean it as fol-
lows:
• The filter can be cleaned with a vaccuum
cleaner or with warm water and neutral de-
tergent.
• If it is washed, leave it to dry in the shade.
3) Place the dry filter back in its housing and
fasten it with the screws (Fig. A - VE version
only).
Attention!
Do not use gasoline, chemical solvents,
powder detergents and/or abrasives, furni -
ture polish, rough cloths or sandpaper.
Extracting the filter from units with front/
bottom air intake.
1) By a screwdriver, through the intake grill hole,
press sideways the unfastening reed (Fig. C).
2) Remove the grille
, and extract the filter
.
3) Clean the filter as described above.
4) Place the dry filter in its housing and re-install
the grille.
Attention!
Clogged filters may cause reduced perfor-
mance of the fan coil unit.
)LJ$
)LJ%
)LJ&
 Loading...