EasyManua.ls Logo

Craftsman 113.213722 User Manual

Craftsman 113.213722
11 pages
To Next Page IconTo Next Page
Page #1 background imageLoading...
Page #1 background image
SAVIETHIS MANUAL
FOR FUTURE REFERENCE
0 wners
manual
MODEL NO.
113.213722
DRtL L PRi:SS WIIH
I 6 HP MOTOR
*. , t
......... J
CAUTION:
Read GENERAL
lind ADDITIONAL
SAFETY
INSTRUCTIONS
carefully
CRAFTSMAN
MOTORIZED
8 INCH
BENCH MODEL DRILL PRESS
assembly
operating
repair parts
Sold by SEARS, i{OEBU('K AND ('0., ('hicago. I1,. 6(W_H U.S.A.
FULL ONE YEAR WARRANTY ON CRAFTSMAN DRILL PRESS
If within one yelr from lhe dill of purchase, this Craftsman Drill Prell flill due to I defect
m material or workmanship. Seers will rlpllr it, free of charge
WARRANTY SERVICE IS AVAILABLE BY SIMPLY CONTACTING THE NEAREST SEARS
SERVICE CENTER DEPARTMENT THROUGH(_'JT THE UNITED STATES
THIS WARRANTY APPLIES ONLY WHILE THIS PRODUCT IS IN USE IN THE UNITED STATES
This warranty g_vee you specific legal rights, end you may also have other rights which
vary from elate 1o elite
SEARS ROEBUCK ANO CO. Dtpt 691|731A Seers Tower. Chmego IL 60684
general safety instructions for power tools
1 KNOW YOUR POWER TOOL 12
,r t,t1,,_.%,t> _!_ t,, _t.p ,[ j.,,f., l, ,h_,,f,_ t,,tZ,t.,1..
, _ " , t' D tt, f, ,
2 GROUND ALL TOOTS
',i' t,i {[' '*J l r ,,_r ] tv[)p _j,j,i* **t_t.,. t.1
, .1,*', j' ,. ,,_,._*_r)*,'t,,_|*- €, lh÷, ¥_,_,q
¢ *., f, tr.,, _' 1 *he ,],,.,r_rJ,n,_ #, r_, /MP,*'"
3 KEEP GUARDS IN PLACE 14
15
4 REMOVE ADJUSTING KEYS AND
WRENCHES
, j,_ n,,: ,t ,. 16
5 KEEP WORK AREA CLEAN
{ ,jttpred a_p_% dn,t het_( h_ , ,r_,.[tP _h ' rt_t_t'_
6 AVOID DANGEROUS ENVIRONMENT
D,_ot use pOWe r tn¢9 ¢, ,rl darn p,,_ we! 'o(at,( ,1%,)_
_Xpo%e them (O ',t,r _PP,_ W()¢k rites _P" hghtP(J 18
P_,_v,dp adequate 5u rrou_d,_q work %pat
7 KEEP CHILDREN AWAY
AH v.Sdors sh_u(d _P kept a _a+P d_siao(p f,o_
_O'k area
$ MAKE WORKSHOP KID-PROOF 19
_ffh padlocks master _w,t(hes 0 ¢ by rpmoV*Oq
_tader keys
9 DON T FOR_E TOOL
If ¢,.I do lhp lOb be_e r and satp_ at the rate fo'
_h,(h If _.ar_ designed
l0 USE RIGHT TOOL 20
Dent fOrte t(_)l or aHa(hmPnl tO dO a lob ,t wa_
not des.gnarl tO"
11 WEAR PROPER APPAREL
DO not wear IOOSr _:lothmg gtoves rlp(ktle_ O r
lewelr_ (qng _, wr _tw_t(hesltogef caughf,n mov
,ng parts N(,nShO footwear ,s re(ommende,' Wear
p_otecbve ha.r _overmq tO (onta,n 'ung ha.r ROv
'ong sleeves above the elbow
USE SAFETY GOGGLES (Head Protect,on)
'J,_'JV tot o,t' [)' ,tr, f '_ _ ' ''"' '" _ ,
_,ufpct t_** 1 [,¢ _ ,,! I ,_.* , l_ r
SECURE WORK
'r '[_¢_',ttr _ t I¢'
DON T OVERREACH
I<pp[ [_' t_$,' I 'It ,; ,]r,, t P+,_ |r_ _ t' _ ' " *
MAINTAIN TOOLS WITH CARE
Kp_, k t,,t, _fla, I, .1_ _ ,I r' ' " ' ' " * I' ' {%
DISCONNECT TOOt S
,_% _'a/1OS _),ts I uttpr', _f,
AVOID ACCIDENTAL STARTING
I_qdko %urP S_,t_h ,_.,n O r _" _r,%,t{,, DPf ,t_, ;,,j._
q.nq ,n
USE RECOMMENDED ACCESSORIES
_'OOSU | #h e O_Per marsut | #0r re.( omm_q(Je( t at
, ebstJr,'aS FOhOW the mMru(t_ons that a{=,onr_D.tr_
The a _ ",_s_o¢_es T_O use O( _mpfOpe _ at.( P_sor'e "_
may cau '_hazards
NEVER STAND ON TOOL
the (UIIIr_Q to0, ,% a(c,_enlllly (.orH l(tpd
DO not Sto,e mater,a,s above o, nea lho tOO Su' h
thai ,t 'S ne(essary tO stand On the 1001 tO ,paTh
lh_=m
CHECK DAMAGED PARTS
Before further use Of the (COl aguardor othf_r par_
that ,5 damaged should be carefu'ly checked to
ensu,e that ,t w,l_ operate properly and perform ,ts
,ntended tor'Chon Check for ahg_ment 0 _ mov,ng
pads b_ndlng of mov,ng pads breakage of pads
r_o_JntlnQ and any othe r condliv_ns that may affPc.t
,l_Op_at=on A guard or other parr that ,_, damaged
should be propedy re oR,red Of replaced
Question and Answer IconNeed help?

Do you have a question about the Craftsman 113.213722 and is the answer not in the manual?

Craftsman 113.213722 Specifications

General IconGeneral
BrandCraftsman
Model113.213722
CategoryPower Tool
LanguageEnglish

Summary

General Safety Instructions

Know Your Power Tool

Understand your tool's capabilities and limitations for safe operation.

Use Safety Goggles

Always wear safety goggles to protect eyes from flying debris.

Secure Workpiece

Ensure the workpiece is securely clamped to prevent movement during operation.

Avoid Accidental Starting

Ensure the switch is off before plugging in to prevent unexpected startup.

Additional Safety Instructions for Drill Presses

Danger: For Your Own Safety

Read and understand the manual before operating the drill press.

Wear Protective Gear

Do not wear loose clothing, jewelry, or tie back long hair.

Think Safety

Familiarity breeds contempt; always be mindful of safety.

Unpacking and Checking Contents

Tools Needed

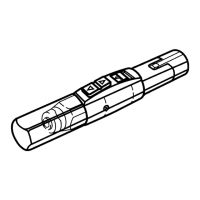
List of essential tools required for assembly and operation.

Tables of Loose Parts

Inventory of all included parts for verification during unpacking.

Motor Specifications and Electrical Requirements

Connecting to Power Source Outlet

Instructions for safely connecting the drill press to a grounded power outlet.

Extension Cord Usage

Guidelines for selecting and using extension cords to maintain power and safety.

Assembly

Assembly of Base Column

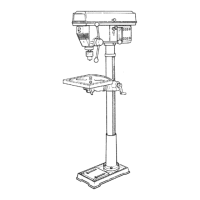
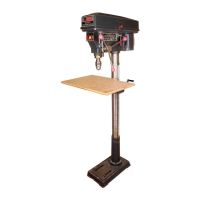
Step-by-step guide for assembling the base and column.

Installation of Table Support

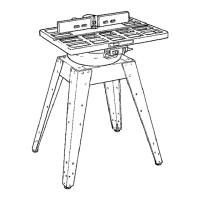
Procedure for attaching the table support assembly.

Installing the Head

Instructions for safely mounting the drill press head onto the column.

Operation and Adjustments

Installing Feed Handles

Guide for attaching the feed handles to the quill.

Installing the Chuck

Steps for securely fitting the drill chuck onto the spindle.

Tensioning Belt

Procedure for adjusting belt tension for optimal speed and performance.

Adjusting the Table Square to Head

How to ensure the drill press table is perpendicular to the head.

Getting to Know Your Drill Press

Spindle and Assembly Identification

Diagram and identification of key spindle and assembly components.

Spindle Speeds in R.P.M.

Chart showing different spindle speed settings for various operations.

On-Off Switch and Safety Lock

Understanding the switch operation and its locking feature for safety.

Basic Drill Press Operation

Removing and Installing Chuck

Instructions for safely removing and installing drill bits using the chuck.

Drilling to Depth

Methods for setting and achieving precise drilling depths.

Positioning Table and Workpiece

Guidance on properly positioning the table and workpiece for drilling.

Feeding the Drill

Techniques for applying steady and controlled feed pressure.

Adjustments

Quill Return Spring Adjustment

Procedure for adjusting the quill return spring tension.

Maintenance and Troubleshooting

Lubrication

Recommended lubrication points and schedule for optimal performance.

Trouble Shooting Common Issues

Solutions for common problems like noisy operation, drill burns, and wobble.

Related product manuals