Brake Switch: This switch is located under the brake
pedal assembly. The engine will not start without first
depressing the brake pedal. This switch will also shut
offthe engine if the operator attempts to get offthe unit
without setting the parking brake,
Blade Control Switch: This switch is located in the
steering column. If the operator attempts to start the
engine, get offthe seat or remove grass bag with the
blade control lever stillengaged, it will shut engine off.
Grass Bag Switch: This switch is located in the
bulkhead behind the engine. If the operator attempts to
cut grass when the grass catcher is not properly
attached to the vehicle, itwill shut engine off.
Before Starting
Filling Up Oil
Check oillevel inthe engine oilsump before starting the
engine. (Oil sump capacity: 22 ozJ0.65 liter)
1. Place the vehicle on level ground and flipthe seat
up to access the engine.
2. With a dry rag, clean the area around the oil fillon
the engine.
3. Remove dipstick and wipe it clean with cloth.
4. Replace and tighten the dipstick. Remove the
dipstick again and check the oillevel mark on it.
The oil level should be at FULL line on the dipstick.
Ifthe level isshort of that, add oil to the oilfill slowly.
Recheck the oil level on the dipstick. If needed, add
more oil. Do not overfill.
NOTE: The lawn utility vehicle is shipped with oil in the
engine crankcase.
5. Place the dipstick inposition and tighten to secure.
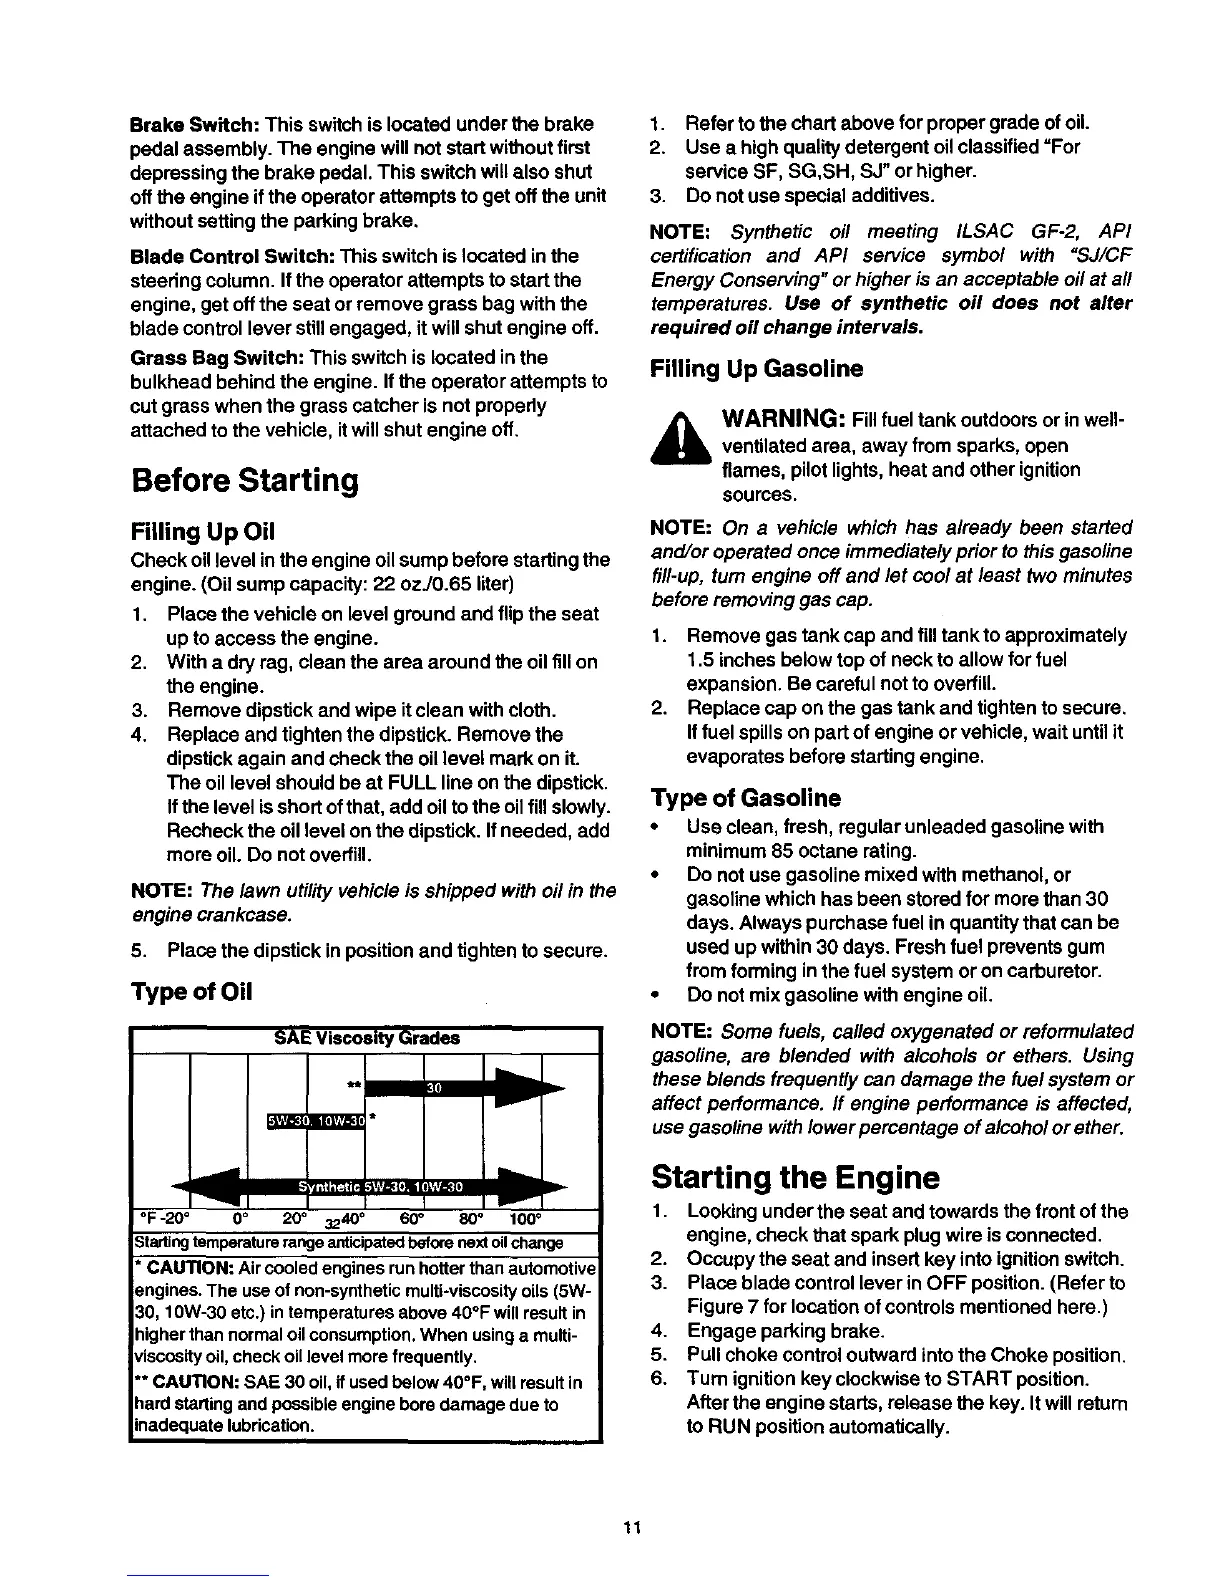
Type of Oil
SAE Viscosity Grades
lIll
_mi[llvdE_
°F -20 ° O° 20 ° 3240 ° 60 _ 80 ° 100°
3tading temperature range anticipated before next oil change
*CAUTION: Air cooledenginesrunhotterthanautomotive
_=ngines.The useof non-syntheticmulti-viscosityoils(5W-
30,10W-30 etc.) intemperaturesabove40°F willresultin
nigherthannormaloilconsumption.Whenusinga multi-
/iscosltyoil,checkoil levelmorefrequently.
'*CAUTION: SAE 30 oil,if usedbelow40°F, willresultin
lard startingandpoesibleengineboredamagedue to
nadequatelubrication.
1. Refer to the chart above for proper grade of oil.
2. Use a high quality detergent oil classified =For
service SF, SG,SH, SJ" or higher.
3. Do not use special additives.
NOTE: Synthetic oil meeting ILSAC GF-2, API
certification and API service symbol with "SJ/CF
Energy Conserving" or higher is an acceptable oil at all
temperatures. Use of synthetic off does not alter
required oil change intervals.
Filling Up Gasoline
WARNING: Fillfuel tank outdoors or in well-
ventilated area, away from sparks, open
flames, pilot lights,heat and other ignition
sources.
NOTE: On a vehicle which has already been started
and/or operated once immediately prior to thisgasoline
fill-up, turn engine off and let cool at least two minutes
before removing gas cap.
1. Remove gas tank cap and fill tank to approximately
1.5 inches below top of neck to allow for fuel
expansion. Be careful not tooverfill.
2. Replace cap on the gas tank and tighten to secure.
If fuel spills on part of engine or vehicle, wait until it
evaporates before startingengine.
Type of Gasoline
• Use clean, fresh, regular unleaded gasoline with
minimum 85 octane rating.
• Do not use gasoline mixed with methanol, or
gasoline which has been stored for more than 30
days. Always purchase fuel in quantity that can be
used up within30 days. Fresh fuel prevents gum
from forming in the fuel system or on carburetor.
• Do not mix gasoline with engine oil.
NOTE: Some fuels, called oxygenated or reformulated
gasoline, are blended with alcohols or ethers. Using
these blends frequently can damage the fuel system or
affect performance. If engine performance is affected,
use gasoline with lower percentage of alcohol or ether.
Starting the Engine
1. Looking under the seat and towards the front of the
engine, check that spark plugwire is connected.
2. Occupy the seat and insert key into ignition switch.
3. Place blade control lever in OFF position. (Refer to
Figure 7 for locationof controls mentioned here.)
4. Engage parking brake.
5. Pull choke control outward into the Choke position.
6. Tum ignition key clockwise to START position.
After the engine starts, release the key. It will retum
to RUN position automatically.
11
 Loading...