10
• Keep top of engine around starter clear
and clean of grass clippings and chaff.
This will help engine air flow and extend
engine life.
MULCHING MOWING TIPS
IMPORTANT: For best performance, keep
mower housing free of built-up grass and
trash. See “CLEANING” in the Maintenance
section of this manual.
• The special mulching blade will recut the
grass clippings many times and reduce
them in size so that as they fall onto the
lawn they will disperse into the grass
and not be noticed. Also, the mulched
grass will biodegrade quickly to provide
nutrients for the lawn. Always mulch with
your highest engine (blade) speed as this
will provide the best recutting action of the
blades.
• Avoid cutting your lawn when it is wet. Wet
grass tends to form clumps and in ter feres
with the mulch ing action. The best time
to mow your lawn is the early afternoon.
At this time the grass has dried, yet the
newly cut area will not be exposed to
direct sunlight.
• For best results, adjust the lawn mower
cutting height so that the lawn mower
cuts off only the top one-third of the
grass blades. If the lawn is over grown it
will be nec es sary to raise the height of
cut to reduce pushing effort and to keep
from over load ing the engine and leaving
clumps of mulched grass. For ex tremely
heavy grass, reduce your width of cut by
overlapping previously cut path and mow
slowly.
• Certain types of grass and grass con di-
tions may re quire that an area be mulched
a second time to com pletely hide the
clip pings. When doing a sec ond cut, mow
across (perpendicular) to the first cut path.
• Change your cutting pattern from week
to week. Mow north to south one week
then change to east to west the next week.
This will help prevent matting and graining
of the lawn.
1. To start a cold engine, push primer three
(3) times before trying to start. Use a firm
push. This step is not usually necessary
when starting an engine which has al-
ready run for a few minutes.
2. Hold operator presence control bar down
to the han dle and pull starter handle
quickly. Do not allow starter rope to snap
back.
NOTE: In cooler weather it may be necessary
to repeat priming steps. In warmer weather
over priming may cause flooding and
engine will not start. If you do flood engine,
wait a few minutes before attempting to start
and do not repeat priming steps.
MOWING TIPS
CAUTION: Do not use de-thatcher
blade attachments on your mower. Such
attachments are hazardous, will damage
your mower and could void your warranty.
• Under certain conditions, such as very
tall grass, it may be necessary to raise
the height of cut to reduce pushing effort
and to keep from over load ing the en gine
and leaving clumps of grass clippings. It
may also be necessary to reduce ground
speed and/or run the lawn mower over
the area a second time.
• For extremely heavy cutting, reduce the
width of cut by overlapping pre vi ous ly cut
path and mow slowly.
• For side discharge operation, cut in a
coun ter clock wise di rec tion, start ing at the
outside of the area to be cut, in order to
spread grass clip pings more evenly and
to put less load on the engine. To keep
clip pings off of walkways, flower beds,
etc., make the first cuts in a clock wise
direction.
MAX 1/3
• If a trail of grass clipping is left on the
right side of the lawn mower during rear
discharge operation, mow in a clockwise
direction with a small overlap to collect
the clippings on the next pass.
• Pores in cloth grass catchers can become
filled with dirt and dust with use and catch-
ers will collect less grass. To prevent this,
regularly hose catcher off with water and
let dry before using.
35
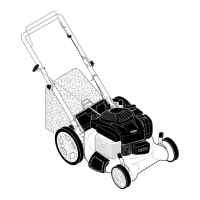
CRAFTSMAN ROTARY LAWN MOWER - - MODEL NUMBER 91737420002
KEY PART
NO. NO. DESCRIPTION
KEY PART
NO. NO. DESCRIPTION
1 532 19 60-25 Control Bar
2 532 44 82-63 Upper Handle
3 580 63 86-02 Bar, Lower Handle
4 581 90 21-01 Rope Guide
5 581 91 26-01 T-Knob
6 532 19 15-74 Handle Bolt
7 532 06 64-26 Wire Tie
8 874 78 05-12 Screw
9 532 15 41-32 Hinge Bracket
10 532 16 57-54 Mulcher Door
11 532 44 09-34 Engine Zone Control Cable
12 532 17 88-48 Screw, Hex Washer Head
#10-16 x 5/8
13 532 43 00-34 Up-Stop Bracket
14 532 18 23-98 Handle Knob
15 812 00 00-36 Klip Ring
18 817 60 04-06 Screw, Hex Head, Serrated
19 532 40 66-89 Axle Arm Assy., Front, LH
20 532 40 66-90 Axle Arm Assy., Front, RH
21 532 41 68-60 Rear Skirt
22 532 40 64-28 Selector Spring, Front
23 532 41 06-03 Rear Door Assembly
25 588 91 24-05 Handle Bracket Assy., LH
26 588 91 24-02 Handle Bracket Assy., RH
29 532 41 05-94 Wheel Adjusting Bracket
30 532 40 16-29 Spacer
31 532 16 57-60 Discharge Deflector
32 532 44 15-59 Selector Spring, Rear
33 532 08 78-77 Selector Knob
34 588 91 26-02 Axle Arm Assembly, Rear
35 532 42 65-89 Nut, Hex 5/16-18
36 532 40 16-38 Shoulder Bolt
37 581 00 94-09 Wheel & Tire Assembly, Front
39 532 40 91-49 Nut, Hex
40 532 44 67-74 Frame, Grassbag
41 532 19 41-86 Hinge Screw
42 532 40 54-21 Spring, Rear Door, LH
43 532 40 54-23 Spring, Rear Door, RH
44 532 18 41-93 Bolt, Rear Door
45 532 15 04-06 Screw, Hex Head, Threaded,
Rolled 3/8-16 x 1
46 532 18 21-66 Danger Decal
47 532 75 11-53 Nut, Hex
49 588 15 48-01 Wheel & Tire Assembly, Rear
50 582 26 90-01 Grassbag
51 532 14 72-86 Hinge Rod
52 581 70 83-37 Kit, Lawn Mower Housing
(Includes Key Number 46)
53 532 85 10-84 Screw, Hex Head, Grade 8
3/8-24 x 1-3/8
54 532 85 02-63 Helical Lockwasher
NOTE: All component dimensions given in U.S. inches. 1 inch = 25.4 mm
IMPORTANT: Use only Original Equipment Manufacturer (O.E.M.) replacement parts. Failure to do so could be hazardous, damage your lawn mower and void your warranty.
55 532 85 10-74 Hardened Washer
56 532 40 67-06 21" Blade
57 581 54 79-01 Blade Adapter
58 532 15 21-24 Hinge Spring
59 - - - Engine, Briggs & Stratton,
Model Number 9P702-
0211-F1 (See Breakdown)
61 532 40 91-48 Nut, Hex
62 873 80 04-00 Nut, Hex
65 532 08 83-48 Washer, Flat
66 532 19 74-80 O-Ring
73 532 40 16-30 Washer, Curved, Cylindrical
74 532 12 50-78 Washer, Special, Engine
76 589 41 68-04 Baffle, Rear
77 817 41 13-12 Screw, Rear Baffle
83 532 42 85-01 Front Baffle
84 817 00 05-10 Screw, Front Baffle
87 532 43 75-16 Plug, Handle Bar
88 586 21 25-01 Bolt, Carriage
89 873 97 05-00 Nut, Hex
- - 532 18 21-91 Warning Decal (not shown)
- - 581 27 63-01 Bag of Parts (Includes
Key Numbers 88 and 89)
- - 115 96 59-96 Owner’s Manual,
English / Spanish
KEY PART
NO. NO. DESCRIPTION
 Loading...

