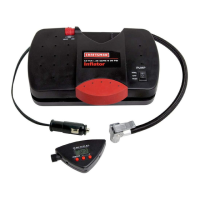
OPERATING INSTRUCTIONS USING PRESET AUTOMATIC SHUT OFF FEATURE
To operate Inflator using the Preset Gauge with Automatic Shut Off feature:
1. Install the “Digital Tire Gauge” on the Inflator and turn the Digital Gauge Lock Nut to secure.
2. Insert the 12 Volt power cord into DC 12 Volt power outlet.
3. Connect the Quick-Connect Universal Valve Adaptor to tire air valve and push down the Valve Lock
Lever to secure the connection.
4. Press “Reset/On” button to turn the gauge on. The gauge will display the current tire pressure, + or
– 2 PSI.
5. The gauge is pre-set at the factory to 30 PSI. This means the Inflator will automatically shut off
when it reaches 30 PSI. Press the “+” or “-“ to change the shut off pressure setting to the desired
automatic shut off pressure (Maximum: 100 PSI). To return to the default setting of 30 PSI, hold
down the “Reset/On” button for 3 seconds.
6. For Automatic Shut Off, switch the “Pump” switch to „Preset‟. In the „Preset‟ Mode the Inflator will
automatically shut off when it reaches the preset pressure setting.
7. Turn the Inflator “Pump” switch to the „Off‟ position when finished. CAUTION: Do Not Over Inflate!
NOTE: If low pressure is present (below 3 PSI), the gauge will turn off automatically after 15
seconds. The gauge will remain on if the pressure is above 3 PSI.
To operate Removable Digital Tire Pressure Gauge and check air pressure in
vehicle tires:
1. Turn the “Digital Gauge Lock Nut” to the unlock position and lift the Digital Tire Pressure Gauge
upward at the arrow marking on the Inflator to remove from the Inflator.
2. Press “Reset/On” button to turn the gauge on. Wait approximately 2 seconds for the gauge LCD
display to read 0.0.
3. Press the Digital Tire Pressure Gauge firmly onto the tire stem/valve to measure the tire pressure.
4. Press the “Reset/On” button to reset the gauge before next use.
5. The gauge will automatically shut off after 15 seconds. To use again, repeat steps 2 and 3.
10
 Loading...