9
ENGLISH
Speed Selection and Lock-Off Button
(Fig.A)
The tool features two speed settings for greaterversatility.
NOTE: Do not change speeds when the tool is running.
Always allow the tool to come to a complete stop before
changingspeed.
1. To select speed 1 (low speed), slide the speed selector
4
so the arrow aligns with position1.
2. To select speed 2 (high speed), slide the speed selector
so the arrow aligns with position2.
3. To lock the tool, slide the speed selector to the locked
position. When the lock/speed change lever is in the
locked position, the tool is locked and the trigger switch
cannot bepulled.
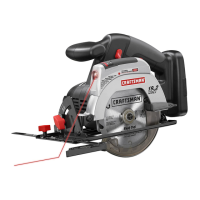
Proper Hand Position (Fig.G)
WARNING: To reduce the risk of serious personal injury,
ALWAYS use proper hand position asshown.
WARNING: To reduce the risk of serious personal
injury, ALWAYS hold securely in anticipation of a
suddenreaction.
Proper hand position requires one hand on the hand grip
9
,
with the other hand on the main handle
8
.
Installing and Removing the Battery Pack
(Fig.F)
WARNING: Ensure the tool/appliance is in the off
position before inserting the batterypack.
NOTE: For best results, make sure your battery pack is
fullycharged.
To install the battery pack
1
into the tool handle, align the
battery pack with the rails inside the tool’s handle and slide it
into the handle until the battery pack is firmly seated in the
tool and ensure that it does notdisengage.
To remove the battery pack from the tool, press the release
button
2
and firmly pull the battery pack out of the tool
handle. Insert it into the charger as described in the charger
section of thismanual.
OPERATION
WARNING: To reduce the risk of serious personal
injury, turn unit off and remove the battery pack
before making any adjustments or removing/
installing attachments or accessories. An
accidental start‑up can causeinjury.
WARNING: Cut hazard. Blade breakage may occur
if the blade does not extend past the shoe and the
thickness of the workpiece during the cut. Increased risk
of personal injury, as well as damage to the shoe and
workpiece may result.
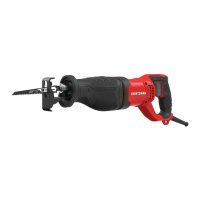
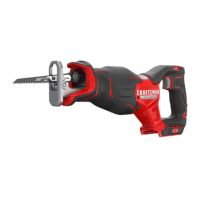
Blade Installation and Removal (Fig. E)
To Install a Blade
1. Point tool away frombody.
2. Use the tab on the blade clamp collar
6
, rotate open the
collar to its full openposition.
3. Insert blade
7
fully into blade clampcollar.
NOTE: Blade can be installed with the teeth facing up to
assist in FlushCutting.
4. Release blade clamp collar and gently tug on the blade
to ensure blade is clampedsecurely.
To Remove a Blade (Fig. E)
WARNING: Burn hazard. Do not touch the the blade
immediately after use. Contact with the blade may
result in personalinjury.
1. Rotate open blade clamp collar
6
to its full
openposition.
2. Removeblade.
To Remove a Broken Blade
If the blade breaks so that the broken piece is caught inside
the clamp, take the following steps to remove the remainder
of the blade from thesaw.
1. Place the saw on its side on a flat stable surface with the
blade clamp collar tab pointingup.
2. Rotate open blade clamp collar to its full openposition.
ASSEMBLY AND ADJUSTMENTS
WARNING: To reduce the risk of serious personal
injury, turn unit off and remove the battery pack
before making any adjustments or removing/
installing attachments or accessories. An accidental
start‑up can causeinjury.
screw exposed. Align the slots on the back of the charger
with the exposed screws and fully engage them in theslots.
NOTE: Do not attempt to mount CMCB101 charger under a
bench ortable.
NOTE: Only mount CMCB101 charger with the charging
lights pointed upward toward theceiling.
VersaTrack™
WARNING: Do not charge batteries while charger is
hung onTrackwall.
CRAFTSMAN chargers, except the CMCB101, can be
stored on CRAFTSMAN VersaTrack™ Trackwall. Hooks and
accessories are sold separately. Please refer to the VersaTrack™
Trackwall accessory sheet for furtherinformation.
NOTE: The CMCB101 charger is not CRAFTSMAN VersaTrack™
Trackwallcompatible.
SAVE THESE INSTRUCTIONS FOR
FUTURE USE
NOTE: For best results, use a 4.0 ah or higher battery pack.
a. If the blade has broken inside the clamp, slide
a flat object into the opening of the clamp as far
as it can go, then remove the flat object. This will
disengage the pin inside theclamp.
b. If the blade has broken outside the clamp, slide
a flat object into the opening of the clamp to the left
of the blade as far as it can go, then remove the flat
object. This will disengage the pin inside the blade
clampcollar.
3. While still holding the blade clamp collar open and the
saw on its side, face the clamp opening down and shake
until the broken blade fallsout.
 Loading...