DO GUIDE
TSR-310
Handheld Touch Screen Remote
DO Charge the Battery
CAUTION: Do not attempt to remove the TSR-310 battery. If the
TSR-310 battery must be replaced, refer to the TSR-310-BTP
Installation Guide (Doc. 8227) at www.crestron.com/manuals.
The Crestron
®
TSR-310 ships in low power mode to conserve the battery
charge. To charge the TSR-310 battery:
1. Apply power to the charging dock using the power supply.
2. Place the TSR-310 into the charging dock as shown in the
illustration below. Prior to operation, allow the remote to remain in
its charging dock for up to three hours until fully charged.
To check the battery level, access the setup screens as described in the
“DO Set Up the Device” section below. The battery level is displayed in the
top right corner of the main setup screen.
DO Set Up the Device
Once the TSR-310 wakes from low power mode, a splash screen is
displayed. For rst time setup, tap the screen to access the setup screens.
Splash Screen
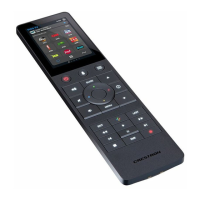
To access the setup screens during normal operation, press the power (1),
microphone (2), home (3), and raise volume (4) buttons twice, in this order,
within ve seconds. Refer to the illustration below for button locations on
the TSR-310.
NOTE: The keypad backlight on the TSR-310 illuminates when the remote is
handled, regardless of the room’s ambient light level.
Congure various settings for the TSR-310, including the display setup,
wireless setup, IP table setup, timeout durations, and diagnostics from the
setup screens.
The TSR-310 also provides a web conguration interface that is used to
view and congure various TSR-310 settings.
To access the web conguration interface, connect to a Wi-Fi
®
network,
then use the Device Discovery tool in Crestron Toolbox™ software to
discover the TSR-310 and its IP address on the network or enter the
TSR-310 IP address into a web browser.
NOTE: To reset the TSR-310, press and hold the power button (1) and
the home button (3) simultaneously for eight seconds. Refer to the
illustration above for button locations on the TSR-310. If the TSR-310
does not reset after ths procedure is performed, place the TSR-310 on
the charging dock to initiate the reset.
For more information, refer to the TSR-310 Supplemental Guide (Doc. 8226)
at www.crestron.com/manuals.
DO Update the Device
Firmware updates require a wired or wireless connection to Crestron
Toolbox.
• If the TSR-310 battery level is over 40%, rmware updates may be
applied while the remote is off of the charging dock (undocked)
• If the TSR-310 battery level is below 40%, the TSR-310 must be
placed on the charging dock prior to applying rmware updates.
To apply rmware updates via a wired connection, connect to the micro
USB port inside the battery compartment. The USB port is accessible only
while the TSR-310 is undocked.
For more information on performing a rmware update, refer to the TSR-310
Supplemental Guide (Doc. 8226) or the embedded Crestron Toolbox help
le.
DO Set Up a Wi-Fi Connection
Select an Access Point
To congure the wireless access point (WAP) for optimal performance with
the TSR-310, refer to the TSR-310 Wireless Access Points Conguration
Guide (Doc. 8309) at www.crestron.com/manuals.
To set up a Wi-Fi network connection:
1. Tap Wireless Setup on the main setup screen to display the
Wireless Setup screen.
2. Tap Connect to WAP on the Wireless Setup screen to display
the Select Access Point screen.
If the desired WAP is already listed, tap the access point, tap
Connect, and proceed to step 8. Otherwise, continue to add and
connect a new access point.
NOTE: The TSR-310 noties the user if the desired WAP is not
included in Crestron’s recommended list of WAP brands. For a
complete list of recommended WAP brands, refer to the TSR-310
Supplemental Guide (Doc. 8226).
3. Tap Add New in the list of access points, and then tap Connect.
The Conrm Info screen displays.
4. Tap the WAP Name (SSID) eld on the Conrm Info screen, and
enter the name of the access point using the on-screen keyboard.
5. Tap SAVE to save the access point name or CANCEL to cancel
editing the access point name.
6. Tap the Security eld on the Conrm Info screen to display the
Encryption screen.
7. Tap the appropriate type of encryption used by the access point,
and then tap < BACK.
8. Tap the Password eld on the Conrm Info screen, and enter the
access point connection password using the on-screen keyboard.
9. Tap SAVE to save the password or CANCEL to cancel editing the
password.
10. Once all elds have been entered, tap Assign Access Point on
the Conrm Info screen to assign the access point. The WAP
Connect screen loads, indicating the status of the wireless
connection attempt.
If the connection to the access point is successful, the WAP
Connect screen indicates that the connection is active.
11. Tap < DONE to return to the Wireless Setup screen.
DO Check the Box
QUANTITY ITEM PART NUMBER
1 Power Pack, 5 Vdc 2.6 A, 100-240 Vac, PW-0526WU 2050124
1 Tool, T-Pin 2050937
Place TSR-310 into
charging dock to wake.
To power
supply
(3) Home
(2) Microphone
(1) Power
(4) Raise
Volume
Main Setup Screen