Do you have a question about the Delta ShopMaster MM300 and is the answer not in the manual?
Steps for unpacking the machine, removing protective coating, and cleaning unpainted surfaces.
Guidance on assembling the fence and holddown components to the mortiser column.
Instructions for attaching the tool and chisel holder and storing accessories.
Details of the manufacturer's two-year limited warranty policy for machines and accessories.
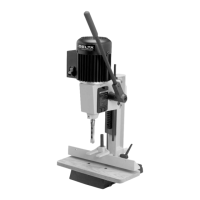
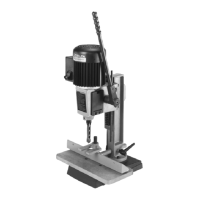
The Delta ShopMaster Model MM300 is a hollow chisel mortiser designed for woodworking tasks, specifically creating mortises (rectangular holes) in wood. It offers a more efficient and precise alternative to using a conventional drill press with a mortising attachment. The machine is constructed from cast-iron and steel, ensuring rigidity and stability during operation.
The primary function of the Hollow Chisel Mortiser is to cut square or rectangular holes in wood, which are essential for creating strong mortise and tenon joints in woodworking projects. It achieves this by using a combination of a rotating drill bit inside a stationary square chisel. The drill bit removes the bulk of the material, while the chisel squares off the edges of the hole. This process allows for clean, accurate, and repeatable mortises. The machine is equipped with a standard 3-jaw type key chuck, which provides a positive grip on the mortising bits, ensuring secure operation and preventing slippage.
The MM300 is designed with several features to enhance its usability and precision. The raising and lowering handle allows the operator to easily control the depth of the mortise. This handle is spring-loaded and can be repositioned for optimal leverage during the mortising operation. A hydraulic cylinder is integrated into the design to keep the machine head in the up position, providing controlled descent and preventing accidental drops.
The machine includes a table that can be adjusted in or out by loosening two screws, allowing for precise positioning of the workpiece relative to the chisel and bit. This adjustability is crucial for accommodating different workpiece sizes and achieving accurate mortise placement. The fence assembly further aids in securing the workpiece, ensuring it remains firmly against the fence during cutting to prevent rotation and maintain alignment. The fence bar can be inserted through a hole in the column and tightened into position.
A holddown mechanism is provided to prevent the workpiece from lifting as the chisel is raised out of the hole. This holddown should be adjusted to just touch the top of the workpiece, allowing it to slide left or right while preventing vertical movement. The holddown can also be inverted to accommodate thicker workpieces, adding to the machine's versatility.
To ensure the chisel is perfectly aligned with the workpiece, an adjustment screw allows the operator to rotate the chisel until its back surface touches the workpiece, after which it can be tightened. This feature is critical for producing square and parallel mortises.
The depth stop rod is a key safety and precision feature, limiting the depth of the chisel's penetration. Operators can adjust this rod by loosening a screw, lowering the head until the chisel reaches the desired depth, and then lowering the depth stop rod until it contacts the base before tightening the screw. This prevents drilling too deep or into the machine's table.
For mortising extra high workpieces, an auxiliary wood fence can be fastened to the main fence using wood screws. This provides additional support and stability for larger materials. The holddown can also be turned upside down to accommodate the increased height.
The column of the machine can be rotated 180 degrees if it's desired to use workpieces off the table, offering flexibility for various project setups. This involves removing three screws, rotating the column, and then replacing the screws.
When using bits with extra long shanks, the machine allows for the removal of an extension from the chuck. This is achieved by inserting a screwdriver into the motor end cap and armature shaft slot, then using the chuck key to unscrew and remove the chuck and extension. The chuck is then reattached directly to the motor shaft.
The MM300 emphasizes ease of maintenance and adjustment. The dovetail gib at the rear of the head ensures a good sliding fit between the head and the column. This fit can be adjusted by loosening two screws and turning adjusting screws, then re-tightening the two screws. Proper adjustment ensures smooth sliding movement without excessive side play, which is vital for accuracy.
Regular maintenance includes ensuring chisels and bits are sharp for optimal performance. The manual also provides guidance on proper chisel and bit assembly, including the correct orientation of the chisel's opening for chip escape and maintaining the appropriate clearance between the bit's cutting lips and the chisel's points. This clearance, typically 1/16" to 3/16", is crucial for efficient cutting and preventing burning.
The machine's electrical connections are designed for safety, with grounding instructions provided to protect the operator from electric shock. It's recommended to use a separate electrical circuit with #12 wire and a 20 Amp time lag fuse. Proper extension cord usage, including selecting the correct gauge based on ampere rating and cord length, is also detailed to prevent power loss and overheating.
The on-off switch is conveniently located on the side of the motor. A locking feature allows the switch to be secured in the "OFF" position by removing the switch toggle, preventing unauthorized use and enhancing safety when the tool is not in operation.
The manual also addresses common operational occurrences, such as smoke from the bit or material, explaining that this is a natural result of chip friction and resin buildup, not necessarily indicative of a dull chisel. However, excessive force required for a cut can signal a dull chisel. For through mortises, placing a thin piece of wood between the workpiece and the table is recommended to prevent "chip-out" and protect the table, a practical tip for maintaining both the workpiece quality and the machine's condition.
| Type | Miter Saw |
|---|---|
| Weight | 30 lbs |
| Voltage | 120V |
| Amperage | 15 A |
| Blade Size | 10 inches |
| Motor Power | 15 amps |
| Power Source | Corded |
| No Load Speed | 5000 RPM |