11
Ceiling Height Allowable Distance Between
Marks
2.5 m (8’) 1.5 mm (1/16”)
3 m (10’) 2.0 mm (3/32”)
4 m (14’) 2.5 mm (1/8”)
6 m (20’) 4.0 mm (5/32’’)
9 m (30’) 6.0mm (1/4’’)
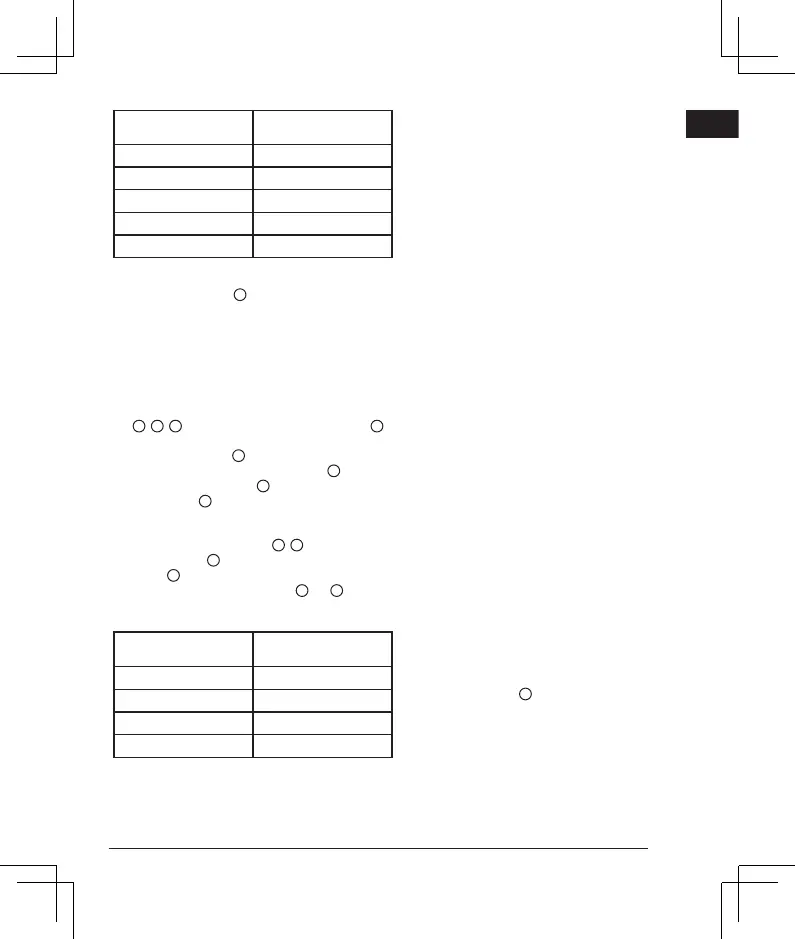
Checking 30º Accuracy Between Vertical Beams
(DCE089R/G) (See Figure
9
)
Checking 30º accuracy requires an open oor area at least 10m
x 5m (33’ x 18’). Refer to Figure 9 for the position of the laser at
each step and for the location of the marks made at each step.
Always mark the center of the beams’ thickness.
1. Set up the laser in one corner of the oor and turn on the
side vertical beam.
2. Mark the center of the beam at three locations
(
a
,
b
,
c
)on the oor along the side laser line. Mark
b
should be at the midpoint of the laser line.
3. Move the laser to mark
b
and turn on both vertical beams.
4. Position the beam crossing precisely at mark
b
, with the
side beam aligned with mark
c
.
5. Mark a location
d
along the front vertical beam at least 5m
(18’) away from the unit.
6. Rotate the laser cross over mark b so that the side vertical
beam now passes through mark
b
,
d
.
7. Mark the location
e
where the side vertical beam passes
by mark
d
.
8. Measure the distance between marks
d
and
e
. If the
measurement is greater than the values shown below, the
laser must be serviced at an authorized service center.
Distance from A to B Allowable Distance Between
Marks
4 m (14’) 3.5 mm (5/32”)
5 m (17’) 4.5 mm (3/16”)
6 m (20’) 5.5 mm (7/32”)
7 m (23’) 6.0mm (1/4’’)
Troubleshooting
The Laser Does Not Turn On
• Make sure AA batteries (when used) are installed correctly
according to (+) and (–) on the inside of the battery door.
• Make sure the batteries or rechargeable pack are in proper
working condition. If in doubt, try installing new batteries.
• Make sure that the battery contacts are clean and free of
rust or corrosion. Be sure to keep the laser level dry and use
only new, high-quality, name brand batteries to reduce the
chance of battery leakage.
• If the laser unit is heated above 50 ˚C (120 ˚F), the unit will
not turn on. If the laser has been stored in extremely hot
temperatures, allow it to cool. The laser level will not be
damaged by pressing the on/off button before cooling to its
proper operating temperature.
The Laser Beams Flash
The lasers are designed to self-level up to an average of
4° in all directions If the laser is tilted so much that the
internal mechanism cannot level itself, the laser beams will
ash indicating that the tilt range has been exceeded. THE
FLASHING BEAMS CREATED BY THE LASER ARE NOT
LEVEL OR PLUMB AND SHOULD NOT BE USED FOR
DETERMINING OR MARKING LEVEL OR PLUMB. Try
repositioning the laser on a more level surface.
The Laser Beams Will Not Stop Moving
The laser is a precision instrument. Therefore, if it is not
positioned on a stable (and motionless) surface, the laser will
continue to try to nd level. If the beam will not stop moving, try
placing the laser on a more stable surface. Also, try to make
sure that the surface is relatively at, so that the laser is stable.
The Battery Meter Led’s Flash
When all 4 LED’s continuously ash on the Battery Meter
this indicates that the unit has not been fully powered off using
the Pendulum Lock switch
B
. The Pendulum Lock switch
should always be placed in the LOCKED/OFF position when the
laser is not in use.
 Loading...