14
English
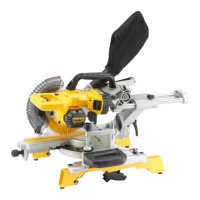
Lock Down Pin (Fig. 1)
WARNING: The lock down pin should be used ONLY when
carrying or storing the saw. NEVER use the lock down pin for
any cutting operation.
To lock the saw head in the down position, push the saw head down, push
the lock down pin (W) in and release the saw head. This will hold the saw
head safely down for moving the saw from place to place. To release, press
the saw head down and pull the pin out.
OPERATION
Instructions for Use
WARNING: Always observe the safety instructions and
applicable regulations.
WARNING: To reduce the risk of serious personal
injury, turn tool off and disconnect battery pack before
making any adjustments, performing any cleaning or
maintenance, or removing/installing attachments or
accessories. An accidental start-up can cause injury.
WARNING: To ensure the blade path is clear of obstructions,
always make a dry run of the cut without power before making
any cuts on the workpiece.
Proper Body and Hand Position (Fig.7A–7D)
WARNING: To reduce the risk of serious personal injury,
ALWAYS use proper hand position as shown in Fig.7A and
7B.
WARNING: To reduce the risk of serious personal injury,
ALWAYS hold securely in anticipation of a sudden reaction.
• Add clamps to support the workpiece whenever possible.
• Never place hands near cutting area. Place hands no closer than
100mm (4") from the blade.
• Hold the workpiece tightly to the table and the fence when cutting.
Keep hands in position until the trigger has been released and the
blade has completely stopped.
• ALWAYS MAKE DRY RUNS (UNPOWERED) BEFORE FINISH CUTS
SO THAT YOU CAN CHECK THE PATH OF THE BLADE. DO NOT
CROSS HANDS, AS SHOWN IN FIGURES 7C AND 7D.
• Keep both feet firmly on the floor and maintain proper balance. As you
move the mitre arm left and right, follow it and stand slightly to the side
of the saw blade.
• Sight through the guard louvers when following a pencil line.
Trigger Switch (Fig. 8)
To turn the saw on, push the lock-off lever (R) to the left, then depress the
trigger switch (A). The saw will run while the switch is depressed. Allow
the blade to spin up to full operating speed before making the cut. To turn
the saw off, release the switch. Allow the blade to stop before raising the
saw head. There is no provision for locking the switch on. A hole (AJ) is
provided in the trigger for insertion of a padlock to lock the switch off.
Your saw is not equipped with an automatic electric blade brake, but the
saw blade should stop within 5 seconds of trigger release. This is not
adjustable. If the stop time repeatedly exceeds 5 seconds, have the tool
serviced by an authorised DeWALT service centre.
Always be sure the blade has stopped before removing it from the kerf.
Dust Extraction (Fig. 1, 9)
WARNING: To reduce the risk of serious personal
injury, turn tool off and disconnect battery pack before
making any adjustments, performing any cleaning or
maintenance, or removing/installing attachments or
accessories. An accidental start-up can cause injury.
WARNING: Certain dust, such as oak or beech dust, is
considered carcinogenic, especially in connection with
wood-treatment additives.
- Always use dust extraction.
- Provide for good ventilation of the work space.
- It is recommended to wear an appropriate respirator.
Your saw has a built-in dust port (N) that allows either the supplied dust bag
(AK) or a shop vacuum system to be connected.
WARNING: The guard bracket must be returned to its original
full down position and the guard bracket screws tightened
before activating the saw. Failure to do so may prevent the
guard from closing or may allow the guard to contact the
spinning saw blade resulting in damage to the saw and severe
personal injury.
Transporting the Saw (Fig. 1)
WARNING: To reduce the risk of serious personal
injury, turn tool off and disconnect battery pack before
making any adjustments, performing any cleaning or
maintenance, or removing/installing attachments or
accessories. An accidental start-up can cause injury.
WARNING: To reduce the risk of serious personal injury, always
lock the rail lock knob (T), mitre lock knob (E), bevel lock knob
(L) and lock down pin (W) before transporting saw. (Refer to
Figure 1.)
In order to conveniently carry the mitre saw from place to place, a lifting
handle (O) has been included on the top of the saw arm and side handles
(J) on the base, as shown in Figure 1.
Storage of Mitre Saw
The mitre saw must be stored in a dry place and locked up securely, out of
reach of children or untrained persons.
FEATURES AND CONTROLS
WARNING: To reduce the risk of serious personal
injury, turn tool off and disconnect battery pack before
making any adjustments, performing any cleaning or
maintenance, or removing/installing attachments or
accessories. An accidental start-up can cause injury.
Use of XPS
TM
LED Worklight System (Fig. 1)
WARNING: Do not stare at operating lamp.
NOTE: The battery must be charged and connected to the mitre saw.
The XPS
TM
LED Worklight System can be turned on by the momentary
switch (Q). The light will automatically turn off within 20 seconds if the saw
is not in use. The light is also activated automatically every time the tool's
main trigger (A) is pulled.
To cut through an existing pencil line on a piece of wood, turn on the XPS
TM
worklight system using the momentary switch (Q) (not with the main trigger),
then pull down on the operating handle (B) to bring the saw blade close to
the wood. The shadow of the blade will appear on the wood. This shadow
line represents the material that the blade will remove when performing a
cut. To correctly locate your cut to the pencil line, align the pencil line with
the edge of the blade’s shadow. Keep in mind that you may have to adjust
the mitre or bevel angles in order to match the pencil line exactly.
Your saw is equipped with a battery fault feature. The XPS
TM
worklight
begins to flash when the battery is near the end of its useful charge, or
when the battery is too hot. Charge the battery prior to continuing cutting
applications. Refer to Charging Procedure under Important Safety
Instructions for All Battery Packs for battery charging instructions.
Mitre Lock Knob (Fig. 1, 10)
The mitre lock knob (E) allows you to mitre your saw to 48° right and 48°
left. The mitre latch will automatically locate at 10˚, 15˚, 22.5˚, 31.62˚ and 45˚
both left and right.
Bevel Lock Knob (Fig. 1, 12)
The bevel lock allows you to bevel the saw 48° to the left. To adjust the
bevel setting, turn the bevel lock knob (L) anticlockwise to loosen. To
tighten, turn the bevel lock knob clockwise.
Rail Lock Knob (Fig. 1)
The rail lock knob (T) allows you to lock the saw head firmly to keep it from
sliding on the rails. This is necessary when making certain cuts or when
transporting the saw.
 Loading...