GB
- 16 -
ries of any kind caused as a result of this.
Please note that our equipment has not been de-
signed for use in commercial, trade or industrial
applications. Our warranty will be voided if the
machine is used in commercial, trade or industrial
businesses or for equivalent purposes.
4. Technical data
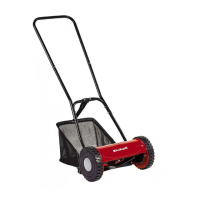
GC-HM 300
Working width: ............................................30 cm
Cutting height: ..................................... 13-37 mm
Weight: .......................................................6,5 kg
GC-HM 400
Working width: ............................................40 cm
Cutting height: ..................................... 13-37 mm
Weight: .......................................................7,2 kg
5. Before starting the equipment
Warning! Wear safety gloves whenever you carry
out any assembly or maintenance work.
5.1 Mower assembly
Fig. 3: Screw the push bar top section (12) to the
two push bar extensions (13). Use the two screws
M6x25 (19) and two hexagonal nuts M6 (20) for
this purpose.
Fig. 4: Screw push bar bottom section A (14),
push bar bottom section B (15) and the two push
bar extensions (13) together. Use four screws size
M6 x 30 (18), two screws size M6 x 25 (19) and
hexagonal nuts size M6 (20).
Fig. 5: First attach one push bar bottom section
to the mower, then press the push bar together
slightly and attach the other side.
5.2 Grass box assembly (Fig. 6 / 7)
A. Push the bar frame into the grass box tube.
B. Snap the side fastening lugs on the grass box
over the bar frame.
C. Snap the bottom fastening lug on the grass
box over the bar frame.
5.3. Attaching the grass box
Attach the assembled grass box to the roller. The
grass box must also be secured to the push bar
using the belt supplied (see Fig. 1).
6. Operation
6.1. Adjusting the cutting height (Fig. 8)
Four diff erent cutting heights can be set between
a range of 13-37 mm. To do so, pull the spring-
loaded bolts (A) on both sides of out and then
engage them in the required holes.
6.2 Operation
It is recommended that you overlap the mowing
swaths.
Only use a sharp blade that is in good condition.
This will prevent the grass blades from fraying
and the lawn from turning yellow.
Try to mow in straight lines for a nice, clean look.
The swaths should overlap each other by a few
centimeters in order to avoid stripes.
For a well-groomed look, we recommend a grass
height of 3 - 4 cm after mowing for normal home
lawns and 1.5 – 2.5 cm for ornamental lawns. The
use of a cylinder lawn mower can help achieve
improved cutting results specifi cally on ornamen-
tal lawns. Mow your lawn 1 – 2 times a week. We
recommend that normal home lawns should be
mowed when the grass is 6 – 7 cm high, orna-
mental lawns when the grass is 3 - 4 cm high.
Irrespective of the recommended cutting height,
the lawn should only be reduced by one third of
the current height each time it is mowed. Before
the onset of the fi rst frost, the lawn should be re-
duced to its recommended height. Only ever mow
the lawn when it is as dry as possible in order to
achieve perfect cutting results. To ensure that it
can be cut cleanly, the grass should never be over
10 cm high. The mower has a freewheeling facility
for when it is pulled back.
Always mow along inclines (not up and down).
You can prevent the lawn mower from slipping
down by holding a position at an angle upwards.
Select the cutting height according to the length
of the grass. Make several passes so that no
more than 4cm of grass are cut at one time.
Switch off the motor before doing any checks on
the blade. Keep in mind that the blade continues
to rotate for a few seconds after the motor has
Anl_GC_HM_400_300_SPK9.indb 16Anl_GC_HM_400_300_SPK9.indb 16 14.07.2020 10:42:4014.07.2020 10:42:40
 Loading...