5.
4 WORK QUALITY
•
Before carrying out any work, stop the machine.
•
If the products have not been cleared properly, check that:
- the ejector is fi tted correctly,
- the products in the receiving bowl are not blocking the outlet,
- there is not an accumulation of products in the cutting cham-
ber,
- there are no foreign bodies or broken cutting elements inside
of the cutting chamber.
•
If the quality of the cut is not satisfactory, check:
- the direction of rotation (anti-clockwise viewed from
above),
- that the correct cutting equipment has been chosen (see
§3.2),
- the condition of the cutting equipment (see § 6.2),
- the choice of the feed hopper (see § 3.4),
- the way that the products are placed in the feed hopper (see §
3.4).
If the problem persists, contact the service department of
your local dealer.
Maintenance
ATTENTION!!
Unplug the machine before carrying out any operation.
Maintenance may only be carried out by a qualifi ed, trained and authorised person.
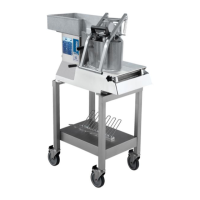
6.1 MECHANICAL PARTS
•
The vegetable cutter requires a minimum amount of mainte-
nance (the motor and the mechanical part bearings are greased
for life).
•
It is recommended to check the tension and wear of the belt
at least once a year.
In order to check it, proceed as follows:
- Unplug the machine,
- remove the TR 260 from its table (4 screws - 19 mm spanner)
or unscrew the four feet (TR 260 without table) and lie it on its
side,
- remove the central screw and remove the bottom plate.
•
To change or tension the belt:
- Unscrew (by 2 turns max.) the 4 retaining screws of the motor
mounting (13 mm spanner).
- Lightly unscrew the tensioning screw on the left hand side and
the locknut (10 mm fl at spanner) until the belt is loose on the
pulleys.
- Push the driven pulley hard with your right hand in order to
give the belt its initial tension.
- At the same time, tighten the tensioning screw with your left
hand (no tool required).
- Measure the distance between centres of the two pulleys.
- Tighten the tensioning screw by 4 turns using a spanner, which
corresponds to an increase of around 3 mm of the distance
between centres.
- Tighten the tensioning screw lock nut and the four motor
mounting retaining screws.
- Remove any belt dust from the inside of the housing.
- Check the condition of the electrical connections.
- Refi t the bottom plate, the central screw, the four feet or the
four table attachment screws.
•
Periodically:
- Grease the cutting equipment drive shaft with liquid paraffi n.
6.2 MAINTENANCE OF THE CUTTING EQUIPMENT
•
C slicing discs: sharpening of the blades
- Remove the attachment screws.
- Sharpen with a grindstone, keeping the blade at the same
angle.
•
AF slicing discs:
- The blades are sharpened in the same way as those of the C
slicing discs (see above).
- The blade blocks are interchangeable.
•
AM grids:
The blades may not be changed as they are moulded.
- If necessary, sharpen using a small fi le to repair any damage
caused to the blades by a shock or impact.
•
J/P/K graters:
The graters cannot be re-sharpened.
- In the case of major wear of the grater teeth, change the
cutter.
6.3 ADJUSTMENT OF THE SAFETY DEVICES
•
Check that the safety devices are operating correctly prior to
each use. The motor should stop within less than 2 seconds.
- When the lid is opened, dimension E at 18 mm max,
- when the feed arm is opened, if the gap F is at maximum 60
mm from the edge of the feed hopper.
• If any one of the three safety devices does not work:
- do not use the machine
- have it adjusted by the service department of your local dealer.
7 TR260 GB 10 07
 Loading...