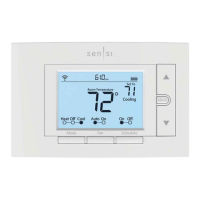
7
THERMOSTAT SCHEDULE / PROGRAMMING
Energy Saving Factory Schedule
This thermostat is programmed with the energy saving settings shown in the table below for
all days of the week.
Wake Leave Return Sleep
Heating Schedule
6:00 AM - 70°F 8:00 AM - 62°F 5:00 PM - 70°F 10:00 PM - 62°F
Cooling Schedule
6:00 AM - 75°F 8:00 AM - 83°F 5:00 PM - 75°F 10:00 PM - 78°F
Note: Thermostat can be programmed on or o the subbase
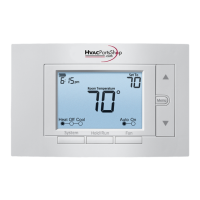
Modify the Heating Schedule
1.) Use the System button to select Heat
2.) Press Menu
3.) Use the button to select Schedule and press Next to enter the schedule
4.) The time icons will ash – use or to set the time for the start of a period
5.) Press Next – the set point icons will ash – use or to set the temperature for the
current period
6.) Continue to press Next to advance through all periods (Wake, Leave, Return, Sleep)
for all days of the week.
Note: Press Back to return to the previous setting. Once all days of the week have been
programmed the thermostat will display End. Press Exit at any time to save changes and
return to home screen.
Modify the Cooling Schedule
1.) Use the System button to select Cool
2.) Repeat steps 2-6 from the heating schedule
Symptom Possible Cause Corrective Action
No Heat/
No Cool/
No Fan
(common problem)
1.) Blown fuse or tripped circuit
breaker
2.) Furnace power switch to OFF
3.) Furnace blower compartment
door panel loose or not properly
installed
4.) Loose connection to thermostat
or system
1.) Replace fuse or reset breaker
2.) Turn switch to ON
3.) Replace door panel in proper position to
engage safety interlock or door switch
4.) Tighten Connections
No Heat
1.) System not set to Heat
2.) Loose connection to thermostat
or system
3.) Heating System requires
service or thermostat requires
replacement
1.) Set thermostat to Heat.
2.) Verify thermostat and system wires are
securely aached.
3.) Diagnosc: Set System to Heat and raise the
setpoint above room temperature. Within ve
minutes the thermostat should make a so click
sound and “Heat On” should appear on display.
This sound indicates the thermostat is operang
properly. If the thermostat does not click, try the
reset operaon listed below. If the thermostat
does not click aer being reset, contact your
heang and cooling service person or place of
purchase for a replacement. If the thermostat
clicks, contact the furnace manufacturer or a
service person to verify the heang system is
operang correctly.
(Troubleshooting continued on next page)
TROUBLESHOOTING
7
PROGRAMMATION DU THERMOSTAT
Programmation d’usine d’économie d’énergie
Ce thermostat est fourni avec les réglages écoénergétiques gurant dans le tableau ci-dessous pour tous
les jours de la semaine.
Réveil Départ Retour Sommeil
Horaire de chauage
6 h – 21 °C (70 °F) 8 h – 17 °C (62 °F) 17 h – 21 °C (70 °F) 22 h – 17 °C (62 °F)
Horaire de
climatisation
6 h – 24 °C (75 °F) 8 h – 28 °C (83 °F) 17 h – 24 °C (75 °F) 22 h – 26 °C (78 °F)
Remarque : Le thermostat peut être programmé avec ou sans la sous-base.
Modication de l’horaire de chauage
1.) Appuyez sur le bouton System pour sélectionner la position Heat (chauage).
2.) Appuyez sur Menu.
3.) Utilisez le bouton pour sélectionner Schedule (horaire) et appuyez sur Next pour accéder à l’horaire.
4.) Les icônes d’heure clignoteront – utilisez ou pour régler l’heure de démarrage d’une période.
5.) Appuyez sur Next – les icônes de point de consigne clignoteront – utilisez ou pour régler la
température pour la période actuelle.
6.) Continuez d’appuyer sur Next pour alterner entre les périodes (Réveil, Départ, Retour, Sommeil) pour
tous les jours de la semaine.
Remarque : Appuyez sur Back (Précédent) pour revenir au réglage précédent. Une fois tous les jours de la
semaine programmés, le thermostat achera End (Fin). Appuyez sur Exit (Quitter) en tout temps
pour sauvegarder les changements et retourner à l’écran d’accueil.
Modication de l’horaire de climatisation
1.) Appuyez sur le bouton System pour sélectionner la position Cool (climatisation).
2.) Répétez les étapes 2 à 6 de l’horaire de chauage.
Problème Cause possible Mesure corrective
Chauage,
climatisation ou
ventilateur non
fonctionnels
(problème courant)
1.) Fusible grillé ou disjoncteur déclenché.
2.) Interrupteur de marche/arrêt de la
fournaise en position arrêt (OFF).
3.) Porte ou panneau du compartiment du
ventilateur de l’appareil de chauage
desserré ou installé incorrectement.
4.) Branchement desserré sur le
thermostat ou le système.
1.) Remplacez le fusible ou réenclenchez le disjoncteur.
2.) Placez l’interrupteur à la position marche (ON).
3.) Remettez la porte ou le panneau en place pour
enclencher le verrou de sécurité ou le commutateur
de la porte.
4.) Serrez les connexions.
Chauage non
fonctionnel
1.) Sélecteur du système non réglé sur le
chauage.
2.) Branchement desserré sur le
thermostat ou le système.
3.) Entretien de l’appareil de chauage ou
remplacement du thermostat requis.
1.) Réglez le thermostat à Heat.
2.) Vériez que le thermostat et les ls du système sont bien
serrés en place.
3.) Diagnosc : Réglez le sélecteur système à Heat
(chauage) et haussez le point de consigne au-dessus
de la température ambiante. Le thermostat devrait
émere un léger déclic dans les cinq minutes et
« Heat On » devrait apparaître à l’achage. Ce bruit
indique que le thermostat fonconne correctement. Si le
thermostat n’émet pas de déclic, eectuez l’opéraon de
réinialisaon décrite précédemment. Si le thermostat
n’émet toujours pas de déclic après la réinialisaon,
communiquez avec un spécialiste du chauage ou de
la climasaon ou le magasin où vous avez acheté
le thermostat pour demander un remplacement. Si
le thermostat émet un déclic, communiquez avec le
fabricant de la fournaise ou un technicien pour vérier si
le chauage fonconne correctement.
(suite du dépannage à la page suivante)
DÉPANNAGE
• Verrouillage du clavier – An d’empêcher les changements indésirables, les boutons peuvent être
désactivés. Pour activer cette fonction, gardez et le bouton Menu enfoncés jusqu’à ce que l’icône
s’ache (cette option peut aussi être activée dans le menu). Pour la désactiver, gardez et le bouton
Menu enfoncés durant 3 secondes.
For tips on programming your thermostat to receive
optimal comfort, convenience and energy savings go to:
thermostathelper.com
 Loading...