© 2015 Seiko Epson Corporation.
All rights reserved.
Printed in XXXXXX
Windows
https://www.epsonconnect.com/
A B C D
E F G H I J
EN
Start Here
HI
Read This First
This printer requires careful handling of ink. Ink may splatter when the ink
tanks are lled or relled with ink. If ink gets on your clothes or belongings, it
may not come o.
,
c
Important; must be observed to avoid damage to your equipment.
;
1
Contents may vary by location.
Q
O Do not open the ink bottle package until you are ready to ll the
ink tank. The ink bottle is vacuum packed to maintain its reliability.
O Even if some ink bottles are dented, the quality and quantity of ink
are guaranteed, and they can be used safely.
O
O
,
2
Do not connect a USB cable unless
instructed to do so.
USB
Windows
Insert the CD and follow the on-screen
instructions to nish the setup process.
CD
Q
If the Firewall alert appears, allow access for Epson applications.
, Epson
Windows (No CD/DVD drive)
Mac OS X
iOS / Android
No PC
Proceed to the next step (Section 3).
( 3)
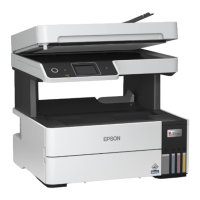
3
A
Remove all protective materials.
c
Never place the printer vertically even when storing or transporting it;
otherwise, ink may leak.
,
; ,
B
For Australia and New Zealand Users
Connect a phone cable.
See the User’s Guide (PDF) for more details.
(PDF)
Except for Australia and New Zealand Users
Connect a phone cable to a telephone wall jack and to the LINE port
on your product.
See the User’s Guide (PDF) for more details.
LINE
(PDF)
C
Open and remove.
c
O Use the ink bottles that came with your printer.
O Epson cannot guarantee the quality or reliability of non-genuine
ink. The use of non-genuine ink may cause damage that is not
covered by Epson’s warranties.
O
O Epson
Epson
D
Snap o, remove, and then close tightly.
,
E
Fill each tank with the correct ink color. Use all of the ink in the bottle.
Q
Install.
F
Close securely.
G
Repeat steps C to F for each ink bottle.
C F
H
Close.
I
Connect and plug in.
J
Turn on.
K
Select a language, country and time.
,
L
When the message of seeing the
setup manual is displayed, press OK
for 3 seconds.
, OK 3
M
Conrm that the tanks are lled with ink, and then press x to start
charging ink. Charging ink takes about 20 minutes.
x
20
N
Load paper in the paper cassette with the printable side facing down.
O
Set the paper size and paper type.
P
Press u to set up the fax, or press d to set it up later.
u ,
d
Q
Visit the website to start the setup process, install software or
applications, and make network settings.
,
Windows (No CD/DVD drive)
Mac OS X
iOS / Android
Epson Connect
Using your mobile device, you can print from any location worldwide to your
Epson Connect compatible printer. Visit the website for more information.
,
Epson Connect
Guide to Control Panel
A
Turns the printer on or o.
B
Displays the home screen.
C
Enter the last dialed number or enter a pause when entering a fax number.
D
Stops the current operation.
E
Press l, u, r, and d to select menus. Press OK to conrm your selection or
run the selected feature.
l, u, r, d
OK
F
Returns to the previous screen.
G
Enters numbers, characters, and symbols.
,
H
Opens the contacts list.
I
J
Starts printing, copying, scanning, and faxing.
, ,
Copying
A
Open the document cover.
B
Place the original, and then close
the cover.
,
C
Select Copy.
D
Press the u and d buttons to enter the number of copies.
u d
E
Press the OK button. Select Layout, and then select the appropriate
layout.
OK
F
Press the d button, and then make other settings as necessary.
d ,
G
Press x to start copying.
x