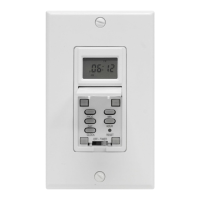
Digital Timer
Models: 15042, 15089, and 15079
Install Set Up:
1. Ifthetimescreeniscompletelyblankitwillneedtobepluggedintoanoutlet
beforeprogrammingcanbegin.Ifthescreenisdisplayingnumbers,itcanbe
programmedandpluggedintothewallafterwards.
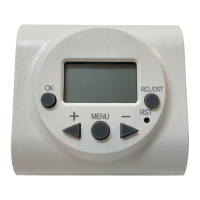
2. Beforeprogramming,allsettingsshouldbereset.Theresetbuttonislocated
justbelowthe“HOUR”buttonandisidentiedbyan“R”.Useapaperclipor
ballpointpentopushthe“R”button.Oncepushedthescreenwillshowthe
displaybelowonthescreen.See Diagram A
Diagram A After few seconds
Current Time Setting:
1. Keepthe“CLOCK”buttonpressedduringtheentiresettingoperation.
2. Pressthe“HOUR”buttontosetthehours.
3. Pressthe“MIN”buttontosettheminutes.
4. Pressthe“DAY”buttontoselectthecorrectdayoftheweek.
5. Releasethe“CLOCK”button.Thetimewillnowbeset!
Programming the On/Off Times:
1. Pressthe“SET”buttononce.DiagramBshouldappear.
2. 1ON--:--Shouldbetherstsetting.Thereareatotalof20On/Offsettings.
Diagram B
3. Pressthe“HOUR”andMIN”buttonstosettheONtime.
4. Pressthe“DAY”buttontoselecttheday(s)thatthissettingisrelevant.
5. Pressthe“SET”buttontosaveandproceedtothe1OFF--:--screen.
6. Repeatsteps3,4,and5tosettheOFFtime.Pressingthe“SET”buttonagain
willtakeyouthroughtheother19ON/OFFsettings.
Multiple Weekday Switching Groups:
Apartfromindividualweekdays,pressingthe“DAY”buttonalsoselectsmultiple
daycombinationssuchas:
‧MondaythruFriday ‧Tuesday&Thursday&Saturday
‧Saturday&Sunday‧MondaythruWednesday.
‧MondaythruSaturday‧ThursdaythruSaturday.
‧Monday&Wednesday&Friday‧MondaythruSunday.
Afterselectingaparticulardaycombination,theON/OFFselectionwillbein
effectonthedaycongurationselectedfromabove.
Restart Button:
1. Pressthe“SET”buttontoselecttheON/OFFsettingthatneedstobechanged
2. Pressthe“
”buttontoresetthecurrentON/OFFsettingseeninDiagramC
withouthavingtoscrollthroughallthehours.
Diagram C Current time display
Switching Mode Indication:
Theactualmodeisshowninthedisplayas“ON”,“AUTOON”,“OFF”or
“AUTOOFF”togetherwiththetimeofday.Usethe“MANUAL”buttontoadjust
thistothedesiredsetting.Thiscanbeusedtooverridethetimerasexplained
below.
Manual Override Option:
Independentoftheprogramming,itispossibleatanygiventimetoadvanceto
thenextswitchingcommandbycontinuouslypressingthekey“MANUAL”,as
shownbelow:
ON=AlwaysON;
OFF=AlwaysOFF;
AUTOON=TimerisONandON/OFFprogramisactivated.
AUTOOFF=TimerisOFFandON/OFFprogramisactivated.
Programming the Countdown Feature:
1. Pressthe“SET”buttonrepeatedlyuntiltheCTDiconappearsonthedisplay.
RefertoDiagramD
2. Pressthe“HOUR”,“MIN”buttonstosettheamountoftimedesiredforthe
devicetobeonbeforeturningoff.
3. Pressthe“CLOCK”buttontostorethesettingandreturntothemaindisplay.
Diagram D
Activating the Countdown Feature:
1. Pressthe“HOUR”and“MIN”buttonsimultaneouslytoactivatethe
countdownfeature.RefertoDiagramEformoredetails
2. OtherFeaturesoftheCountdown
a. Pressthe“MANUAL”buttontopauseorcontinuethecountdown.
b. Pressthe“CLOCK”buttontoswitchbetweentheclockandcountdown
display.
c. Press“HOUR”and“MIN”buttonsimultaneouslytodeactivatethe
countdown.
Diagram E
Random, ON/OFF Setting:
1. Pressthe“HOUR”buttonfor3secondstoactivatetherandomfeature.The
displaywillshowtheRNDicon.SeeDiagramF.
2. Pressthe“HOUR”buttonfor3secondstodeactivatetherandomfeature.The
displaywillnotshowtheRNDicon.
Diagram F
Summer Time Feature (DST):
Pushthe“CLOCK”buttonfor3secondstoadvancethecurrenttime1hour,+1h
iconshouldappearonthedisplay.Repeatingthisprocesswilldecreasethetime
by1hourandthe+1hiconwilldisappear.RefertoDiagramG
Diagram G
Power Back Up Feature:
Intheeventofapowerfailure,thetimerwillretainitssettingsforanestimated3
monthsassumingthepowerbackupisfullycharged.
HOUR + MIN
HOUR + MIN
MANUAL
CLOCK
Hour
Current time display
End of countdown ON
Countdown pause
Show current time
Clock
OFFAUTO ONONAUTO OFF
If your Timer looks like this,
use the following instructions
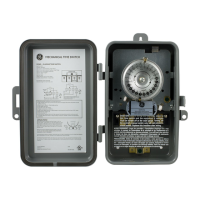
If your Timer does not look like
this, go to the previous page
 Loading...