Installation
Microwave Oven
Instructions
Built-In Trim Kits
1
❒ BEFORE YOU BEGIN
Read these instructions completely and carefully.
•
IMPORTANT — Save these instructions
for local inspector’s use.
•
IMPORTANT — Observe all governing codes and
ordinances.
•
Note to Installer – Be sure to leave these instructions with
the Consumer.
• Note to Consumer – Keep these instructions for future
reference.
• Skill level – Installation of this appliance requires basic
mechanical and electrical skills.
• Completion time –
1 to 3 hours
• Properinstallationistheresponsibilityoftheinstaller.
• Productfailureduetoimproperinstallationisnotcovered
undertheWarranty.
• Thiskitisforuseonmodels:
PEM10SFC,PEM10BFC,PEM10WFCandCEM11SFC
• Donotalterormodifyanypartofthiskitortheoven.
• Foreasierinstallationandpersonalsafety,we
recommend that two people install this microwave oven.
• Unplugthemicrowaveovenbeforeattemptinginstallation
of this kit.
WARNING —Thisovenmustbepluggedintoa
properlygrounded3-hole,120voltreceptacleasrequiredby
theNationalElectricalCode.
Questions? Call 1-800-561-3344 or Visit our Website at: GEAppliances.ca
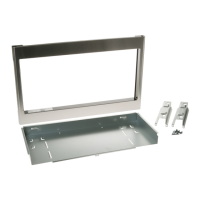
PARTS INCLUDED
PART QUANTITY
❒ BasePan 1
❒ Rail 2
❒ TrimKit 1
❒ 4mmx10mm 11required
Screw A 3 extra
❒ 4 mm x 16 mm 4 required
ScrewB 2extra
NOTE: Thiskithasextrascrewstopreventthetechnician
from spending extra time locating a replacement in case
theyloseoneduringinstallation.
FOR YOUR SAFETY:
WARNING —Beforebeginningtheinstallation,
switch power off at service panel and lock the service
disconnecting means to prevent power from being switched
onaccidentally.Whentheservicedisconnectingmeans
cannotbelocked,securelyfastenaprominentwarning
device,suchasatag,totheservicepanel.
JX827 and JX830
1”2.5cm;1’=0.3m