EN
EN
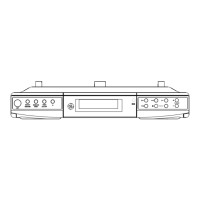
INSTANT WEATHER - Selects weather
broadcast stations given by U.S. Government
Weather Stations.
BAND / RADIO ON - Turns on radio mode, selects
radio bands.
VOL + / – - Adjusts volume.
In standby mode, selects display brightness level
(bright (normal) / dim / dimmer).
TIMER ON / OFF - Turns on/ off timer.
MEMO SET - Sets radio preset stations.
MEMO RECALL - Recalls preset radio stations.
OPEN CLOSE - Opens/Closes CD disc tray.
SET - Sets the clock time.
STOP - Stops CD disc playback.
TRACK / SEARCH / TUNE - Tunes down radio
frequency, selects the previous TV and weather
channel, selects previous CD disc tracks, searches
backwards through a track, counts backwards for
setting clock and timer.
In standby mode - shows seconds counter.
TRACK / SEARCH / TUNE - Tunes up radio
frequency, selects the next TV and weather
channel, selects next CD disc tracks, searches
forward through a track, counts forwards for
setting clock and timer.
In standby mode - shows seconds counter.
PLAY PAUSE - Turns on CD mode, starts CD
playback, pauses CD disc playback
OFF - Turns the unit off.
6
First Things First
5
EQUAL TO OR
LONGER THAN
CABINET
OVERHANG
3
/
8
" MINIMUM
3
/
4
" MAXIMUM
CABINET
OVERHANG
CABINET
BOTTOM
WASHER
SPACERS
SELECTED SCREWS WHICH MEET MINIMUM,
BUT DO NOT EXCEED MAXIMUM LENGHT.
5. Insert screws FROM INSIDE THE CABINET. The
washers must be used on metal cabinets, and
on wood cabinets if you did not countersink
the drilled holes. Position washers, flat side
down, and place screws into the holes.
If your cabinet does not have an
overhang, go to Step 7.
6. Hold screw heads down while you push the
selected spacers onto the screws under the
cabinet. Be sure to push up spacers until they
are firmly against the cabinet bottom and/or
fully nested (if more than one is used).
7. Align radio under the screws. Hold the screw
holes in the top of the clock radio against the
mounting screws and partially tighten the
screws.
Do not fully tighten until all 3 screws have
been started. (The top front edge of the clock
radio should clear the overhang.)
8. Extend cord towards electrical outlet and
secure by using the Cord Hooks to hold cord
out of the way. For most attractive
appearance, place Cord Hooks at back edge
of cabinet (on or next to wall) directly over
outlet to be used. To attach Cord Hooks, peel
off adhesive back and attach to a clean, dry
surface on underside of cabinet or back wall.
Plug Cord into 120-volt AC electrical outlet.
We recommend that the line cord be fully
extended for best FM reception.
COMPACT DISC PLAYER
OF
RADI
STERE
A
A
F
8
5
92
96
100
104
108
MH
5
3
0
6
5
0
8
0
0
1
0
0
0
1
3
0
0
1
7
0
0
k
H
z
High Performance Sub-wooferAM/FM StereoCompact DIsc Player
Spacemaker
CL
O
CK/
TI
ME
R
DIS
P
LA
Y
O
F
M
I
N
U
T
S
E
H
O
U
T
I
M
E
R
O
N
/S
E
T
S
T
O
R
E
P
E
A
T
R
A
C
S
E
A
R
C
S
H
U
F
F
L
P
L
A
Y
/
P
A
U
S
C
The Main Unit
Remote sensor
General Controls
Side View
LIGHT (HI / LO / OFF) - Slide the switch to OFF to
switch off countertop light, slide to LO for
dimmer light, and slide to HI for brighter light.
Disc Tray
 Loading...