L
lbakerJul 28, 2025
What to do if my Gravely Lawn Mower will not crank?
- SSamantha EvansJul 28, 2025
If your Gravely Lawn Mower will not crank, charge the battery or replace it.
What to do if my Gravely Lawn Mower will not crank?
If your Gravely Lawn Mower will not crank, charge the battery or replace it.
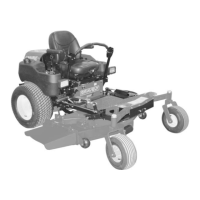
| Deck Type | Fabricated |
|---|---|
| Turning Radius | Zero-turn |
| Cutting Width | 60 inches |
| Cutting Height | 1.5 - 5 inches |
| Drive Wheel Size | 23 x 10.5 in |
Measured sound pressure level at the operator's ear during use.
Measured vibration levels transmitted to the operator during operation.
Guidance on reading and understanding the operator's manual for safe operation.
Instructions on locating and recording unit and engine model and serial numbers.
Warning against using non-Gravely parts and disclaiming liability for related issues.
Statement regarding Gravely's right to change product specifications without notice.
Importance of registering the product for warranty and service information.
Notes for customers receiving the product requiring assembly and setup.
Explanation of the safety alert symbol and its meaning for user attention.
Defines DANGER, WARNING, and CAUTION signal words used in manuals and decals.
Information on safety decals, their meaning, and proper placement on the unit.
Warning about potentially hazardous situations and resulting injury.
Explains NOTE and IMPORTANT symbols for general and specific information.
Emphasizes safe working practices, applicable rules, and laws.
Stresses the need for proper operator training before using the unit.
Procedure for safely removing the unit and components from the shipping container.
Instructions for preparing and installing the seat onto the hood frame.
Steps for correctly installing the steering levers into their operating position.
Guidance on installing the deflector, ensuring it pivots freely.
Instruction to verify and adjust tire pressure according to specifications.
Procedure to check the engine oil level, referring to the engine manual.
Steps to check the hydraulic oil level as per the manual.
Instructions for checking the engine's coolant level.
Steps for safely filling the fuel tank with the correct type and amount of fuel.
Procedure for connecting the battery after assembly.
Instructions on how to level the mower deck for optimal cutting performance.
Critical procedure to test the safety interlock system before operation.
Verifying that all unit controls operate correctly after assembly.
Details on testing and ensuring the safety interlock system is functional before operation.
Explanation of the ignition switch positions and their functions for starting the engine.
How to use the choke control for cold engine starts and warm-up.
Operation of the PTO switch to engage or disengage the mower blades.
How to adjust the throttle lever to control engine speed.
Indicates low oil pressure; requires checking engine oil level.
Displays the total hours the engine has run for maintenance tracking.
Verifying the safety interlock system's functionality as part of routine maintenance.
Inspecting the parking brake's interaction with the interlock system.
Procedure to check and adjust the parking brake for proper function.
Routine check of the hydraulic system's oil level for proper operation.
Verifying tire condition and pressure as part of the maintenance schedule.
Instructions for cleaning the unit to maintain its condition and prevent damage.
Inspecting the cooling system for debris and proper function.
Inspecting mower blades for wear, damage, and proper tightening.
Greasing key lubrication points for smooth operation and wear prevention.
Guidance on safely positioning the unit for various service tasks.
Step-by-step guide for safely removing and installing the unit's battery.
Instructions on how to safely charge the unit's battery.
Detailed procedure for removing the mower blade.
Detailed procedure for installing the mower blade.
Detailed procedure for removing the mower deck.
Detailed procedure for installing the mower deck.
How to check the hydraulic oil level and add fluid if necessary.
Procedure for draining and replacing the hydraulic oil.
Steps for replacing the hydraulic oil filter.
How to check the engine coolant level in the reservoir.
Procedure for draining and refilling the engine's cooling system.
Diagnosing and resolving issues when the engine fails to start.
Troubleshooting steps for when the engine turns over but won't run.
Identifying why the battery light may not illuminate during engine start.
Addressing the issue of the hour meter running when the engine is off.
Troubleshooting low oil pressure indicated by the warning light.
Resolving issues related to the fuel/water separator warning light.
Diagnosing and fixing engine overheating indicated by the temperature gauge.
Conditions for warranty coverage, including rental or lease usage.
Duties of the owner regarding maintenance, adjustments, and service requests.
Importance of registering the product for warranty and future communications.
Warranty coverage for separately purchased service parts and accessories.
Requirement that warranty service must be performed by an authorized dealer.
Information on the prorated warranty coverage for the unit's battery.
List of parts and conditions not covered by the manufacturer's warranty.
Legal limitations on remedies and damages related to the warranty.
Statement clarifying that no other warranties are expressed or implied.