Refer to Supplemental Information (next page) for complete descriptions of these installation steps
5-051-737-00 Rev C Page 1
FlexGuard
®
FG-1625F Glassbreak Detector Installation Instructions
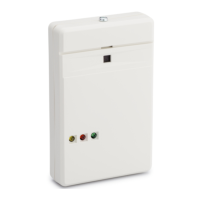
FG-1625F Glassbreak Detector
FG1625F-1
MED
LOWE
ST
LOW
MA
X
S
1
=
S
E
N
S
1
S
2
=
S
E
N
S
2
S
1
=
S
E
N
S
1
S
2
=
S
E
N
S
2
S
1
=
S
E
N
S
1
S
2
=
S
E
N
S
2
S
1
=
S
E
N
S
1
S
2
=
S
E
N
S
2
ON
1
2
ON
1
2
ON
1
2
ON
1
2
FlexGuard
R
FG-1625F
Refer to manual 0-051-737-00 Rev A
for complete wiring and installation
instructions. Protected under US patent
5,524,099. Other US patents pending
2
341
CTS 206-4
O
N
TEST
PADS
SENS 1
SENS 2
LATCH
LCD
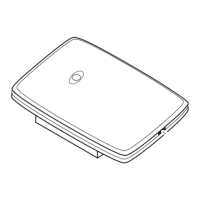
INSERT BLADE
AND TWIST
Opening FG-1625F Case
FG1625F-2
MED
LOWEST
LOW
MAX
S1 = SENS1
S2 = SENS2
S1 = SENS1
S2 = SENS2
S1 = SENS1
S2 = SENS2
S1 = SENS1
S2 = SENS2
ON
1
2
ON
1
2
ON
1
2
ON
1
2
FlexGuard
R
FG-1625F
Refer to manual 0-051-737-00 Rev A
for complete wiring and installation
instructions. Protected under US patent
5,524,099. Other US patents pending
2341
CTS 206-4
O
N
TEST
PADS
SENS 1
SENS 2
LATCH
LED
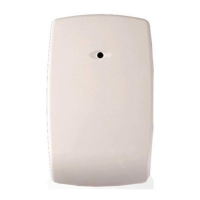
Mounting Hole
Mounting Hole
Microphone
LED Indicators
Front Cover
DIP Switch
Test Mode Pads
FG-1625F Glassbreak Detector, Front View
FG1625F-3
WIRE RESTRAINT
C
NC
V -
V +
TMPR
TMPR
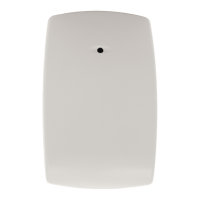
Terminal Block
Mounting Hole
Wire Restraint
Mounting Hole
FG-1625F Glassbreak Detector, Back View
Select Mounting Location
Wall Mount
(Top View)
FG1625F-4
FG1625F-5
Ceiling Mount: (Side View)
Test Location w/ 9V Battery
If uncertain about location or range, test the detector
before mounting using a 9V battery as shown:
V
+
V
9V
FG1625F-6
Set Sensitivity & LED Configuration
2341
CTS 206-4
O
N
TEST
PADS
SENS 1
SENS 2
LATCH
LED
MED
LOWEST
LOW
MAX
S1
S2
S1
S2
S1
S2
S1
S2
S1 = SENS1
S2 = SENS2
S1 = SENS1
S2 = SENS2
S1 = SENS1
S2 = SENS2
S1 = SENS1
S2 = SENS2
ON
1
2
ON
1
2
ON
1
2
ON
1
2
FlexGuard
R
FG-1625F
Refer to manual 0-051-737-00 Rev A
for complete wiring and installation
instructions. Protected under US patent
5,524,099. Other US patents pending
1
O
N
234
SENS 1
SENS 2
LATCH
LED
FG1625F-7
SENS1 & SENS2 configure sensitivity
SENSITIVITY APPROXIMATE
RANGE
SENS1 SENS2
MAX 7.6m (25 ft)
OFF OFF
MEDIUM 4.6m (15 ft)
ON OFF
LOW 3m (10 ft)
OFF ON
LOWEST 1.5m (5 ft)
ON ON
NOTE: Ranges are approximate and vary with each
room’s acoustic properties. Always verify range with an
IntelliSense FG-701 Glassbreak Simulator.
The LATCH and LED DIP switches configure LED
indicator behavior.
SWITCH OFF ON
LATCH
Red LED lights for 5
seconds during alarm
Red LED latches ON when
detector goes into alarm
1, 2
LED
LEDs disabled (except for
power up and test mode
3
)
LEDs always enabled
1
The timing of the alarm relay is not affected by the latched Alarm LED.
2
Reset the Alarm LED by removing/restoring power, or by toggling the
detector in and out of Test Mode.
3
LEDs can be enabled/disabled using FG-701.
Connect Detector
Connect detector using 18 to 22 AWG wire, with ends
stripped approximately 6mm (1/4 in.) Use the
appropriate wiring method as shown in these diagrams:
TMPR
TMPR
C
NC
V+
1625F-8
Normally Closed Loop
Tamper Loop (NC)
Control Panel Power
Normally Closed Loop/No EOL Resistor
TMPR
TMPR
C
NC
V+
1625F-9
Normally Closed
Loop w/
EOL Resistor
Tamper Loop w/
EOL resistor
Control Panel Power
Normally Closed Loop/With EOL Resistor
Install Detector
• Test location and set Sensitivity as needed.
• Mount the junction box as appropriate.
• When wiring the detector, be sure to tie-wrap
the wires to the wire restraint loop on back of
the device (as shown below).
• Mount the detector to the junction box using
the appropriate screws (not supplied).
Junction Box
FG1625F-10
WIRE RESTRAINT
C
NC
V -
V +
TMPR
TMPR
Use Tie Wrap to attach wires to Wire Restraint
Wiring Detector/Wire Restraint Loop
Junction Box
M
E
D
L
O
W
E
S
T
L
O
W
M
A
X
S1
= SENS1
S
2 = SENS2
S
1 = S
ENS1
S2 = SENS2
S1 =
S
ENS1
S2 = SENS
2
S1 = SENS1
S2 = SENS2
ON
1
2
ON
1
2
ON
1
2
ON
1
2
FlexGuard
R
FG-1625F
Refer to manual 0-051-737-00 Rev A
for complete wiring and installation
instructions. Protected under US patent
5,524,099. Other US patents pending
2341
CTS 206-4
O
N
TEST
PADS
SENS 1
SENS 2
LATCH
LED
FG1625F-11
Attaching Detector to Junction Box
Test Detector Installation
Enter Test Mode using FG-701 (see Testing the
Detector on the next page) or manually by shorting
Test Mode pads (as below). Replace cover before
testing the detector.
2341
CTS 206-4
O
N
TEST
PADS
SENS 1
SENS 2
LATCH
LED
MED
LOWEST
LOW
MAX
S1
S2
S1
S2
S1
S2
S1
S2
S1 = SENS1
S2 = SENS2
S1 = SENS1
S2 = SENS2
S1 = SENS1
S2 = SENS2
S1 = SENS1
S2 = SENS2
ON
1
2
ON
1
2
ON
1
2
ON
1
2
FlexGuard
R
FG-1625F
Refer to manual 0-051-737-00 Rev A
for complete wiring and installation
instructions. Protected under US patent
5,524,099. Other US patents pending
TEST
2341
CTS 206-4
O
N
TEST
PADS
SENS 1
SENS 2
LATCH
LED
FG1625F-12
Install Cover
Replace the cover as shown below.
M
E
D
L
O
W
E
S
T
L
O
W
M
A
X
S1 = SENS1
S2 = SENS2
S1 = SENS1
S2 = SENS2
S1 = SENS1
S2 = SENS2
S1 = SENS1
S2 = SENS2
ON
1
2
ON
1
2
ON
1
2
ON
1
2
FlexGuard
R
FG-1625F
Refer to manual 0-051-737-00 Rev A
for complete wiring and installation
instructions. Protected under US patent
5,524,099. Other US patents pending
2341
CTS 206-4
O
N
TEST
PADS
SENS 1
SENS 2
LATCH
LED
Front Cover
FG1625F-13
Engage top hooks first...
...engage bottom hooks last,
then snap cover into place.