– 2 –
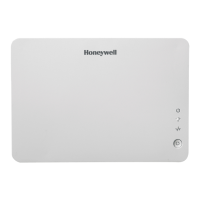
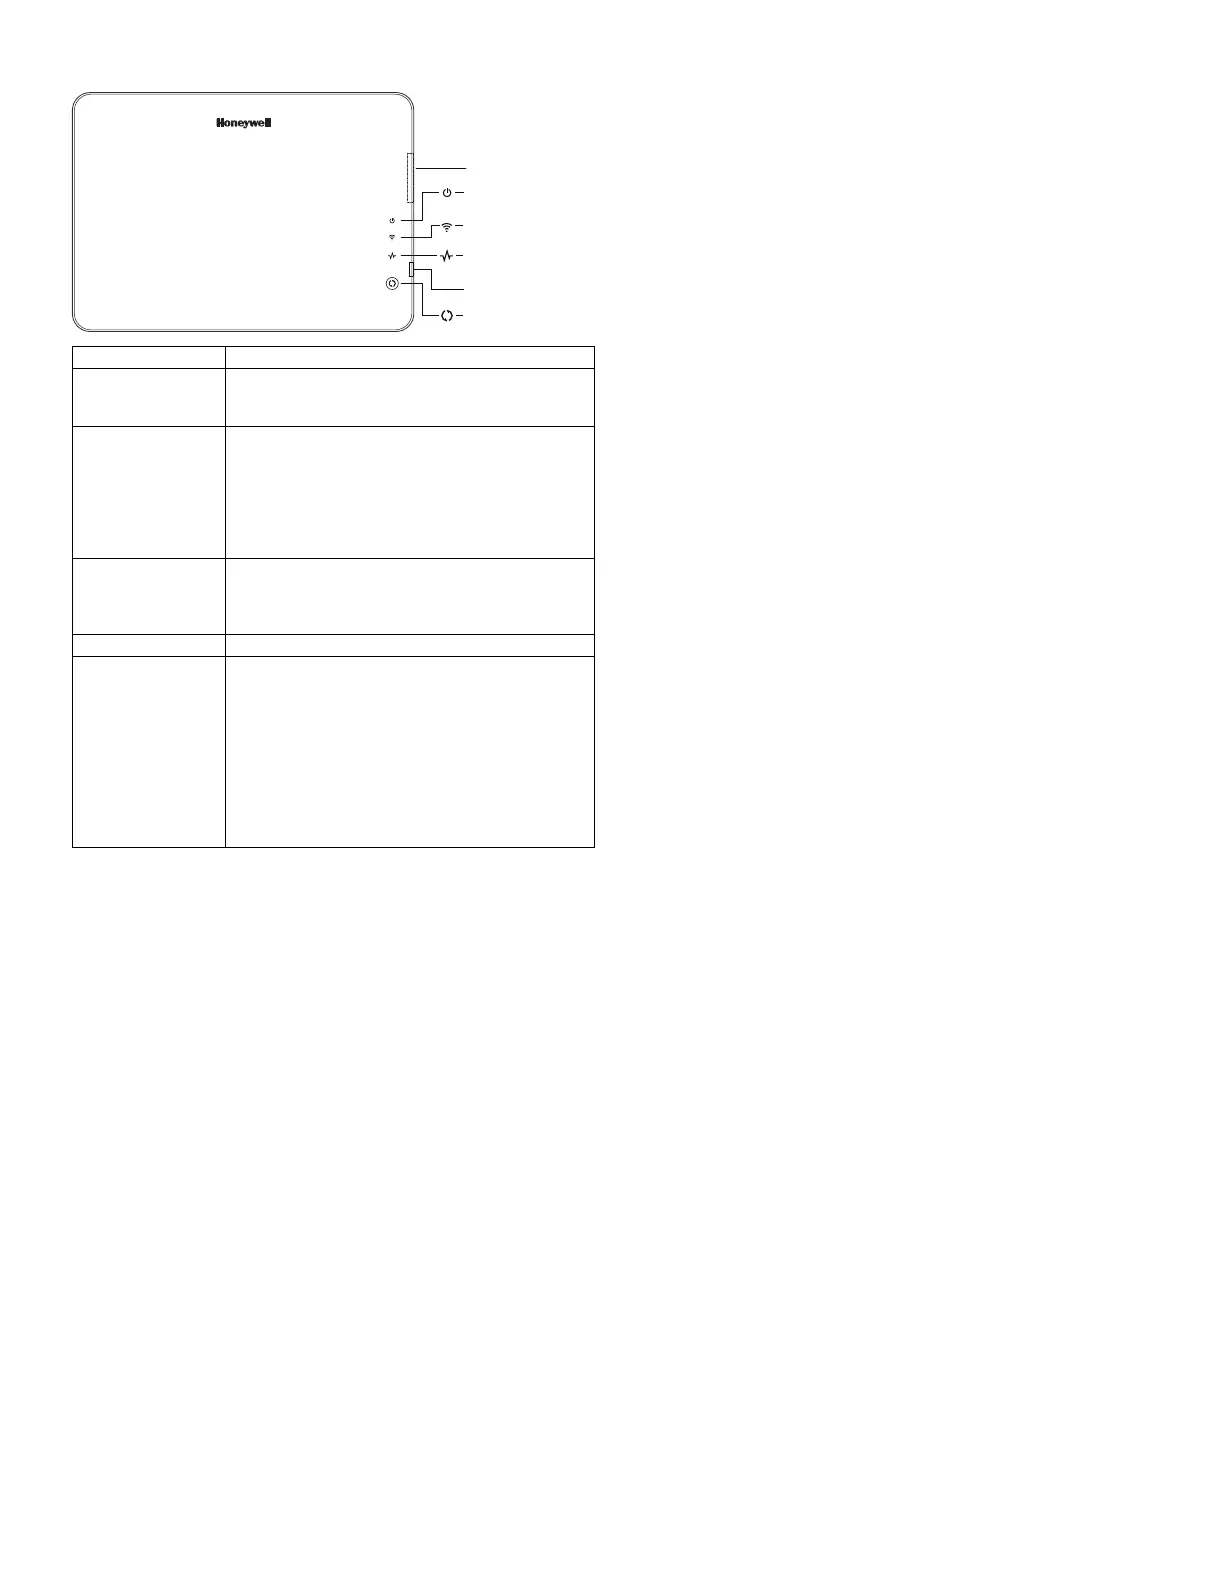
SD/SDHC Card Slot
Power Status LED
(Green)
Network Status LED
(Blue)
Operation Status LED
(Yellow)
Reset Button
Wi-Fi & Factory
Default Button
vam-001-V0
(Green)
Indicates power status. Blinking when it is
powered up and booting. Solid green when it is
fully functional.
(Blue)
When the WIFI is connected to the VAM, it will
show the WIFI status through the blue LED. The
LED is blinking when VAM is booting and solid
blue when VAM is ready as AP mode (acting as
an Access Point) or connects to the internet as
STA mode (station mode, device is connected to
the Wi-Fi router).
(Yellow)
Normally off. It will blink slowly when there is no
ECP(including ECP error) or Z-
responding. Fast blinking indicates Z-wave is in
enrollment or deletion status.
Press to reset the device.
Default Button
Wi-Fi Network Reset: Press and hold down
for more than 5 seconds to clear the VAM’s
Wi-Fi network connection. You will then need
to reconnect the VAM to your home Wi-Fi
network.
• Factory Default Reset: Double press this
button, then, while the green, blue, and yellow
LEDs blink in sequence, press and hold down
this button for more than 5 seconds to set the
VAM to its factory default settings.
Specifications
Mechanical
Width: 7.58’’ (192.5mm)
Height: 5.31’’(135.0mm)
Depth: 0.53’’(13.45mm)
Electrical
Voltage: 12VDC
Current: 180mA
Operating Environment
Humidity : 93% RH, non- condensing
Temperature:
Operating : 14˚F to 131˚F / -10˚C to 55˚C
Shipping / Storage: -40˚F to 158˚F / -40˚C to 70˚C
To set up the WiFi network for VAM, you will need the following:
• Wi-Fi enabled smart device (
Tablet PC, laptop, Smartphone, etc.
)
• VAM SSID and WPA2 password (located on the VAM’s label)
• VAM default IP address: 192.168.2.1
• Home router SSID and WPA2 password (typically located on
the home router’s label); home router must use WPA2
encryption and have a password (key) assigned.
NOTES: 1. Before setting up the network, set your smart device
for Wi-Fi operation only (turn off 3G/4G option).
2.
If the wireless router is later replaced, these steps must
be repeated to connect the VAM to the new router.
1. Connect a smart device to VAM.
a. Power up the VAM.
b. Connect the smart device to the VAM using the device’s
WiFi settings menu (VAM is a wireless access point).
Enter the VAM SSID: VAM_xxxx (SSID is case-sensitive)
NOTE: xxxx = the last 4 digits of the MAC address
Enter the Key (found on the VAM label “WPA2 pw” line)
2. Access VAM’s home screen.
a. Open a web browser on the computer device.
b. Go to VAM’s default IP address: 192.168.2.1
c. Optional: Z-Wave devices can be installed and added into
the system before connecting to the home router (ex. the
home router is not available at the time of VAM
installation). by using the VAM automation menus. Refer to
the Adding Z-Wave Devices section for details.
d. When ready to connect the VAM to the home router
network, go to step 3.
3. Connect the VAM to the home router.
a. From the main menu, click the Set Home Router button.
b. Enter the home router SSID and security key
(SSID and security key are case-sensitive).
c. Click Connect. A countdown begins and displays “Trying
to connect to the Router: xxxx, please stay in this page
and wait…” VAM can take about 2 minutes to connect to
the home router. During this time, a new network IP
address is assigned to the VAM.
d. When done, VAM automatically connects to the home
router.
4.
Retrieve and save VAM’s network IP address.
a. Leave the browser page open (minimize, but don’t close, if
needed).
b. Reconnect the device to the VAM using the device’s Wi-Fi
settings menu.
c. When connected to the VAM, return to the open browser
page and click the Show IP Info link.
d. The home router’s SSID and VAM’s new IP address is
shown.
e. Select the Fixed IP option and replace the displayed IP
address with the recommended address shown. Note this
IP address for future reference. Click the Save button.
f. At the “…do you want to continue?” prompt, click the
checkmark (yes). VAM reboots, then automatically
connects to the home router and opens the main menu.
5.
Complete the setup and bookmark VAM’s URL.
a. VAM should now be connected to the home network
router.
b. Bookmark the URL displayed in the browser’s address bar
for easy access to VAM later.
c. To access VAM’s main menu at a later session, simply go
to the bookmarked address, or find the IP address at the
following URL:
http://vam.mylanconnect.com
 Loading...