GB
11
Start-up and use
Measuring out the detergent
A good wash result also depends on the correct amount of
detergent being used. Exceeding the stated amount does not
result in a more effective wash and increases environmental
pollution.
Based on how soiled the items are, the amount can
be adjusted to individual cases using powder or liquid
detergent.
In the case of normally soiled items, use approximately either
35 gr (powder detergent) or 35 ml (liquid detergent). If tablets
are used, one tablet will be enough.
If the crockery is only lightly soiled or it has been rinsed
with water before being placed in the dishwasher, reduce
the amount of detergent considerably.
For good washing results also follow the instructions shown
on the detergent box. For further questions please ask the
detergent producers' Advice Offices.
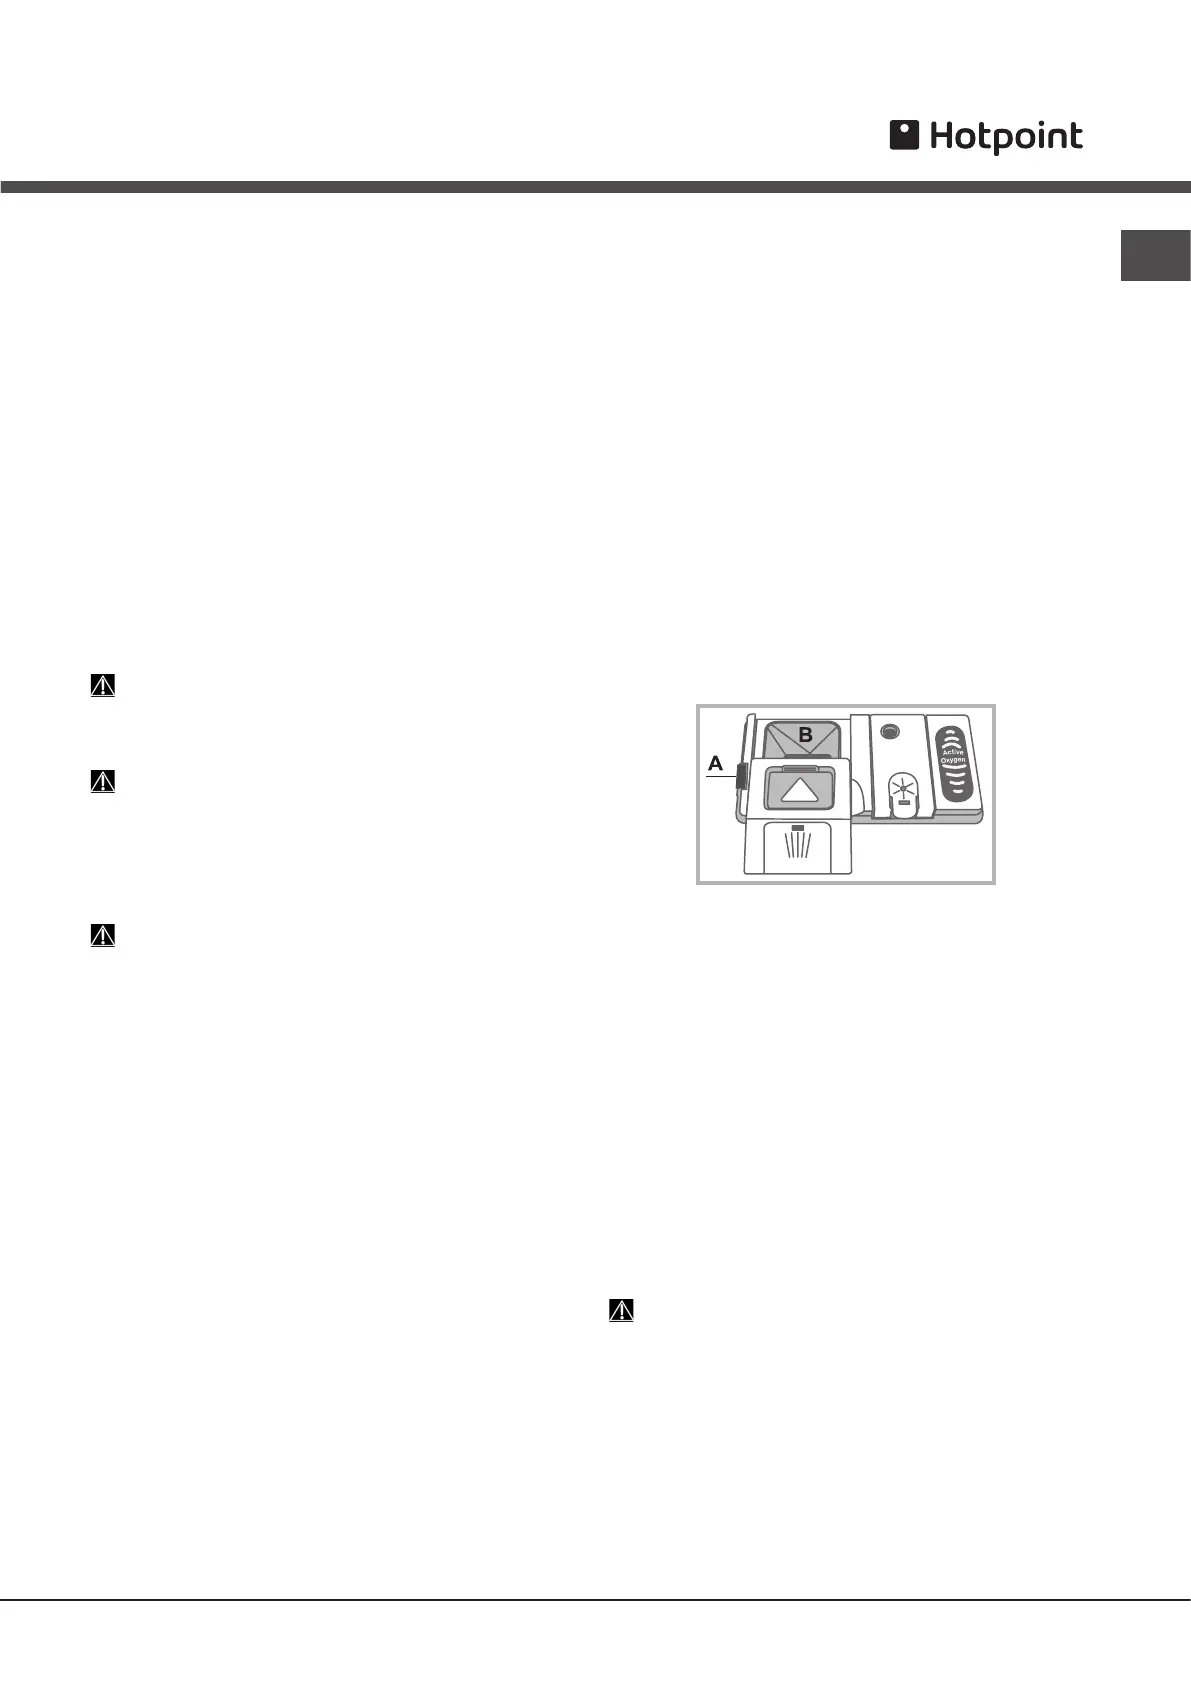
If the detergent dispenser is still closed, use the closing
device “A” to open it.
Introduce the detergent into the dry dispenser “B” only.
Place the amount of detergent for pre-washing directly
inside the tub.
1.WhenmeasuringoutthedetergentrefertotheTableofwash
cyclestoaddtheproperquantity.CompartmentB comprises
a level showing the maximum quantity of liquid or powder
detergent that can be added to each cycle.
2.Removedetergentresiduesfromtheedgesofthedispenser
and close the cover until it clicks.
3.Closethelidofthedetergentdispenserbypullingitupuntil
the closing device is secured in place.
The detergent dispenser automatically opens up at the right time
according to the wash cycle.
If all-in-one detergents are used, we recommend using the TABS
option, because it adjusts the cycle so that the best washing
and drying results are always achieved.
Only use detergent which has been specifically designed
for dishwashers.
DO NOT USE washing up liquid.
Using excessive detergent may result in foam residue
remaining in the machine after the cycle has ended.
The use of tablets is only recommended for models which
offer the MULTI-FUNCTIONAL TABLETS option.
To achieve the best results from each washing and drying
cycle, powder detergent, rinse-aid liquid and salt should
be used.
*Onlyavailableinselectedmodels.
Starting the dishwasher
1.Turnthewatertapon.
2. Open the door and press ON-OFF button: the ON/OFF
indicator lights, options and the display come on.
3. Measure out the detergent.
(see adjacent information).
4. Load the racks
(see Loading the racks)
.
5. Select the wash cycle in accordance with the type of crockery
and its soil level
(see table of wash cycles)
by pressing the P
button.
6. Select the wash options*.
(see Special wash cycles and
options)
.
7.Startthewashcyclebyshuttingthedoor.
8. The end of the wash cycle is indicated by beeps and by the
flashingofthewashcyclenumberonthedisplay.Openthedoor,
switchofftheappliancebypressingtheON/OFFbutton,shut
off the water tap and unplug the appliance from the electricity
socket.
9.Waitforafewminutesbeforeremovingthecrockery,inorder
toavoidburns.Unloadtheracks,beginningwiththelowerlevel.
- The machine will switch off automatically during
certain extended periods of inactivity, in order to
minimise electricity consumption.
AUTO WASH CYCLES*:some models of dishwashers are
equipped with a special sensor which can be used to assess
the level of soiling and automatically setting the most efficient
and economic wash cycle accordingly.
The duration of the Auto wash cycles may vary due to the
operation of the sensor.
If the crockery is only lightly soiled or if it has been rinsed
with water before being placed in the dishwasher, reduce the
amount of detergent used accordingly.
Modifying a wash cycle in progress
If a mistake was made during the wash cycle selection process,
it is possible to change the cycle, provided that it has only just
begun: open the door taking care to avoid the escaping steam,
bypressingandholdingtheON/OFFbutton,themachinewill
switchoff.SwitchthemachinebackonusingtheON/OFFbutton
and select the new wash cycle and any options desired; start
the cycle by closing the door.
Adding extra crockery
Withoutswitchingoffthemachine,openthedoor,takingcare
to avoid the escaping steam, and place the crockery inside the
dishwasher. Shut the door and the cycle will begin from the point
at which it was interrupted.
Accidental interruptions
If the door is opened during the wash cycle, or if there is a power
cut, the cycle stops. It starts again from the point at which it
was interrupted once the door has been shut or the electricity
supply is restored.