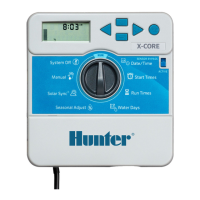
X-CORE
®
PROGRAMMING GUIDE
SETTING THE DATE AND TIME
1. Turn the dial to the CURRENT
TIME/DAY position.
2. Use the
or buttons to change
the year. Press the
button to proceed
to setting the month.
3. Use the
or buttons to change
the month. Press the
button to
proceed to setting the day.
4. Use the
or buttons to change
the day. Press the
button to proceed
to setting the time.
5. Use the
and buttons to select
AM, PM, or 24 hour. Press the
button to move to hours. Use the
and buttons to change the hour
shown on the display. Press the
button to move to minute. Use the
and buttons to change the
minutes shown on the display.
The date, day, and time have now
been set.
SETTING THE PROGRAM
START TIME(S)
1. Turn the dial to the START TIMES
position.
2. The factory preset is set on program
A. You can select program B or C by
pressing the
button.
3. Use the
or button to change
the start time. (The start times
advance in 15-minute increments).
4. Press the
button to add an
additional start time, or button
for the next program.
SETTING STATION RUN TIMES
1. Turn the dial to RUN TIMES position.
2. The display will show the last program
selected (A, B, or C), the station
number selected. You can switch
to another program by pressing the
button.
3. Use the
or button to change
the station run time on the display
from 0 to 4 hours.
4. Press the
button to advance to the
next station.
SETTING DAYS TO WATER
1. Turn the dial to the WATER DAYS
position.
2. The display will show the last program
selected (A, B, or C). Switch to another
program by pressing the
button.
3. The controller will display the seven
days of the week. Each day will have a
icon or a icon above the day. The
icon would represent an “On” water
day, while a
icon would represent
an “O” watering day.
SELECTING SPECIFIC DAYS OF THE
WEEK TO WATER
1. With the
cursor on a specic day
press the button to activate a
particular day of the week to water.
Press the button to cancel
watering for that day.
2. Repeat step 1 so all desired days have
been selected. The selected days will
show a
to indicate their status is ON.
SELECTING ODD OR EVEN DAYS
TO WATER
This feature uses numbered day(s)
of the month for watering instead of
specic days of the week (odd days:
1st, 3rd, 5th, etc.; even days: 2nd, 4th,
6th, etc.).
1. With the
cursor on SU press the
button once. The icon and odd will
be displayed.
2. If odd day watering is desired, turn
the dial back to the run position.
3. If even day watering is desired, press
the
button once. The icon and
EVEN will be displayed. You can move
back and forth from ODD to EVEN by
pressing the and
buttons.
SELECTING INTERVAL WATERING
With this option you can select interval
watering from 1 to 31 days.
1. With the cursor on EVEN, press the
button once and the
icon will
appear and a 1 ashing in the display.
2. Press the
or button to select
the number of days between watering
days (from 1 to 31 days).
The controller will water at the next start
time and will then water at the interval
programmed.
SETTING EVENT DAY(S) OFF
The X-Core allows you to program
Non-Water Day(s). This feature is useful
to inhibit watering on a specic day(s). For
example, if you always mow the lawn on
Saturdays, you would designate Saturday
as a Non-Water Day so that you are not
mowing wet grass.
1. Turn the dial to the WATER DAYS
position.
2. Enter an interval watering schedule
as described above.
3. Press the
button to scroll to the
Non-Water Days at the bottom of the
display. MO will be ashing.
4. Use the
button until the cursor is at
the day of the week you wish to set as
a Non-Water Day.
5. Press the
button to set this
day as a Non-Water Day. The
will
illuminate over this day.
6. Repeat steps 4 and 5 until all desired
event day(s) are o.
AUTOMATIC WATERING
Aer programming the X-Core, set
the dial to the RUN position to enable
automatic execution of all watering
programs and start times.
SYSTEM OFF
Valves currently watering will be shut
o aer the dial is turned to the SYSTEM
OFF position for two seconds. All active
programs are discontinued and watering
is stopped. To return the controller to
normal automatic operation, simply
return the dial to the RUN position.