HYDROTEK® 1000 / 2000 SINGLE STATION CONTROLLER INSTALLATION /
TROUBLESHOOTING
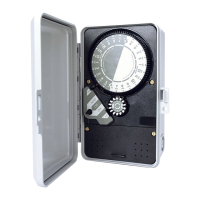
CONTROLLER FUNCTIONS
1. TIME DIAL - Rotates one clockwise revolution every 24 hours. Controller is
programmed for automatic (AUTO)operation with the insertion of timing pins in the
time dial holes. Once properly set, correct time of day is shown by the alignment of
the arrow labeled "TIME" with the time time shown on the time dial.
2. DAY WHEEL AND RETAINED PIN ASSEMBLY - Has 14 pin locations for a 2
week program. Controller will operate in AUTO only on the days programmed by the
depression of the day wheel pin. Once properly set, correct day is shown by the
alignment of the arrow labeled "DAY" with the day shown on the wheel.
3. AUTO-OFF-ON SWITCH KNOB - Indicates the function of the controller by
turning to ON, for manual operation, AUTO, for automatic operation and OFF,to stop
manual (ON) and automatic (AUTO) functions.
4. CHASSIS SCREWS - Secures controller chassis to enclosure.
5. ELECTRICAL CONNECTION STRIP (2000 SERIES) - Allows for input and
output electrical connection. Consult Electrical Circuit and Connection Diagrams
prior to wiring.
SETTING AND OPERATION INSTRUCTIONS
z
TO SET DAY OF WEEK AND TIME OF DAY:
Turn the Day Wheel until correct day is indicated by arrowed labeled "DAY" .
Turn the Time Dial CLOCKWISE until the correct time is indicated at the arrow
labeled "TIME".
CAUTION: Set Time Dial in CLOCKWISE direction only. DO NOT FORCE TIME
DIAL IN REVERSE DIRECTION.
Pa
e 1 of 9
-Rain - H
drotek Controllers Instructions
8/2/2005
http://waterheatertimer.org/Woods-timers-and-manuals-old.html