Muestra de costura,
tensión del hilo
Costura experimental,
tensão da linha
Una vez terminado el enhebrado,
haga una costura de prueda.
Utilice siempre una doble capa de
tela para poder comprodar la
formación de la puntada y la
tensión adecuada del hilo.
Depois de enfiar a linha, faça uma
experiência. Utilize sempre um
forro duplo de tecido, de modo a
poder verificar adequadamente a
formação do ponto e a tensão da
linha.
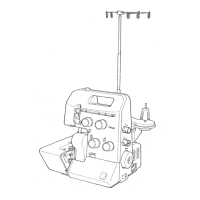
1
2 Hilo del ojo-guía inferior (rojo)
3
4
(amarillo)
Hilo de ojo-guía superior (verde)
Hilo de la aguja de la derecha
(azul)
Hilo de la aguja de la izquierda
1 Linha da lançadeira superior
(verde)
2 Linha da lançadeira inferior
(vermelha)
3 Linha da agulha direita (azul)
4 Linha da agulha esquerda
(amarela)
- Ponga la máquina en la posición
“I”.
- Coloque todas las tensiones de
hilo en 3.
- Eleve ligeramente la punta del
prensatelas son su dedo pulgar y
deslice la tela bajo el prensatelas
hasta la cuchilla.
- Proceda a coser.
- Una vez alcanzada la extremidad,
continúe sosiendo para formar una
cadeneta larga de unos 8 cm.
- Corte la cadeneta de hilo y retire
el trabajo.
- Comute a máquina para “I”.
- Fixe todos os mostradores de
tensão em 3.
- Levante ligeiramente a parte
da frente do calcador com o
polegar e posicione o tecido
debaixo do calcador
imediatamente em cima da
faca.
- Costure.
- No fim da costura, continue a
costurar uma cadeia de linha
de 8 cms.
- Corte a cadeia de linha e retire
o trabalho.
La tensión del hilo estará bien
ajustada si los dos hilos del ojo-guía
se cruzan exactamente en el
borde de la tela. Los hilos de las
agujas son reconocibles por las
líneas de puntos rectos que forman
y mantienen la costura dejándola
elástica.
Según la calidad de la tela y del
hilo utilizados, a veces resulta
indispensable adaptar las tensiones
del hilo.
A formação de ponto perfeito
ocorre quando as duas linhas da
lançadeira se encontram na
extremidade do tecido. As linhas
da agulha forman pontos a direito
para configurar uma costura
alongada e duradoura.
Pode tornar-se necessário fazer
ajustamentos da tensão da linha,
dependendo do tipo de tecido e
da linha que estão a ser
utilizados.
Muestra de costura Costura experimental
Comprobación de su
funcionamiento de prueda
Verifique o curso da experiência
Echantillon de couture,
Tension de fil
Echantillon de couture
Procéder à un échantillon,une fcis
l'enfilage terminé. Pour pouvoir
mieux juger de l'aspect des points
et de la tension du fil, coudre
toujours deux épaisseurs de tissu.
Vesificction de l'échantillon
d'essai
1 Fil de boucleur supérieur ( )
2 Fil de boucleur inférieur (rouge)
3 Fil d'aiguille de droite (vert)
4 Fil d'aiguille de gauche (jaune)
bleu
- Enclencher la machine sur "I".
- Placer toutes les tensions de fil
sur 3.
- Relever légèrement la pointe du
pied-de-biche avec le pouce,
glisser le tissu sous le pied
jusqu'au couteau.
- Coudre.
- Une fois l'extrémité atteinte,
piquer au-delà du bord pour
former une chaînette longue
d'env. 8cm.
- Saisir l'ouvrage de la main
gauche pour l'enlever, puis
couper la chaînette.
La tension de fil est bien réglée si
les deux fils de boucleurs se
croisent exactement au bord de
l'étoffe. Les fils d'aiguilles sont
reconnaissables aux lignes de
points droits qu'ils forment et
maintiennent la couture tout en la
laissant élastique.
Selon la qualité de l'ouvrage ou
des fils employés, il peut être
parfois indispensable d'adapter
les tensions de fil.