EasyManua.ls Logo

JUKI TNU-243 User Manual

JUKI TNU-243
24 pages
To Next Page IconTo Next Page
To Previous Page IconTo Previous Page
Page #11 background imageLoading...
Page #11 background image
– 5 –
12. HOW TO INSTALL THE NEEDLE
13. HOW TO THREAD THE MACHINE HEAD
14. ADJUSTING THE
STITCH LENGTH AND
REVERSE STITCHING
WARNING :
To protect against possible personal injury due to abrupt start of the
machine, be sure to start the following work after turning the power
off and ascertaining that the motor is at rest.
WARNING :
To protect against possible personal injury due to abrupt start of the machine, be sure to start the following
work after turning the power off and ascertaining that the motor is at rest.
– 2 –
2. INSTALLING THE THREAD STAND
3.
INSTALLING THE HANDWHEEL
4.
ADJUSTING THE BELT TENSION
5. INSTALLING THE BELT COVER
10 mm
9.8N
Adjust the belt tension with the height of the motor so that the
belt sags 10 mm when the center of V belt is applied with a 9.8N
load.
Handwheel
Motor pulley
WARNING :
To protect against possible personal injury due
to abrupt start of the machine, be sure to start
the following work after turning the power off
and ascertaining that the motor is at rest.
WARNING :
To protect against possible personal injury due
to abrupt start of the machine, be sure to start
the following work after turning the power off
and ascertaining that the motor is at rest.

Other manuals for JUKI TNU-243

Question and Answer IconNeed help?

Do you have a question about the JUKI TNU-243 and is the answer not in the manual?

JUKI TNU-243 Specifications

General IconGeneral
BrandJUKI
ModelTNU-243
CategorySewing Machine
LanguageEnglish

Summary

Safe Use of Sewing Machine

Explanation of Risk Levels

Explains the different categories of risk levels (DANGER, WARNING, CAUTION).

Pictorial Warnings and Labels

Details various pictorial warnings and their meanings for safe operation.

Safety Precautions

General Safety Guidelines

Basic precautions, safety devices, warning labels, application, modification, and training.

Operations Requiring Power Off

Lists operations requiring the machine to be powered off for safety.

Precautions in Operation Stages

Transportation and Unpacking Safety

Safety measures for moving, transporting, and unpacking the machine.

Installation Precautions

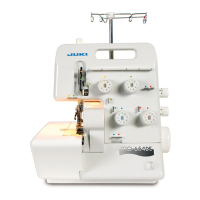
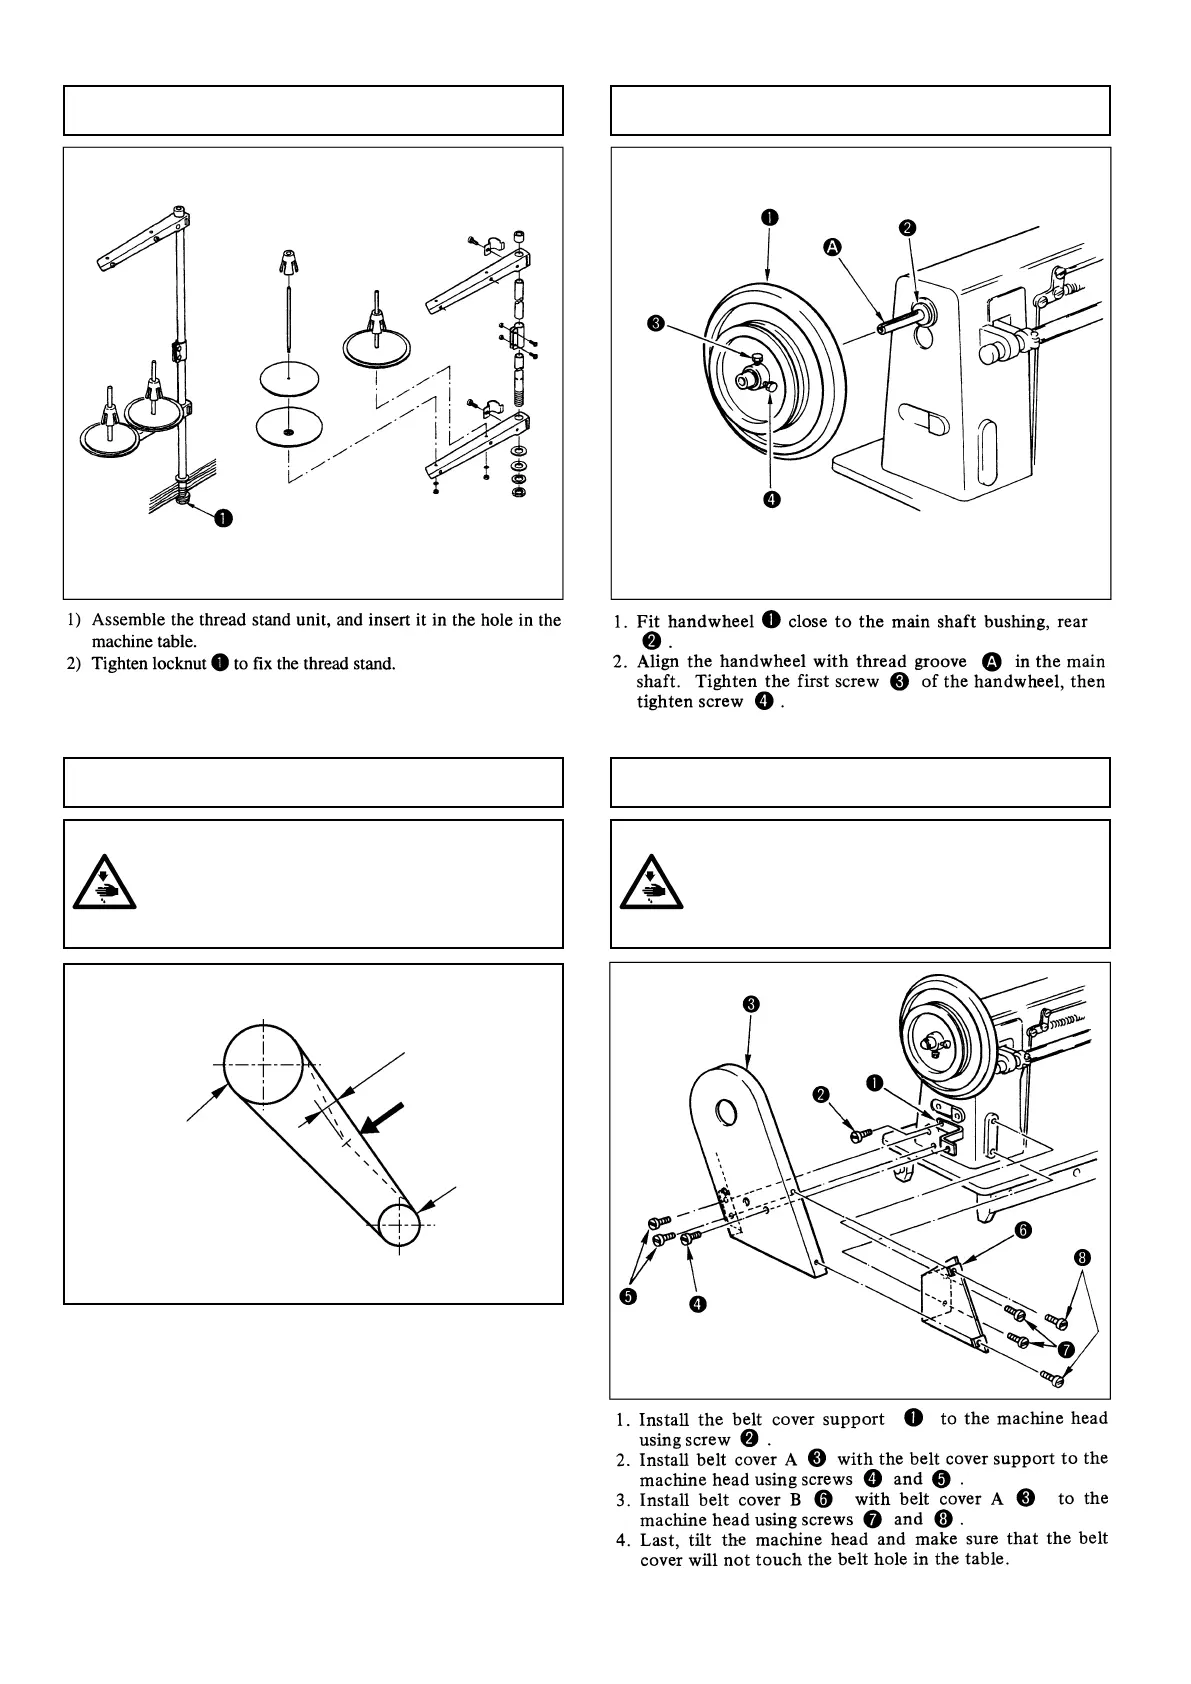
Guidance on safe table, cable, grounding, and motor installation.

Pre-Operation and During Operation Safety

Checks before operation and critical safety rules during machine running.

Machine Lubrication and Maintenance

Operating Environment and Safety

TNU-243 Specific Safety Measures

General Operating Safety

Key safety measures to prevent injury from moving parts and electrical hazards.

Important Cautions and Device Integrity

Notes regarding safety devices and their importance during operation.

Declaration of Machinery Incorporation

Machine Specifications

Installing the Sewing Machine

Thread Stand and Handwheel Installation

Belt Tension and Cover Installation

Knee Press Plate and Cleaning

Machine Lubrication Procedure

Needle Installation and Bobbin Handling

How to Install the Needle

Guide for properly inserting and securing the needle into the needle bar.

How to Take Out the Bobbin

Procedure for removing the bobbin case and bobbin from the shuttle.

Bobbin Handling and Threading

How to Insert Bobbin into Bobbin Case

Steps for placing the bobbin into the bobbin case correctly.

How to Thread the Machine Head

Step-by-step instructions for threading the sewing machine head.

Stitch Adjustment and Reverse Stitching

Thread Tension Adjustment

Thread Take-Up Spring Adjustment

Adjusting Presser Foot and Feed Dog

Adjusting the Presser Foot Pressure

How to adjust the pressure applied by the presser foot.

Adjusting the Height of the Feed Dog

Procedure for adjusting the feed dog height for optimal sewing.

Needle-to-Shuttle Relationship Adjustments

Shuttle Position Adjustment

Adjusting the shuttle position when it is recessed most.

Needle and Shuttle Positioning

Aligning the needle bar and shuttle for proper operation.

Needle Bar Height Adjustment

Setting the correct height of the needle bar.

Needle and Shuttle Clearance Settings

Needle-to-Shuttle Clearance

Adjusting the clearance between needle and shuttle blade point.

Needle-to-Shuttle Driver Clearance

Adjusting clearance between needle and shuttle driver.

Standard Clearance Adjustment Procedure

Standard procedure for setting needle clearances with shuttle.

Adjustments for Walking Foot, Presser Foot, and Feed Dog Timing

Walking Foot and Presser Foot Height

Adjusting the vertical operating height of the walking and presser feet.

Vertical Movement of Walking Foot

Adjusting the vertical movement amount of the walking/presser feet.

Feed Dog-to-Needle Timing

Adjusting the timing relationship between the feed dog and needle.

Feed Dog and Needle Motion Synchronization

Adjusting Needle Entry Point

Motor Pulley and Sewing Speed

Sewing Problems and Corrective Measures

Thread Breakage and Stitch Quality

Troubleshooting common problems like thread breaking and poor stitch quality.

Skipped Stitches and Tension Issues

Addressing issues like skipped stitches, thread tension, and bobbin thread problems.

Advanced Sewing Problem Diagnosis

Seam Finish and Bobbin Tension

Troubleshooting inconsistent seams and bobbin thread tension issues.

Belt Slippage and Motor Operation

Addressing V-belt slippage and related motor stoppages.

Related product manuals