EasyManua.ls Logo

JVC GR-AX201 User Manual

JVC GR-AX201
56 pages
To Next Page IconTo Next Page
To Previous Page IconTo Previous Page
Page #51 background image
EN51
Controls
1 Dioptre Adjustment Control ................. Z pg. 10
2 Lens Cover Open/Close Ring
[LENS COVER] .................................... Z pg. 12
3 Video Light Switch [LIGHT OFF/AUTO/ON]
(GR-AX501/AX401 only) ...................... Z pg. 17
4 Snapshot Button [SNAPSHOT]
(GR-AX501/AX401 only) ................... Z pg. 18
5-Second Recording Button [5 SEC. REC]
(GR-AX301/AX201 only) ................... Z pg. 16
5 Power Zoom Lever [T/W] ..................... Z pg. 14
6 Picture Stabilizer Button
[P.STABILIZER] ..................................... Z pg. 16
7 Program AE Button [P.AE]..................... Z pg. 20
8 Fade/Wipe Button [EFFECT] ................. Z pg. 19
9 Rewind Button [
2
, REW] ................ Z pg. 34
Retake Rewind Button [RETAKE R]..... Z pg. 15
Quick Review Button [ R] ............. Z pg. 15
0 Fast-Forward Button [
3
, FF] ............ Z pg. 34
Retake Forward Button [RETAKE F] .... Z pg. 15
! Stop Button [5, STOP] ......................... Z pg. 34
@ Play/Pause Button
[
4
/6, PLAY/PAUSE] ............................. Z pg. 34
# Select Dial [+, , PUSH] .................. Z pg. 7, 24
$ MENU/DISPLAY Button ................. Z pg. 13, 24
% Counter Reset/Memory Button
[COUNTER R/M] .............................. Z pg. 36
Recording Mode Button [SP/LP] ........... Z pg. 8
^ EJECT Switch ......................................... Z pg. 9
& Recording Start/Stop Button .................. Z pg. 12
* Power Switch ................................ Z pg. 12, 34
( Battery Release Switch
[BATTERY RELEASE] .............................. Z pg. 4
) PUSH Button ......................................... Z pg. 9
Connectors
q DC IN Jack ............................................ Z pg. 5
The connectors w to r are located beneath the
cover.
w Video Output Connector ...................... Z pg. 38
e Audio Output Connector ..................... Z pg. 38
r J Terminal [JLIP (Joint Level Interface Protocol)
Connector]
Connect the editing cable when performing
Random Assemble Editing ( Z pg. 42 - 45).
It is used to connect the camcorder to a device
such as a personal computer.
For further details consult your nearest JVC
dealer.
JLIP-controlled editing from camcorder to VCR
is not possible if the VCR is not equipped with a
J terminal.
Indicators
t Tally Lamp ........................................... Z pg. 12
y Power Lamp ........................................ Z pg. 12
Other Parts
u Battery Pack Mount ............................... Z pg. 4
i Viewfinder ........................................... Z pg. 10
o Grip Strap ............................................ Z pg. 10
p Camera sensor
Be careful not to cover this area; a sensor
necessary for shooting is built-in here.
Remote Sensor .................................. Z pg. 41
Q Video Light (GR-AX501/AX401 only) .... Z pg. 17
W Microphone......................................... Z pg. 47
E Eyepiece
R Shoulder Strap Eyelets .......................... Z pg. 11
T Clock Battery Slot .................................. Z pg. 6
Y Tripod Mounting Socket ....................... Z pg. 11
Question and Answer IconNeed help?

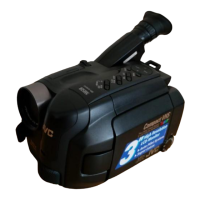
Do you have a question about the JVC GR-AX201 and is the answer not in the manual?
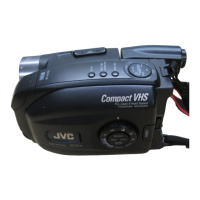
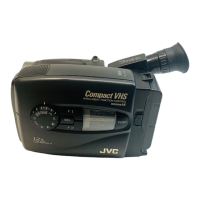
JVC GR-AX201 Specifications

General IconGeneral
Recording MediaVHS-C
Image Sensor1/4-inch CCD
ViewfinderElectronic
Battery Lifeapprox. 1 hour
FocusAuto / Manual
LCD Screen2.5 inches

Summary

Safety Precautions

Major Features Overview

Provided Accessories

Getting Started

Power and Battery Charging

Explains the camcorder's power sources, charging the battery pack, and using the battery pack.

AC and Car Power Options

Details how to use AC power via the adapter and power options using a car battery.

Clock Battery Management

Instructions for inserting and removing the lithium battery for clock operation.

Date and Time Settings

Procedure for accessing and setting the camcorder's date and time.

Recording Mode and Tape Length

Guidance on selecting recording mode (SP/LP) and tape length settings.

Cassette Handling

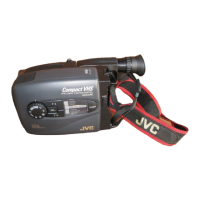
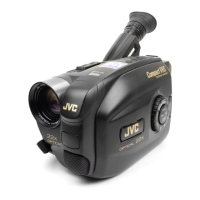
Instructions for loading and unloading a VHS-C cassette into the camcorder.

Ergonomic Adjustments

Details on adjusting the grip for comfort and the viewfinder for clarity.

Accessories Attachment

Instructions for attaching the shoulder strap and mounting the camcorder on a tripod.

Recording

Basic Recording Procedures

Steps for loading a cassette, entering record-standby mode, and starting recording.

Recording Indicators and Controls

Explanation of viewfinder indications like tape remaining time and how to stop recording.

Zooming Functionality

How to use the Power Zoom Lever for optical and digital zooming effects.

Playback and Re-recording Features

Features for checking the last recording (Quick Review) and re-recording segments (Retake).

Image Stabilization and Quick Recording

Using the Picture Stabilizer to compensate for shake and 5-Second Recording feature.

Video Light Usage

Operating the built-in video light for low-light scenes and safety warnings.

Taking Still Snapshots

How to use the camcorder to capture still images like a regular camera.

Scene Transition Effects

Using Fade/Wipe effects for professional scene transitions during recording.

Programme AE and Special Effects

Applying various shooting effects like Sepia, Sports, Fog, and Twilight.

Date and Time Overlay

How to display and record date and time information on the video.

Preset Title Superimposition

Adding pre-programmed titles to your recordings.

Advanced Menu Settings

Using the on-screen menu system for detailed camcorder adjustments.

Exposure Adjustments

Manually adjusting the camcorder's iris for optimal exposure.

Focusing Modes

Understanding Auto Focus capabilities and limitations.

Manual Focus Operation

Detailed steps for manually adjusting the focus for precise sharpness.

White Balance Calibration

Adjusting white balance for accurate color reproduction under various lighting.

Manual White Balance Operation

Procedure for manually setting white balance using a white reference.

Self-Timer Recording

Setting a delay between pressing the record button and the actual start of recording.

Animation and Time-Lapse Recording

Creating motion effects by recording sequential images at intervals.

Playback

Basic Playback Operations

Loading a cassette and performing basic playback functions.

Playback Noise Reduction

Using the Tracking feature to eliminate noise bars during playback.

Playback Search and Memory

Features for still playback, high-speed shuttle search, and counter memory.

Using the VHS-C Cassette Adapter

Instructions for using the cassette adapter to play VHS-C tapes on a VHS VCR.

Connections and Dubbing

Basic connections for viewing and procedures for tape dubbing.

Using the Remote Control Unit

Remote Control Unit Basics

Installing the battery and overview of remote control buttons and functions.

Remote Control for Special Recording Modes

Using the remote for Self-Timer, Animation, and Time-Lapse functions.

VCR Control and Editing Setup

Setting up the remote to control a VCR and preparing for Random Assemble Editing.

Connecting for Remote VCR Operation

Wiring instructions for connecting the camcorder and VCR for remote control.

Scene Selection for Editing

Registering in- and out-points for scenes to be edited.

Automated Video Editing

Performing automatic editing by copying selected scenes to a VCR.

Insert Editing Guide

Step-by-step instructions for recording new scenes over existing tape sections.

Audio Dubbing Guide

Recording a new soundtrack over prerecorded audio.

Troubleshooting

Power, Recording, and Playback Troubleshooting

Addresses common issues related to power supply, recording, and playback problems.

Other Troubleshooting Scenarios

Resolves issues with display indications, function availability, image artifacts, and errors.

Controls

Connectors

Indicators

Other Parts

Cautions

Video Light and Battery Safety

Important warnings regarding the video light's heat and battery handling.

Unit Handling and Maintenance

Guidelines for safe unit operation, avoiding moisture, and basic cleaning.

Specifications

Camcorder and Accessory Specifications

Technical details of the camcorder, power adapter, and cassette adapter.

Related product manuals