English
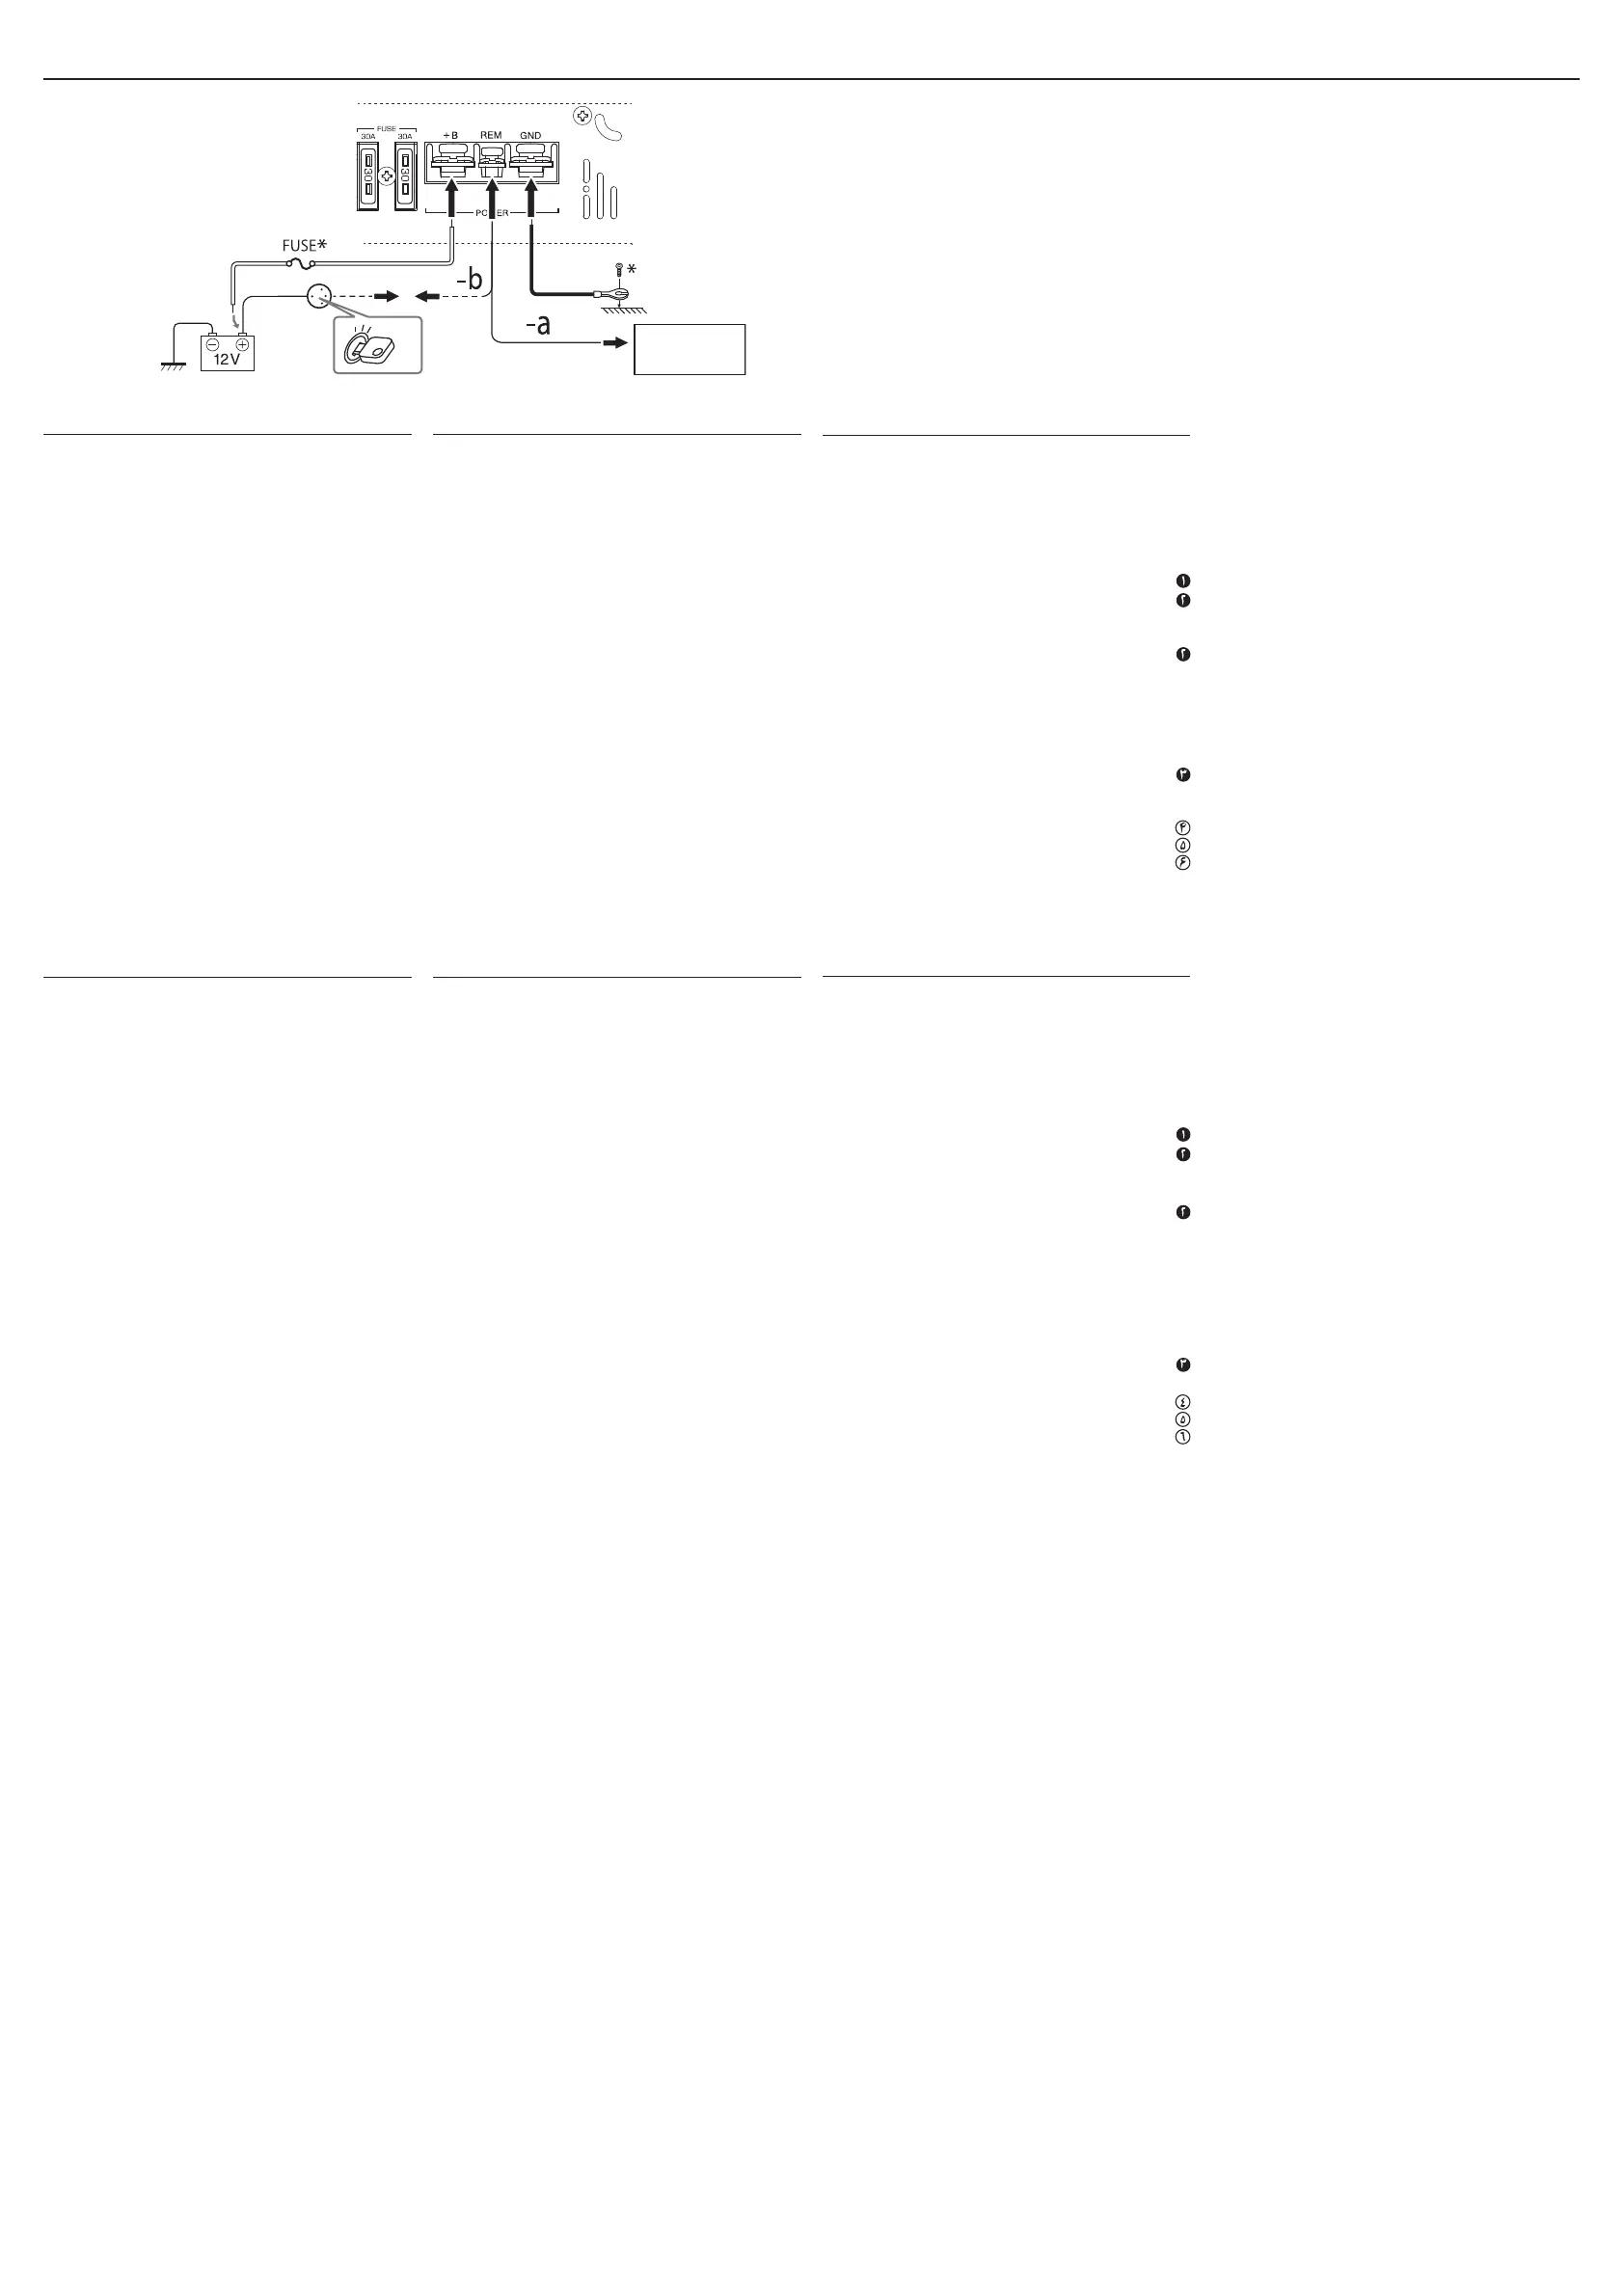
POWER SUPPLY CONNECTION
The proper lead wire connected to each POWER terminal is as
follows.
• + B and GND: AWG 8 to AWG 4
(The cross section is about 8 mm
2
to 21 mm
2
.)
• REM: AWG 18 to AWG 8
(The cross section is about 0.8 mm
2
to 8 mm
2
.)
❶ Connect to metallic body or chassis.
❷-a When you use JVC car receiver with REMOTE OUTPUT, connect
to REMOTE OUTPUT.
❷-b When you use a unit without REMOTE OUTPUT, connect to the
accessory circuit of the car which is activated by the ignition
switch. In this case, noise may occur when the car receiver is
turned on or off. To avoid this noise, do not turn on or off the
car receiver itself. You can turn on or off the car receiver along
with the on/off operation of the ignition switch.
❸ After all connections have been made, connect to the battery 12 V.
– Be sure to place the fuse near the battery as shown.
④ Car battery
⑤ Ignition switch
⑥ JVC car receiver, etc.
* Not supplied
Français
CONNEXION DE L’ALIMENTATION
Le fil correct connecté à chaque prise POWER est indiqué ci-après.
• + B et GND: AWG 8 à AWG 4
(La section est d’environ 8 mm
2
à 21mm
2
.)
• REM: AWG 18 à AWG 8
(La section est d’environ 0,8 mm
2
à 8mm
2
.)
❶ Connectez au corps métallique ou au châssis.
❷-a Quand vous utilisez un autoradio JVC muni d’une sortie
REMOTE OUTPUT, connectez a REMOTE OUTPUT.
❷-b Quand vous utilisez un autoradio JVC sans prise REMOTE OUTPUT,
connectez au circuit accessoire de la voiture qui est mis sous
tension avec le commutateur d’allumage. Dans ce cas, du bruit
peut se produire quand l’autoradio est mis sous ou hors tension.
Pour éviter ce bruit, ne mettez pas directement l’autoradio sous
ou hors tension. Vous pouvez le mettre sous ou hors tension en
même temps que le commutateur d’allumage de votre voiture.
❸ Une fois toutes les connexions terminées, connectez à la batterie
12 V.
– Assurez-vous de placez le fusible près de la batterie, de la façon
indiquée.
④ Batterie de la voiture
⑤ Commutateur d’allumage
⑥ Autoradio JVC, etc.
* Non fourni
POWER SUPPLY CONNECTION
Español
CONEXIÓN DE LA FUENTE DE ALIMENTACIÓN
A continuación se indica el conductor principal apropiado que se
debe conectar a cada terminal POWER.
• + B y GND: AWG 8 a AWG 4
(La sección transversal es de unos 8mm
2
a 21 mm
2
.)
• REM: AWG 18 a AWG 8
(La sección transversal es de unos 0,8 mm
2
a 8 mm
2
.)
❶ Conecte a la carrocería de metal o al chasis.
❷-a Cuando utilice un receptor para automóvil JVC, conéctese a
REMOTE OUTPUT.
❷-b Cuando utilice una unidad sin REMOTE OUTPUT, conéctese al
circuito de accesorios del automóvil que se activa mediante
el interruptor de encendido. En este caso, se podrían producir
ruidos al encender o apagar el receptor. Para evitar este ruido,
no encienda ni apague el receptor para automóvil mismo.
Puede encender o apagar el receptor para automóvil cuando
gira a on u off el interruptor de encendido.
❸ Después de haber realizado todas las conexiones, conéctese a la
batería de 12 V.
– Asegúrese de colocar el fusible cerca de la batería, tal como se
muestra en la ilustración.
④ Batería del automóvil
⑤ Interruptor de encendido
⑥ Receptor para automóvil JVC, etc.
* No suministrado
Русский
ПОДКЛЮЧЕНИЕ ИСТОЧНИКА ПИТАНИЯ
Ниже описано правильное подключение проводов к каждому
разъему POWER.
• + B и GND: от AWG 8 на AWG 4
(Поперечное сечение составляет от около 8мм
2
до 21мм
2
.)
• REM: от AWG 18 на AWG 8
(Поперечное сечение составляет от около 0,8мм
2
до 8мм
2
.)
❶ Подсоедините к металлическому кузову или шасси.
❷-a В случае использования автомобильного приемника JVC с
выходом REMOTE OUTPUT подсоедините к выходу REMOTE
OUTPUT.
❷-b В случае использования устройства без выхода
REMOTE OUTPUT, подсоедините к электрической цепи
автомобиля для вспомогательных устройств, включаемой
переключателем зажигания. В этом случае, при включения
или выключения автомобильного приемника могут
возникать шумы. Во избежание шумов не включайте
и не выключайте автомобильный приемник. Для его
включения или выключения поверните ключ зажигания в
положение “вкл.” или “выкл.”.
❸ После выполнения всех соединений подсключите к батарее
напряжением 12 В.
– Обязательно установите предохранитель рядом с батареей,
как это показано на рисунке.
④ Аккумуляторная батарея автомобиля
⑤ Ключ зажигания
⑥ Автомобильный приемник JVC и т.п.
* Не прилагается
④
⑤
⑥
❶
❷
❷❸
POWER
AWG 4AWG 8 :GND+ B
AWG 8AWG 18 :REM
REMOTE
JVC a-
REMOTE OUTPUT
OUTPUT
REMOTE OUTPUT b-
–
JVC
*
:
POWER
:GND+ B •
(.
)
:
REM •"
(.
)
a-
REMOTE OUTPUT
.REMOTE OUTPUT
b-
REMOTE OUTPUT
/
–
JVC
*
B5E-0092_DR3005D.indd 4 2015/10/14 10:29
 Loading...