EasyManua.ls Logo

JVC LT-55C870 - User Manual

JVC LT-55C870
2 pages
Print Icon
To Next Page IconTo Next Page
Loading...
Quick Start Guide
55" LED Smart 4K HDR TV
LT-55C870(B)
Thank you for purchasing your new JVC TV.
Your new TV incorporates the latest technology to enhance your viewing
experience. We would suggest that you allow about 15 mins for initial setup.
Please follow this guide for a successful rst time installation.
The latest eco-friendly power-saving technology will switch o the TV if
it is left on and idle for 4 hours. Please refer to Auto Standby under the
Time Settings” section of the instruction manual for more detail.
Remove all packaging from the unit. Retain the packaging. If you dispose of it please do so according to any local regulations.
TV
TV Stand Neck
TV Stand Neck cover
TV Stand Base
Remote Control/
AAA Batteries x2
Screws (A) x 5
Screws (B) x 6
Scart Adaptor
Instruction Manual
Quick Start Guide
Please inspect your TV for damage after unpacking. If
you do notice any damage please consult your dealer.
1. Slide open the battery compartment on the back of the remote control.
2. Insert two AAA size batteries. Make sure to match the (+) and ( - ) ends of
the batteries with the (+) and ( - ) ends indicated in the battery compartment.
3. Slide the battery compartment cover back into place. Make sure it clicks into place.
For extra safety use the screw supplied to screw the battery compartment closed.
Fitting the Neck and Neck Cover Together
1. Fit the neck cover over the neck.
2. Using 2 of the supplied screws (A), screw the neck and neck
cover together.
The LCD display is very fragile, and must be protected at all times when installing and removing the base stand. Be sure that no hard or sharp object, or
anything that could scratch or damage the LCD display, comes into contact with it. DO NOT exert pressure on the front of the TV at any time because the
screen could crack.
Do not connect the TV to the mains supply until you have completed all the connections.
Always disconnect the TV from the mains socket when not in use for a long period of time.
The
button on the remote control is only used for switching the TV into standby, it does not disconnect the TV from the mains power.
To completely disconnect the mains power, please remove the mains plug from the mains socket.
1. Connect one end of the RF coaxial cable to the aerial socket on the wall and the other end of the cable to the ANT socket on the back of your TV.
2. Plug the TV into a mains socket and switch on at the mains.
3. In standby mode, press the
button on the remote control to turn the TV on. The LED indicator will ash for a few seconds then the TV will switch on.
RF coaxial cable
(not included)
Router
(not included)
LANVGA ANT
.
HDMI 1Optic.OUT
Optional
If you want to connect to the internet via a wired connection
then connect your ethernet cable to the LAN socket.
Setup in
15mins
3
2
What’s in the Box?
Operating Your Remote Control
Installing the Base Stand
1
4
Connecting the Aerial and Turning on the TV
A
A
Fitting the Neck and Stand to the TV
3. Ensure the TV is switched off and not connected to
the mains power supply.
4. Lay the TV down on a flat surface ideally on the
edge of a table so the base of the TV slightly
overhangs the edge of the table, with the back
side facing up. Please make sure a soft cushioned
material (such as a dry bath towel or thick piece of
foam) is placed beneath the screen. You can leave
the protective bag on to protect the TV at this point.
5. Slide the Neck and Neck cover under the lip, the
neck will fit snugly over the screw holes. Then screw
the Neck to the TV using the 6 screws (B) supplied.
6. Once the Neck is secure screw the base to the neck
using the 3 screws (A) supplied. Be careful not the
drop the base, its heavy.
B
A
Protective
Bag
Table
Cushioned
material
JVC 55' LED Smart 4K HDR TV LT-55C870(B) Quick Start.indd 1-3 07/11/2018 15:09
Question and Answer IconNeed help?

Do you have a question about the JVC LT-55C870 and is the answer not in the manual?

Summary

Whats in the Box?

Connecting the Aerial and Turning on the TV

Getting Started

To Accept ALL (recommended)

Accept all privacy settings and terms for initial setup.

Select Individual Settings

Choose specific privacy settings to activate individually.

Choosing to Activate No Settings

Skip privacy settings activation and proceed without enabling smart features.

Connecting to the Internet - Wired, Wireless or using the WPS button

WIRED Connection

Connect TV to the internet using an Ethernet cable.

WIRELESS Connection

Connect TV to the internet wirelessly via Wi-Fi.

WPS Connection

Connect TV wirelessly using WPS button on router.

Tuning in Your TV

Choose Region (UK only)

Select correct regional transmission for local news services during tuning.

Overview

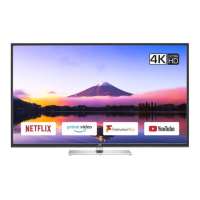
This document describes the JVC 55" LED Smart 4K HDR TV, model LT-55C870(B), and serves as a quick start guide for its setup and initial use. The TV is designed to provide an enhanced viewing experience with its 4K HDR capabilities and smart features, including access to various streaming services and applications.

Function Description:

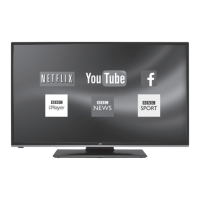
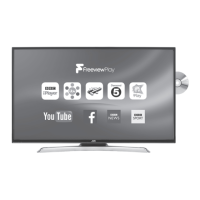
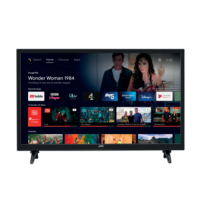
The JVC LT-55C870(B) is a smart television that integrates high-definition visual technology with internet connectivity. It supports 4K HDR (High Dynamic Range) for superior picture quality, offering vibrant colors, enhanced contrast, and greater detail. As a "smart" TV, it allows users to access a wide range of online content, including popular streaming platforms like Netflix, YouTube, and Amazon Prime Video, as well as catch-up TV services such as BBC iPlayer and Freeview Play. The TV is equipped with Freeview Play, which combines live television with on-demand and catch-up services from various UK broadcasters, all accessible through the electronic program guide (EPG). Dolby Audio™ support ensures a rich and immersive sound experience, complementing the high-quality visuals. The inclusion of DTS-HD and DTS TruSurround further enhances the audio output, providing a cinematic sound experience. The TV is designed for ease of use, with a remote control that allows for intuitive navigation through its menus and features. It also incorporates eco-friendly power-saving technology, which automatically switches off the TV if it remains idle for an extended period, contributing to energy efficiency.

Usage Features:

The initial setup process for the TV is designed to be straightforward, estimated to take about 15 minutes. Users are guided through connecting the physical components, such as the stand and aerial, and then configuring the software settings.

Physical Setup:

  1. Unboxing and Inspection: Upon unboxing, users are instructed to remove all packaging and inspect the TV for any damage. Retaining the packaging is recommended for future transport or if the device needs to be returned.
  2. Stand Assembly: The TV comes with a stand that requires assembly. This involves fitting the neck cover over the neck, securing them together with screws (A), and then attaching the assembled neck and neck cover to the TV using screws (B). Finally, the base is secured to the neck using additional screws (A). Users are advised to exercise caution during this step, particularly when handling the base, due to its weight, and to protect the LCD display from damage.
  3. Connectivity:
    • Aerial Connection: An RF coaxial cable is used to connect the TV's ANT socket to the aerial wall socket, enabling reception of broadcast television channels.
    • Power Connection: The TV is plugged into a mains socket and switched on.
    • Internet Connection (Wired): For a wired internet connection, an Ethernet cable is connected from the router to the LAN socket on the back of the TV.
    • HDMI Ports: Multiple HDMI ports are available for connecting external devices such as set-top boxes, gaming consoles, or Blu-ray players.
    • Other Ports: The TV also includes VGA, Optic.OUT, and a Scart Adaptor for various other connectivity needs.

Software Setup:

  1. First Time Installation Wizard: Upon the first power-on, the TV enters a "First Time Installation" menu.
    • Language and Country Selection: Users select their preferred language and country.
    • Home Mode: The TV prompts users to select "Home Mode," which is recommended for energy efficiency.
    • Picture Mode: Users can choose their desired picture mode, with "Natural" being the most energy-efficient option.
  2. Internet Connection (Wireless):
    • Wireless Device Selection: Users can choose to connect wirelessly by selecting "WIRELESS DEVICE."
    • Network Selection: The TV scans for available wireless networks, and users select their network from the list.
    • Password Entry: A virtual keyboard appears, allowing users to enter their Wi-Fi password.
    • WPS Connection: Alternatively, users can use the WPS (Wi-Fi Protected Setup) option by pressing the WPS button on their router, eliminating the need to manually enter a password.
  3. Privacy Settings: To enable smart features and internet connectivity, users must activate certain privacy settings, including "Portal and Applications" and "Internet connection." For Red Button services, "HbbTV" must also be activated. Users can choose to accept all recommended settings or configure individual settings. The TV provides descriptions for each setting to inform the user.
  4. Tuning in TV Channels:
    • Freeview Play Activation: Users confirm activation of Freeview Play.
    • Channel Scan: The TV automatically scans for and tunes in available digital television channels via the aerial connection.
    • Region Selection (UK Only): If multiple transmitters are detected, users are prompted to select their Primary, Secondary, and Tertiary regions to ensure correct local news services.
    • Set-Top Box Connection: If using an external set-top box (e.g., Sky, Virgin, BT) via HDMI, users are advised to untick "Digital Aerial" during setup and select the appropriate HDMI source via the "HOME" button.

Daily Operation:

  • Power On/Off: The TV can be turned on from standby mode using the remote control's power button. To completely disconnect power, the mains plug must be removed from the socket.
  • Remote Control: The remote control allows for navigation through channels, menus, and smart features. Batteries (2x AAA) are inserted into the compartment on the back of the remote, with an option to secure the compartment with a screw for added safety.
  • Smart Features: Once connected to the internet and privacy settings are configured, users can access various smart applications and streaming services.

Maintenance Features:

  • Packaging Retention: Users are advised to retain the original packaging for potential future use, such as moving the TV or returning it.
  • LCD Display Protection: A critical maintenance note emphasizes the fragility of the LCD display. Users are warned to protect it from hard or sharp objects, avoid scratching or damaging it, and refrain from exerting pressure on the front of the TV at any time, as this could cause the screen to crack. During stand assembly, placing a soft, cushioned material beneath the screen is recommended.
  • Power Disconnection: For long periods of disuse, it is recommended to disconnect the TV from the mains socket to save power and ensure safety. The remote control's power button only puts the TV into standby mode, not a complete power disconnection.
  • Eco-Friendly Power Saving: The TV includes an "Auto Standby" feature that automatically switches off the TV if it remains idle for 4 hours, contributing to energy conservation. More details on this feature can be found in the instruction manual under "Time Settings."

JVC LT-55C870 Specifications

General IconGeneral
Screen Size55 inches
Display TypeLED
Smart TVYes
HDR SupportHDR10
Refresh Rate60 Hz
HDMI Ports3
USB Ports2
Wi-FiYes
Ethernet PortYes
BluetoothNo
Built-in SpeakersYes
Speaker Output20W
Resolution3840 x 2160 (4K UHD)

Related product manuals