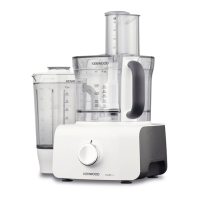
using the attachments
R
efer to recommended speed chart for each attachment.
knife blade
The knife blade is the most versatile of all the attachments. The
l
ength of the processing time will determine the texture achieved.
F
or coarser textures use the pulse control.
Use the knife blade for cake and pastry making, chopping raw
a
nd cooked meat, vegetables, nuts, pate, dips, pureeing soups
a
nd to also make crumbs from biscuits and bread.
It can also be used for yeasted dough mixes if the dough tool is
not supplied.
h
ints
l
Cut food such as meat, bread, vegetables into cubes
a
pproximately 2cm/3/4in before processing.
l
Biscuits should be broken into pieces and added down the feed
tube whilst the machine is running.
l
When making pastry use fat straight from the fridge cut into
2cm/3/4in.cubes.
l
Take care not to over-process.
dough tool (if supplied)
Use for yeasted dough mixes.
l
Place the dry ingredients in the bowl and add the liquid down the
feed tube whilst the machine is running. Process until a smooth
elastic ball of dough is formed this will take 60 secs.
l
Re-knead by hand only. Re-kneading in the bowl is not
recommended as it may cause the processor to become unstable.
emulsifying tool
Use for light mixtures only eg cream, mayonnaise.
hints
l
Ensure the bowl and tool are clean and free from grease before
use.
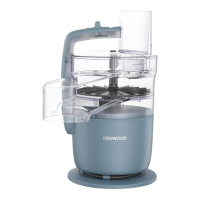
slicing/grating disc
To use the disc.
reversible slicing/grating disc
Use the grating side for cheese, carrots, potatoes and foods of a
similar texture.
Use the slicing side for cheese, carrots, potatoes, cabbage,
cucumber, courgette, beetroot and onions.
to use the cutting discs
1 Fit the bowl onto the power unit, add the detachable drive
shaft .
2 Holding by the centre grip, place the disc onto the drive shaft with
the appropriate side uppermost.
3 Fit the lid.
4 Put the food in the feed tube.
5 Switch on and push down evenly with the pusher - never put
your fingers in the feed tube.
h
ints
l
Use fresh ingredients
l
Don’t cut food too small. Fill the width of the feed tube fairly full.
T
his prevents the food from slipping sideways during processing.
l
Food placed upright comes out shorter than food placed
horizontal.
l
T
here will always be a small amount of waste on the disc or in
the bowl after processing.
citrus juicer (if supplied)
U
se the citrus juicer to squeeze the juice from citrus fruits (eg
oranges, lemons, limes and grapefruits).
c
one
s
ieve
to use the citrus juicer
1 Fit the bowl onto the power unit, add the detachable drive shaft.
2 Fit the sieve into the bowl - ensuring the sieve handle is locked
into position directly over the bowl handle.
3 Place the cone over the drive shaft turning until it drops all the
way down.
4 Cut the fruit in half. Then switch on and press the fruit onto the
cone.
l
The citrus juicer will not operate if the sieve is not
locked correctly.
l
For best results store and juice the fruit at room temperature and
hand roll on a worktop before juicing.
l
To help with juice extraction move the fruit from side to side
when juicing.
l
When juicing large quantities, empty the strainer regularly to
prevent the build up of pulp and seeds.
6
 Loading...