GBGB
1 - SAFETY WARNINGS
CAUTION – to ensure personal safety it is important to
follow these instructions and keep them for future reference.
Read the instructions carefully before proceeding with installation. The design and ma-
nufacture of the devices making up the product and the information in this manual are
compliant with current safety standards. However, incorrect installation or programming
may cause serious injury to those working on or using the system. Compliance with the
instructions provided here when installing the product is therefore extremely important.
2 - INTRODUCING THE PRODUCT
RADIO RECEIVERS
Key Automation radio receivers are 4-output receivers for control units with SSQ (RX4/
RX4K) connector, with Molex connector (RXI23) and with external terminal board
(RXM23). Receivers accept fi xed or variable code transmitters.
Warning: any use other than as specifi ed herein or in environmental conditions
other than as stated in this manual is to be considered improper and is prohibited.
CODE DESCRIPTION
RX4 Plug-in receiver, 4 outputs, 433.92 MHz. Maximum memory capacity 200 codes
RX4K Plug-in receiver, 4 outputs, 433.92 MHz. Maximum memory capacity 1000 codes
RXI23 Plug-in receiver, 2 outputs 433.92 MHz. Maximum memory capacity 200 codes
RXM23 External receiver, 2 outputs 433.92 MHz. Maximum memory capacity 200 codes
TECHNICAL SPECIFICATIONS 900RX4 / RX4K 900RXI23 900RXM23
Decoding FIX/ROLLING FIX/ROLLING FIX/ROLLING
Compatible transmitters SUB/ORION SUB/ORION SUB/ORION
Frequency 433.92 MHz 433.92 MHz 433.92 MHz
Power Vac/ (Vdc) (5) Vac/ (Vdc) 12/ (24) Vac/ (Vdc) 12/ (24)
Idle consumption 12 m A 18 m A 18 m A
Max consumption 15 m A 44 m A 44 m A
Input impedance 50 Ω 50 Ω 50 Ω
Outputs 4 2 2
Relay outputs -
24 Vdc, 1 A MAX,
NORMALLY OPEN
24 Vdc, 1 A MAX,
NORMALLY OPEN
Sensitivity -108 dB -108 dB -108 dB
Operating temperature -20°+55° C -20°+55° C -20°+55° C
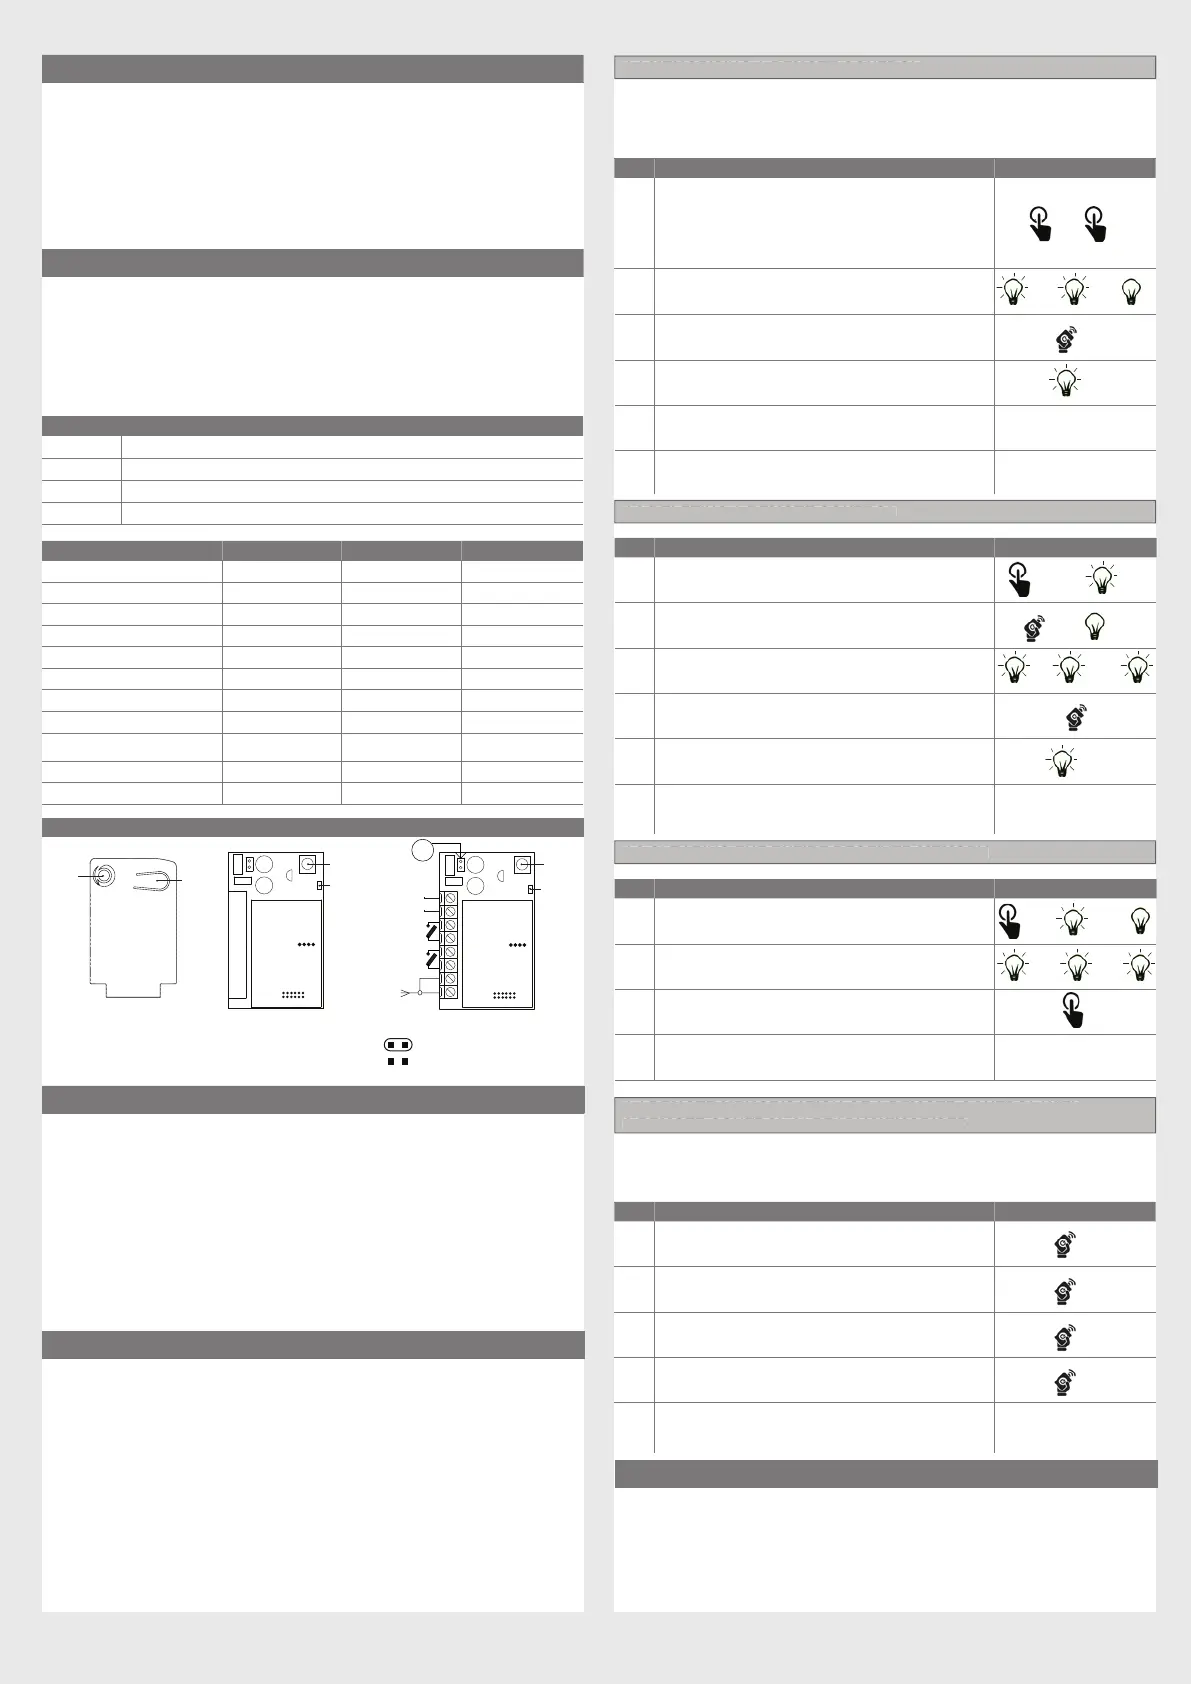
MAIN COMPONENTS
RX4/RX4K RXI23 RXM23
3 - PRELIMINARY CHECKS
WARNING - before installing the product, perform the following checks and
inspections:
• Check that the intended mounting surface is solid and does not allow vibrations
• Use electrical connections suitable for the currents required
• Check that the power supply conforms to the values in the technical specifi cations
• Connect a type ANTS433 antenna; without an antenna, the range is cut to a few metres.
The antenna must be installed as high up as possible and above
any metal or reinforced concrete structures. The antenna cable must be
type RG58 and no more than 10 metres long.
• If it is not possible to fi t an antenna, the range can be increased signifi cantly
by connecting an electric cable and keeping it straight.
4 - INSTALLING THE PRODUCT
Connect the radio receiver with the power supply disconnected and for RX4/
RX4K models check the connection position following the instructions on the
control unit to which the receiver is to be connected.
Warning: in some control units, the cover of the RX4 model must be removed.
Follow the instructions of the control unit concerned.
The fi rst remote control sets the type of encoding (fi xed or variable code). When
powered up, the receiver fl ashes to indicate the type of encoding used by the
remote controls in its memory:
• 1 long fl ash = memory empty
• 2 quick fl ashes = fi xed code
• 3 quick fl ashes = variable code
4.1 MEMORISING A REMOTE CONTROL
WARNING: When the memorisation phase is activated, any transmitter within
the reception range may be memorised. To reduce the receiver’s range,
disconnect the antenna temporarily.
4.2 DELETING A REMOTE CONTROL
4.3 CLEARING THE ENTIRE RECEIVER MEMORY
4.4 REMOTE MEMORISATION OF A REMOTE CONTROL WITH
A REMOTE CONTROL ALREADY MEMORISED
A transmitter can be memorised without accessing the receiver. The user needs to
have a transmitter memorised previously, after which the procedure is as described
below.
3
Press the key of the remote control to be memorised
within 7 seconds, holding it down for at least 2 seconds
2s
4
If the memorisation has been successful, the receiver
will give one long fl ash
3s
5
To memorise another remote control on the same
output, repeat point 3
N.B.
If no commands are given for 7 seconds, the receiver
automatically quits the programming mode
PH. DESCRIPTION EXAMPLE
1
Press the button on the receiver until the LED lights up
(about 3 seconds)
(>3s)->
2
Press the key of the remote control to be deleted
within 7 seconds, holding it down until the LED on the
receiver goes out. Release the remote control key
->
3
About 1 second after the key is released, the LED on
the receiver starts to fl ash
0,5s 0,5s
4 Confi rm the deletion by pressing the button on the RX
5
If the deletion has been successful, the receiver will
give one long fl ash
3s
N.B.
If no commands are given for 7 seconds, the receiver
automatically quits the programming mode
PH. DESCRIPTION EXAMPLE
1
Press the button on the receiver and hold it down until
the LED lights up (about 3 seconds) and then goes out
(about 3 seconds). Release the key
(>3s)-> (>3s)->
2
About 1 second after the key is released, the LED on
the receiver starts to fl ash
(1s)+ (1s)+
3
Press the key on the receiver as the LED fl ashes for the
third time
4
If the deletion has been successful, the receiver will
give one long fl ash
PH. DESCRIPTION EXAMPLE
1
Press the key of the new remote control to be
memorised, holding it down for at least 5 seconds
>5s
2
Press the key of the old remote control to be copied
(if phase 1 has been successful, the automation system
will not respond)
>3s
3
Press the key of the new remote control to be
memorised, holding it down for at least 3 seconds
>3s
4
Press the key of the old remote control to be
copied, holding it down for at least 3 seconds, to confi rm
and quit the programming mode
>3s
N.B.
If no commands are given for 7 seconds, the receiver
automatically quits the programming mode
LED
LED
KEY
KEY
5 - TESTING AND COMMISSIONING
The system may be put into operation after testing by a qualifi ed technician, who must
perform the tests required by the relevant standards in relation to the risks present, to
check that the installation complies with the relevant regulatory requirements.
PH. DESCRIPTION EXAMPLE
1
Press and release the receiver button a number
of times equal to the number of the output to be
activated: once for output 1, twice for output 2, etc.
To fi nd out which function the receiver output
activates, refer to the manual of the control unit or
device on which the receiver is to be installed
+
2
The LED on the receiver will fl ash a number of times
equal to the number of the output selected, with 1
second pauses between fl ashes
+ 1s +1s
4.1 MEMORISING A REMOTE CONTROL
4.2 DELETING A REMOTE CONTROL
4.3 CLEARING THE ENTIRE RECEIVER MEMORY
4.4 REMOTE MEMORISATION OF A REMOTE CONTROL WITH
A REMOTE CONTROL ALREADY MEMORISED
LED
KEY
+ (~)
- (~)
12/24
Vac/Vdc
OUT 1
OUT 2
J1: = 12 Vac/Vdc
= 24Vac/Vdc
OUT1-OUT2= impulsive monostable output
J1
 Loading...