dicate that the flash will operate automatically.
2)
Press the shutter release button
to
take the
picture with flash.
31
After u
si
ng the flash. the Red Lamp will
li
ght
for a
few
seconds
wh
ile
th
e flash
is
recharg
in
g.
Shutter locks until recharging:
is
completed.
Flash Photography Range
ISO 100/200 1.2m
-3.0
m
I
SO~OO
1 .2m-6.0m
® Foc us
Lock
(Fig.1
1)
1) Aim
th
e
au
to-focu
:.,
mode symb
ol
at
the subject.
Press
the Shutter Release Butten 0 part way
dawn umil the Green Lamp ln Finder
~
turn
:-.
on.
2)
\Vith the shutter
re
lease button held
at
thi
s
point. compose the picture, and then press the
sh
uuer ali the way dawn
to
tnke. the picture.
* If you remove your lïnger from the
sh
utler
release butten without taking
th
e picture.
th
e
focus l
cx:k
will
be
released.
*
lt
is difficult
to
foc
us on:
G)
!'ubjects which are
black and reflect little light: @ small subjects:
@ su
bjt>cts
which emit
li
ght;@
and shiny
s
ubject~.
so
fir~t
point the camera
at
an
abject
the same distance away which can
be
easily
focused
on
to
use the focus
Jock
fuJll'tion.
* To take a picture of a subject though a
g
l
n.~s
pane.use the focus Jock w
ith
the camera
pre s~c
d
again"t the glass. and then l'Ompose y0ur pic-
ture.
® Unloading the Film (Fig.
12
)
1) When a
li
of the film
ha
s been
fini
shed. the
camera
wi
ll start
to
rewind automatically.
At
the comple tian
ofrewind
in
g.
a"
[:"
wi
ll
blink
in
the frame counter.
* \Vhile the lïlm
i~
being rewound.
the-
Frame
counter
wi
ll
di!-.play
the numlxr::
as
they are
counted bac
k.
2)
After checking
th
e;:
blink.ine "[
:-·
of
the frame
counter.
remo~e
th
e film
frÛm
the camer
a.
Rewinding the Film Before Reaching the
End (Fig.
13
)
To rewi
nd
the film before
it
has
ali
been
taken.
press the Rewi
nd
Button 0
wi
th
the key auachcd
to
the strap.
* Wipe off any watt•r droplets. sa
nd.
etc.,
be
fore
ope
nin
g the Back Cover
CD
.
8
Advanced
lnsturuction
6.
Taking Advanced Pictures
Mode Change Operati
on
(Fig.1
4)
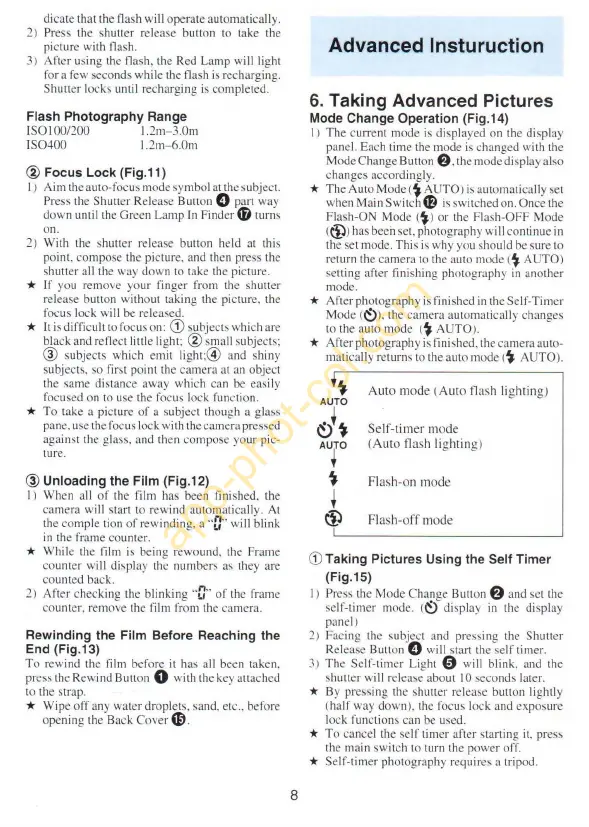
1) The current mode
is
displayed on the dispby
pa
nel. Each
ti
me the mode
i
~
ch:.mgcd
with the
Mode Change But
ton
f)
. the
modcdispby
a iso
changes accordingly.
* The Auto Mode <t AUTO! is automatically set
when Main Switd1
~
i"
switched on. Once the
Flash-ON
M
ode(
~
}
or the Flash-OFF Mode
t
tl)
)
ha
s bech se
t.
photography will continue
in
th
e set mode.
Thi"-
i..;
why you should
be
s
ure
to
rcturn the camera to the auto
mode{
~
AUTO)
se
tting aft
er
fin
ishing
ph
ntography
in
another
mode.
* After photogrJ.phy is finished
in
the Sclf-Timcr
Mode(
~
),
the camera automatically changes
to
the a
ut
o mode
(
~ AU
TO
).
*
After
photography
i:-~
lï
ni
!-lhed.
the came
ra
auto-
matic:.~lly
return"
to
the auto mode (
"t
AUTO).
t
AUTO
~
·
.,
AU~O
t
+
®
A
ut
o mode (Auto flash lightingJ
Self-timer
m
ode
(A
ut
o flush
li
ghtin
gl
Flash-on m
ode
Flash-
off
mode
CD
Taking Pictures Using the
Se
lf Timer
(Fig
.1
5)
1 J Press the Mode Change Button $ and set the
self-timer
m<XIe
.
(
~
..._
display
in
the displ
ay
pant'I J
2)
Facing the s
ubjCL'l
and pressing the Shuttcr
Rel
ease Button 0 will stan the self
ti
mer.
3) The
Se
l
f-timt:-
r L
i!!
ht
0 wi
ll
blink. and
th
e
shuttcr wi
Il
rt.•lea~e..._
abo
ut
1 0 seconds
la
ter.
*
By
prc~"ing
the shutter
re
lease butten lightly
(half way dawn). the
foc
us
Jock and
ex:posu
rc
Jock
fu
nc
ti
ons can
be
used.
* To cancel the self
ti
mer after starting
it.
pre
s~
the main switch to turn the power off.
* Self-timer photogrJ.phy
rcquire~
a tripod.
 Loading...