EasyManua.ls Logo

Krups KP 5000 User Manual

Krups KP 5000
73 pages
To Next Page IconTo Next Page
To Previous Page IconTo Previous Page
Page #67 background image
F U N C T I O N T E S T S
Measuringflow rateofhotbeverage
1. SwitchmachineON.
2. Placeameasuringbeakerunder
outlet.
3. Insertanespressocapsulein
capsuleholder.
4. Insertcapsuleholderandpushit
down.
5. Setselectionlever atposition
)
(hot).
6. Starttimersimultaneously.
7. Waitunt il40mlcoffeehas flownin
themeasuringbeaker.
8. Stoptimer.
Themeasuredti mem ustbewithin
915sec.

Table of Contents

Question and Answer IconNeed help?

Do you have a question about the Krups KP 5000 and is the answer not in the manual?

Krups KP 5000 Specifications

General IconGeneral
BrandKrups
ModelKP 5000
CategoryCoffee Maker
LanguageEnglish

Summary

Overview of External Parts

Overview of Internal Parts

Overview of Extraction Head Parts

Overview of Rating Plate

Rating Plate Information

Details and codes found on the machine's rating plate.

Water Circuit

Technical Data

Mains Voltage and Approvals

Electrical voltage, frequency, and regulatory approvals for the appliance.

Machine Performance Ratings

Details on power consumption, preheating, flow rates, and capacities.

Operational Temperatures

Safety and operating temperature ranges for the beverage center.

Various Data

Machine Dimensions and Weights

Overall dimensions (DxWxH) and machine weight.

Performance Specifications

Pre-heating time, pump pressure, noise levels, and cord length.

Machine Status Indicators

Power Button LED Signals

Interpreting power button LED signals for different operating modes and failures.

Preparation for First Use

Preparing a Beverage

Economy Mode and Auto Shut-off

Disabling Auto Shut-off

Steps to disable the machine's automatic power-off function.

Restoring Auto Shut-off

Procedure to re-enable the automatic power-off function.

Emptying Fluid System for Shipping

Troubleshooting Checklist

General Condition and Accessories Check

Checking housing, accessories, and power cord for damage or issues.

Mechanical Elements Inspection

Verifying correct insertion and movement of capsule holder, drip tray, and levers.

Tools and Repair Accessories

Removing and De-blocking the Injector

General Disassembly Procedure

Safety and Preparation for Disassembly

Important safety warnings and preparation steps before disassembling the appliance.

Removing the Housing Back

Removing the Housing Front

Removing the Housing Right Side

Removing the Housing Left Side

Removing Spacers

Assembling Spacers

Assembling Housing Left and Right

Assembling the Housing Front

Assembling the Housing Back

Replacing the Water Tank Connector

Replacing the Cup Lighting Assembly

Replacing the PCB Assembly

PCB Assembly Components and Disconnection

Identifying PCB components and unplugging connectors for removal.

Replacing the Power Button Cap

Replacing the Pump Unit

Pump Removal Procedures

Steps to disconnect the pump and remove its hoses and elbow.

Pump Installation and Mounting

Guidance on fitting the new pump, rubber strap, and ensuring correct hose positioning.

Assembling a New NTC Sensor

NTC Sensor Wire Routing

NTC Sensor Replacement Steps

Steps for routing wires and removing the old NTC sensor.

NTC Sensor Installation and Testing

Procedure for installing the new NTC sensor, including heat paste and clamp spring.

Replacing the Thermoblock

Thermoblock Disconnection and Removal

Steps to unplug connectors, remove hoses, and detach the thermoblock.

Thermoblock Assembly and Hose Connection

Instructions for fitting the new thermoblock, connecting new hoses, and using connectors.

Replacing Power Cord and Fuses

Power Cord and Fuse Holder Removal

Steps to disconnect power cord, fuses, and receptacles from PCB, pump, and thermoblock.

Power Cord Installation and Wiring

Guidance for installing the new power cord, checking wiring, and layout.

Fastening Shaky Extraction Head

Replacing the Extraction Head

Extraction Head Wire Disconnection and Hose Removal

Disconnecting wires and removing hoses from the extraction head assembly.

New Wire Routing for Extraction Head

Extraction Head Assembly Information

Main Wiring Diagram

100V/120V/230V Mains Voltage Wiring

Schematic of the electrical connections for various mains voltages.

Functional Testing Procedures

Heating Up Time Test

Measuring the time for the machine to reach operational temperature.

Fluid System Priming

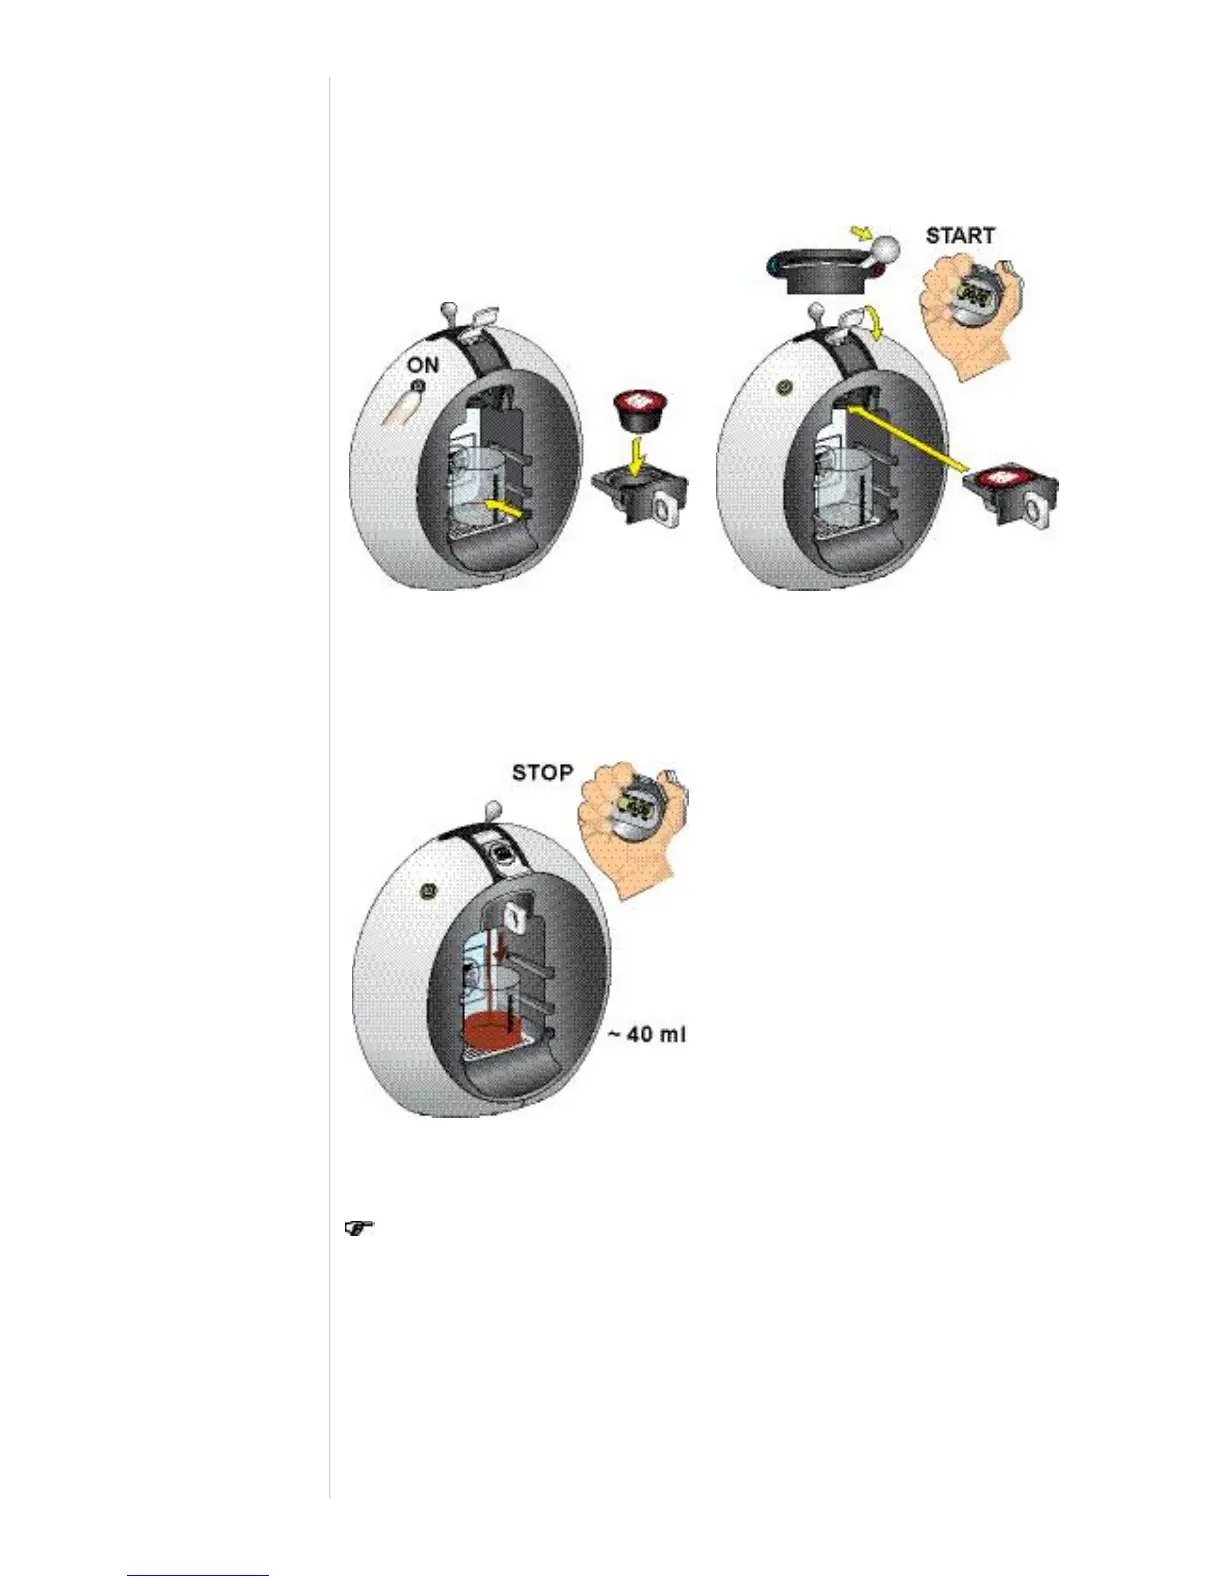
Procedure to prime the internal fluid system before testing.

Hot Beverage Temperature Measurement

Testing the temperature of the dispensed hot beverage.

Hot Beverage Flow Rate Measurement

Measuring the time taken to dispense a specific volume of hot beverage.

Selection Lever Movability Test

Verifying smooth operation and correct positioning of the selection lever.

Maintenance

Descaling Procedure

Instructions for cleaning mineral deposits from the machine.

Descaling Solution Preparation

Instructions for preparing the KRUPS descaling solution with water.

Descaling Cycle Execution

Performing the descaling cycle using hot and cold solution flows.

Post-Descaling Rinse and Cleaning

Rinsing the machine with water and final cleaning after descaling.

Daily Care and Final Cleaning

Cleaning Drip Tray and Water Tank

Steps for removing, emptying, rinsing, and cleaning the drip tray and water tank.

Cleaning Capsule Holder and Bin

Instructions for rinsing and cleaning the capsule holder and used capsule bin.

Rinsing the Machine After Cleaning

Performing a final rinse of the machine with hot water.

Related product manuals